|
If you’ve got a tiling project in your future (even the distant future), remember, bookmark, voice memo, tattoo, or do whatever you need to do to remember Mapei Flexcolor grout. I know this sounds like I’m overreacting, but take it from people who have grouted 7 bathroom floors, 3 showers, 3 mudrooms, and 2 backsplashes in the last two years: this grout has been life-changing. And no, this is not sponsored by either Mapei or Floor & Decor, which is where we typically buy ours (sorry, necessary disclaimer because this post is going to sound pretty gushy). 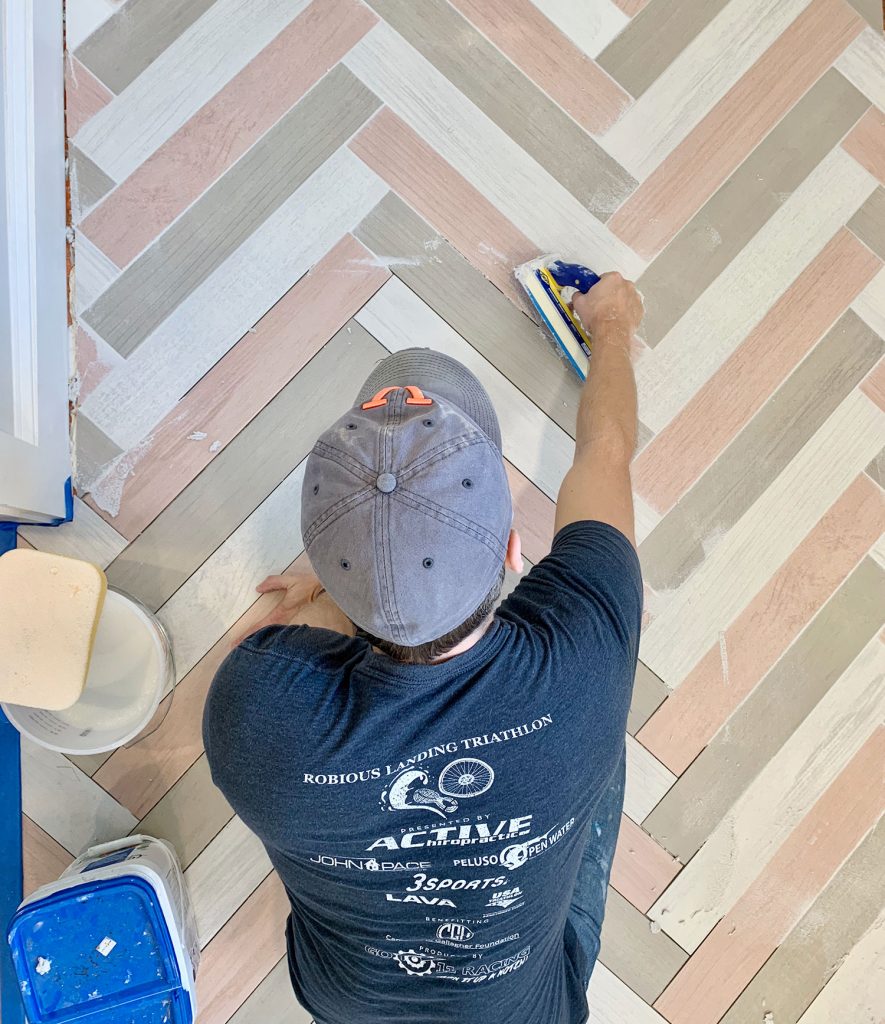 I meant to proclaim our love for this grout after finishing the beach house tiling two summers ago but we got sucked into the duplex and, well, this post never got written. Butthe duplex tiling just gave us more time for our romance to blossom, so I wanted to tell you why this has become THE ONLY GROUT we ever buy & use. We are going on 2+ years of not buying a single other type of grout (we don’t even look their way – our heart is TAKEN). Even our contractor swears by this stuff. That’s actually how we found it. So I’m going to just dive into all the whys of that very big statement about grout – and I’m also going to toss in some tips for picking the right grout color (including our go-to color that works nearly every time – we’ve used it in so many rooms) and my new trick for minimizing grout haze while I’m at it. 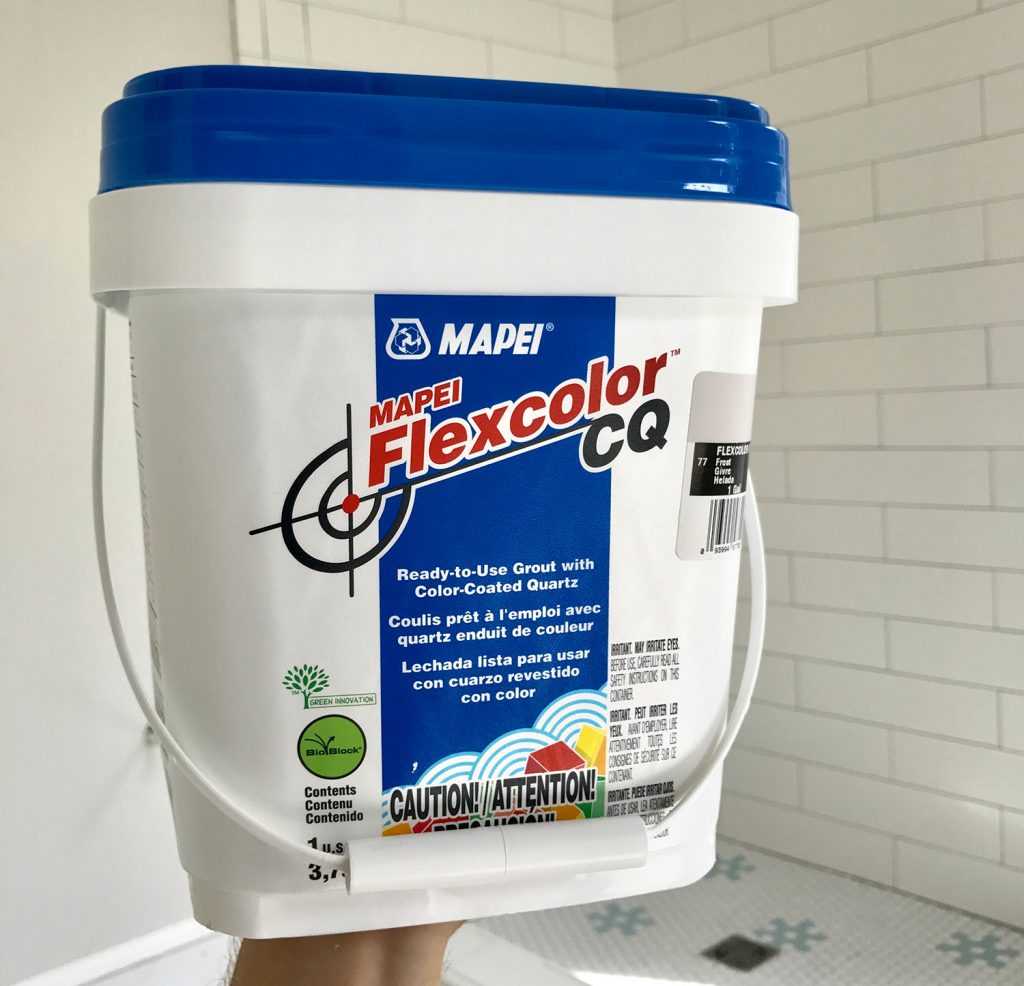 1. This Grout Is Pre-MixedIf you’ve ever mixed your own grout, I don’t need to say much more about why pre-mixed is a better experience. For starters, it eliminates a lot of time and effort spent measuring out your powder and liquid additive, stirring it together, and adjusting until you get the right consistency. Instead, you can just pop open a tub and get going. 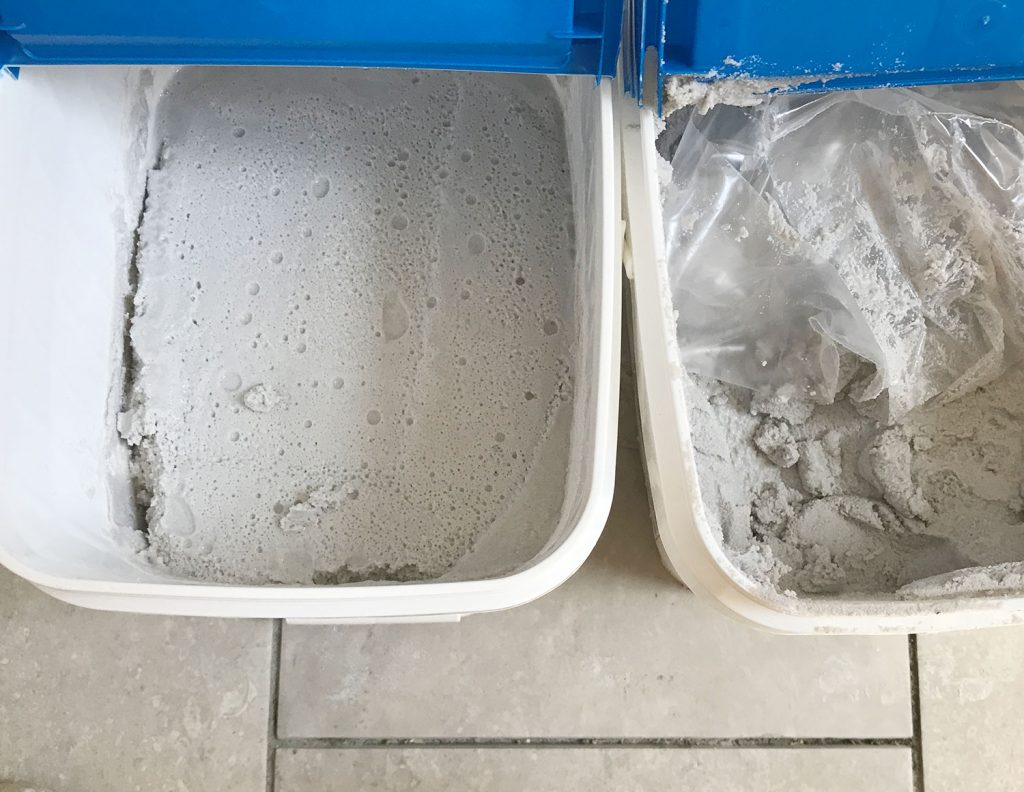 But a lesser appreciated benefit of premixed grout is that it also ELIMINATES COLOR INCONSISTENCY. We ran into this problem when grouting our covered back porch. We used a dark grout for the first time and the way that we mixed/applied it caused it to dry lighter in some spots than we had hoped (some areas that we mixed ourselves must have been a little more watered down, so it dried a slightly different color in those spots). It wasn’t a huge deal, but we were definitely disappointed that after all that time and labor it didn’t look consistent. So using premixed grout means you don’t have to worry about your color changing from one mixed batch to the next. 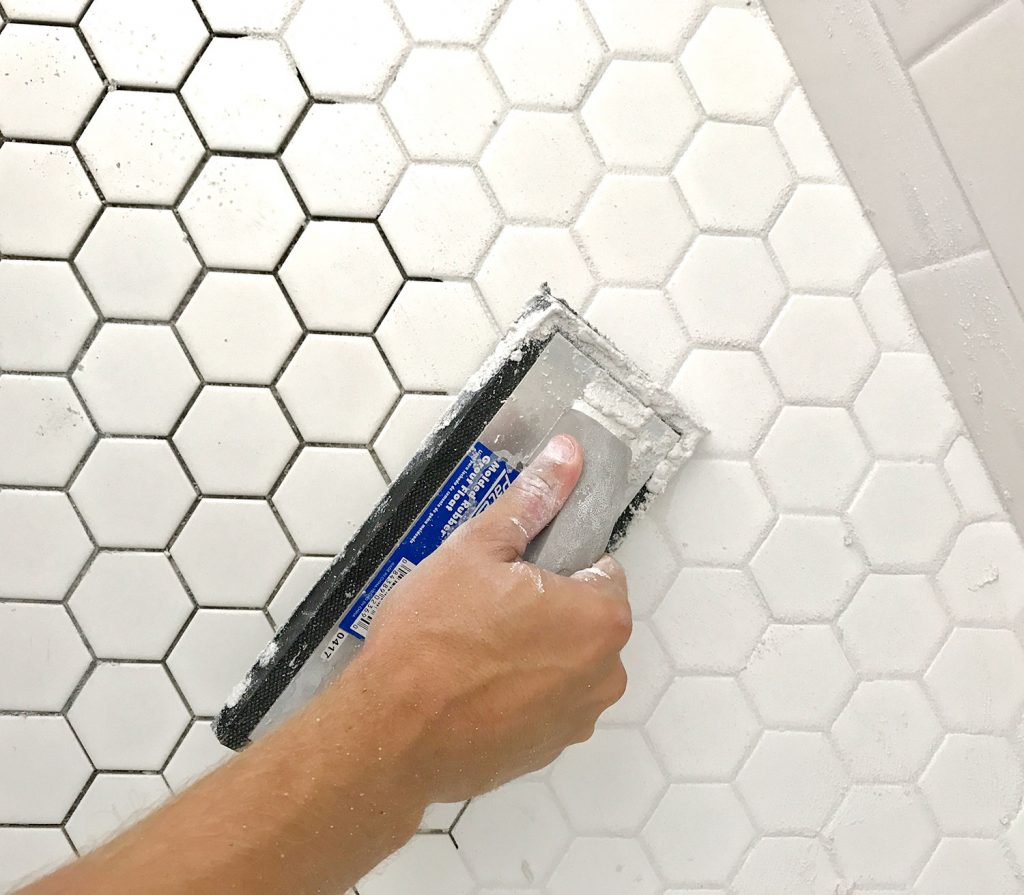 And the last thing I’ll say about pre-mixed grout is that it also stores well for touch-ups later (like if you drop something heavy and pop some grout out of a crack and you need to smear some more onto that spot, or if you see that you missed a spot). The tubs seal up nicely (firmly press the lid down until it snaps all around the perimeter and that’s it), so I’ve really appreciated reopening grout that’s over a year old to use it for another project and finding it fresh and ready to go. 2. This Grout Doesn’t Need Sealing & Is Stain ResistantAgain, need I say more? Probably not, but that’s never stopped me before. 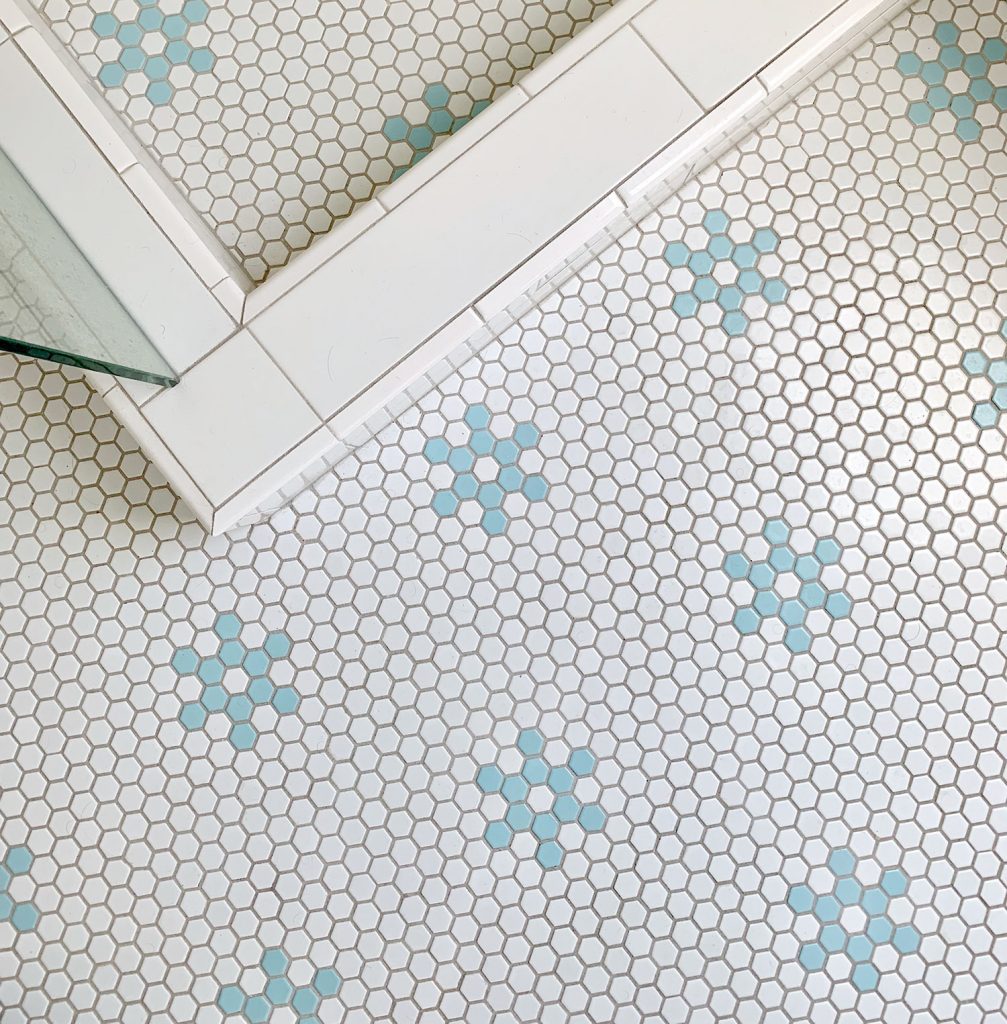 Tiling already has enough steps involved so I’m always happy to eliminate one, especially the annoying ones at the end like sealing your grout to prevent stains. This Mapei Flexcolor is somehow formulated to prevent stains (how, I don’t know – magic? crystals? the dark arts?) so all you have to do is let it cure for 3 days and it’s good to go (you can walk on it after 24 hours). I should disclaim that it’s water-based stains that this grout is resistant to and like any “stain resistant†surface, you still probably shouldn’t slather marinara on it and let it sit for days. But we’re over 18-months in on the beach floors and they’re still looking as good as new. As in, not a single crack or stain. Anywhere. In any of the three bathrooms, the mudroom, the backsplash. Everything looks as good as the day we grouted it. In fact, I took the photo above this weekend, over a year & a half after we grouted just to demonstrate that this stuff goes the distance. Looks like new, eh? 3. It’s Crack Resistant & Shrinkage ControlledOld grouts that we used to use recommended a special liquid additive in place of water that made it more flexible to help it resist cracking or shrinking. So it was extra money and an extra step. Meanwhile, that feature is built right into this formula, and we have never had it crack or shrink in all of our years of using it – which isn’t something we can say about the other grout we’ve used (even with that special liquid additive).  4. This Grout Works For (Almost) All SituationsTiling indoors? This grout works. Tiling outdoors? Still works. Got a small 1/16″ grout line? Cool. Got a big 1/2″ grout line? That’s fine too. This essentially means we don’t have to debate over sanded or unsanded grout or worry that one product is better for one application, but we better use some other one for something else. 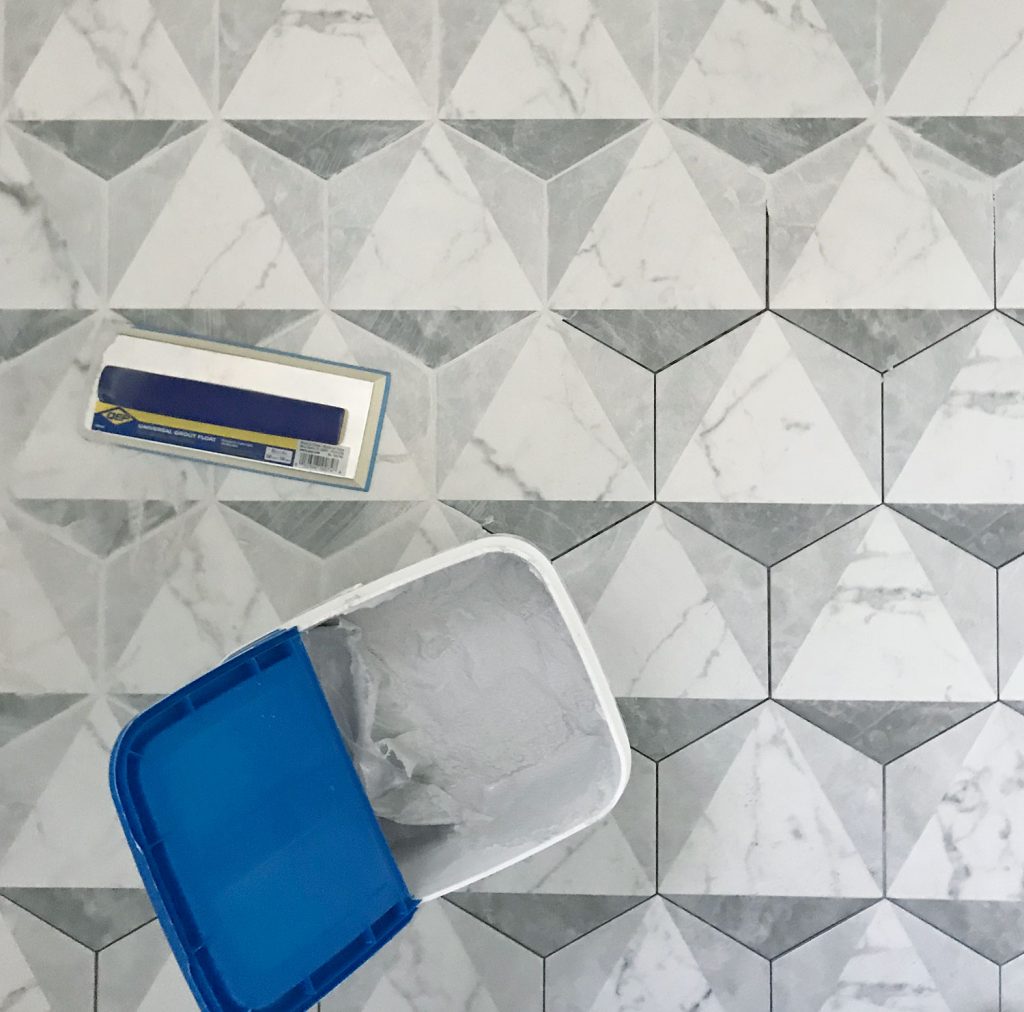 Now, if you read the fine print in the “Limitations†section of their brochure, it does nix some application scenarios – like not submerged in a pool or in saunas or steam rooms – but any basic bathroom, kitchen, patio, laundry room, or mudroom tiling scenario should be all good. And while they warn you that you should test it on sensitive materials like glass or marble tile first, it does say it’s compatible with those applications too. In the end, if you’re unsure, always double-check or ask an expert at your store, but the range of use here is pretty impressive. Which probably explains why we haven’t purchased any other type of grout for the last few years. This stuff earns my final rose. Picking The Right Grout ColorIt still amazes me how much grout changes the finished look of any tiling project, so it’s important to give some thought to the color you choose. If you don’t believe me, Emily Henderson did a great post a couple of years ago showing off the impact of your grout color section. That being said, we use Warm Gray in 85% of our tiling projects. To us, it’s the perfect neutral grout color that offers enough contrast to the lighter tiles that we choose (like white subway tile) while still looking great with darker tiles (it almost reads as white with a darker tile next to it, but isn’t as harsh and unforgiving of dust/dirt as bright white grout would be).  And since it’s so agreeable to so many tiles, you can use it throughout an entire room to help tie your various surfaces together (floors, walls, etc). For instance, in the downstairs bathroom at the beach house we used it on both the shower and the floor. It provides a different type of contrast in each spot – but using the same grout helps them work together. 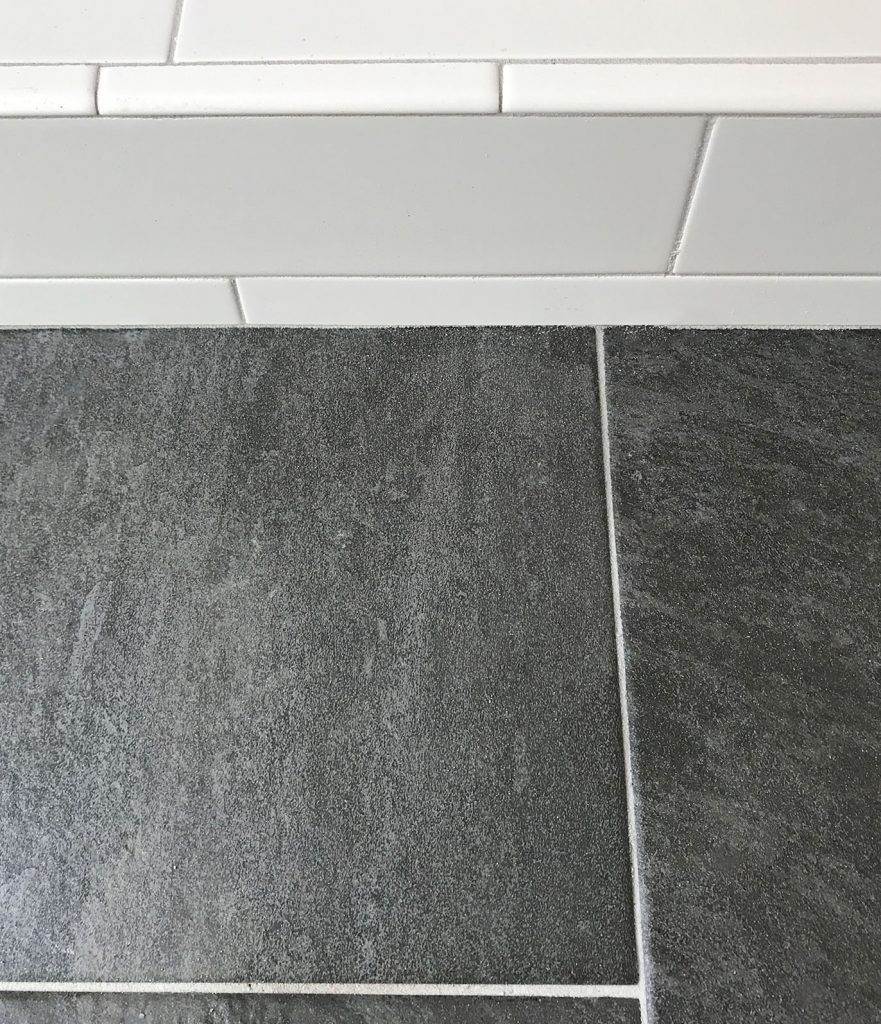 And if you study that photo above, you can see what I mean about how crisp and white it looks when paired with darker tile, without being as unforgiving as bright white grout can be. That’s the same exact grout color (Warm Gray) everywhere in the picture above – although it looks grayer when it’s next to the white subway tile and lighter when it’s next to the dark floor tile. But if Warm Gray isn’t what you had in mind for a particular project, there are a TON of other colors to choose from that Mapei makes. I’d almost argue that there are TOO MANY colors (paradox of choice, anyone?) so if you need or want something different, here’s some advice: 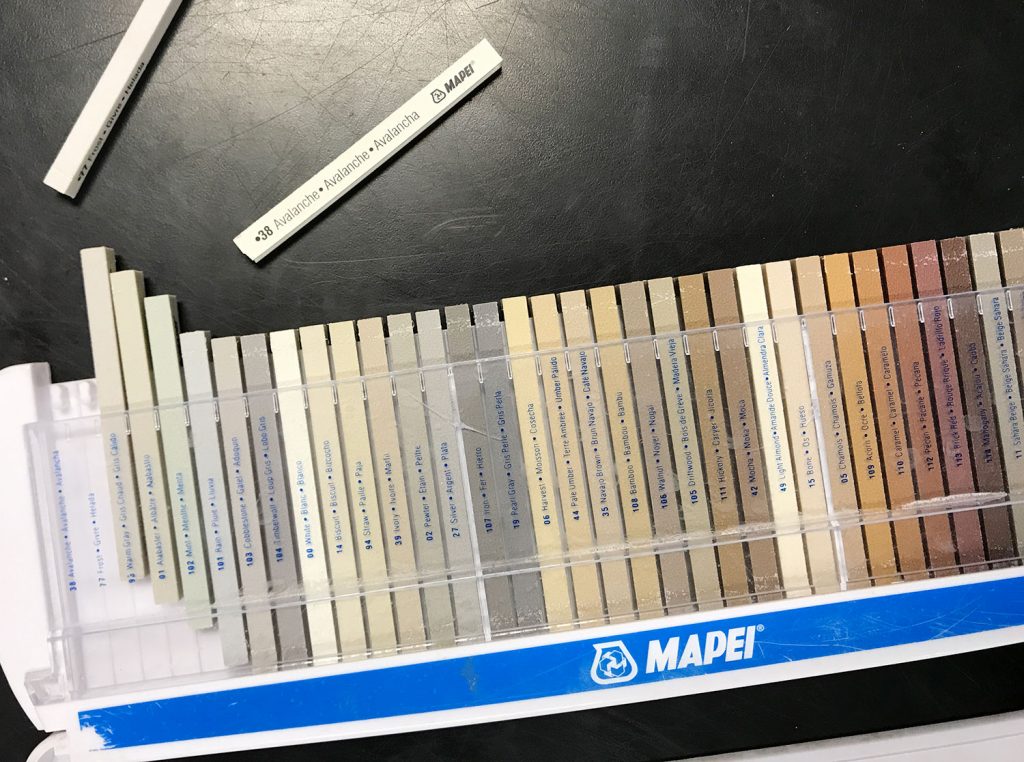 Don’t work off of paper samples. You might see posters or brochures around the store with the various grout colors, but they aren’t always super accurate. Instead, ask an employee to borrow the stick samples like the ones shown here. If you ask someone at Floor & Decor they should be able to dig up these little plastic sample sticks for you to debate your options (they don’t usually let you leave with them, so just bring your tile to the store and hold them up to it). Not only are they truer to color, but it’s a lot easier to place them right onto your tile and get a much better sense of what your final result will look like. 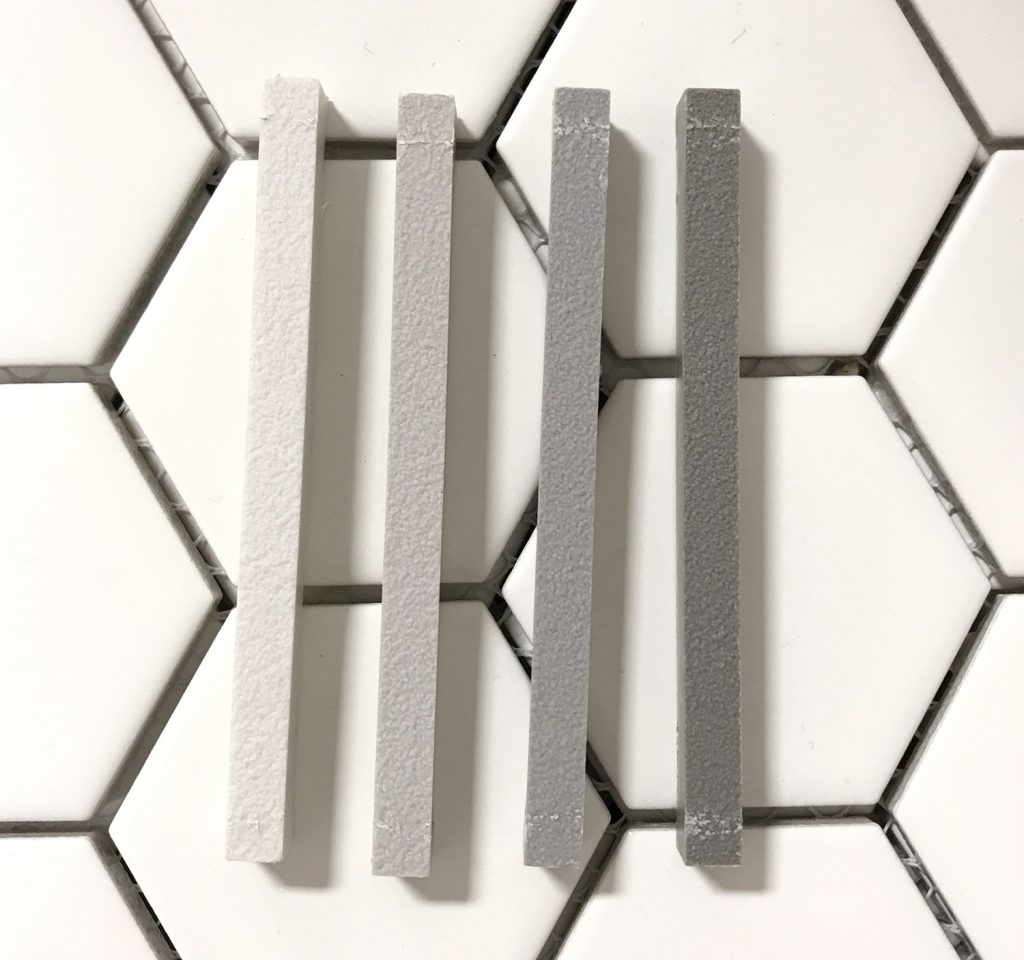 Pay attention to undertones. In addition to choosing your grout based on how light or dark it is, note how warm (yellow-ish) or cool (blue-ish) a color looks – especially as it relates to your tile. For instance, I said we used Warm Gray in most, but not all, of our spaces. It’s on the warmer side of gray (hence the name), but there’s a cooler gray called Frost that Mapei also sells. We used that in a couple of rooms, like the one below, because the grays on the tile were a bit cooler and we wanted the grout to align with that. 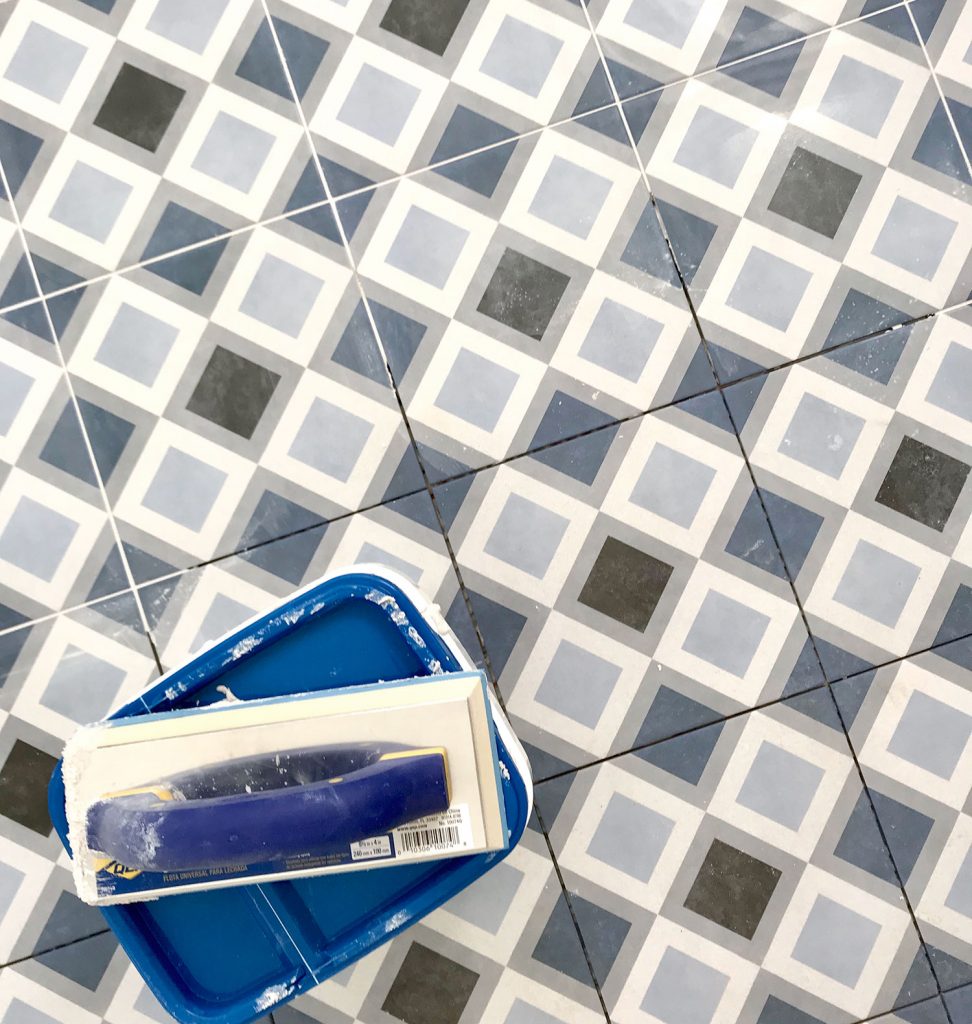 Look around the store for input. If you’re uncertain or nervous about your grout selection, see what you can learn while you’re in the store. Most tile stores will identify the color that their tile displays are grouted with, so you can choose to just mimic the display grout that they used with the tile you’re purchasing, or you can go lighter/darker or cooler/warmer than what they show if you think you’d prefer that to what they picked. I noticed our Floor & Decor store also has this newfangled grout selection tool. I played around with it a little bit using tiles in the store (you’ll want to bring your own tile if it’s not something you’re buying at the same time) and while I wouldn’t blindly go with whatever it tells you, it could at least help you hone in on a few finalists. 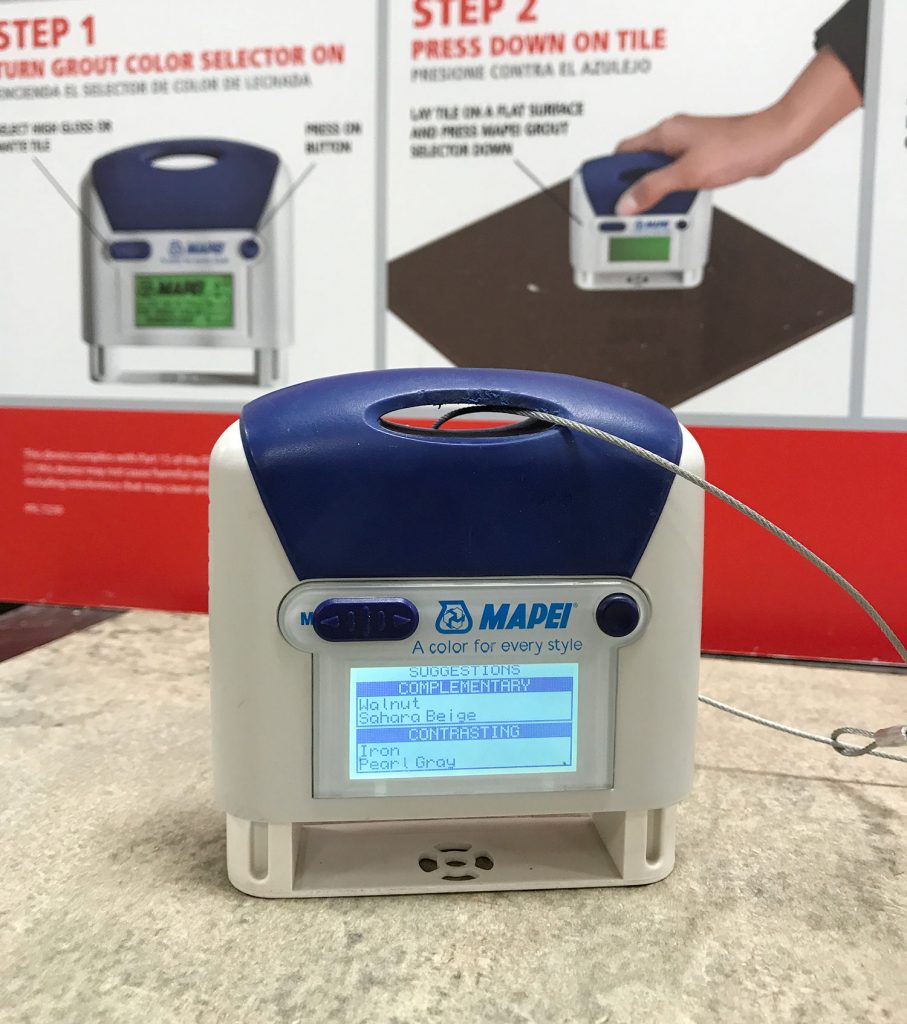 Parting Tip: Minimizing Grout HazeNow, this Mapei grout doesn’t seem to leave more or less grout haze than any of the other grouts we’ve used (you know, that film on your tile that’s often leftover once your grout has dried). And grout haze is one of my least favorite things in the world because it’s like the LAST THING I want to spend time on after having survived tiling and then grouting. So a thing I experimented with in the duplex that worked really well was doing a preemptive tile wipe while the grout was still wet. I don’t have any pictures of this, so let me explain. It only really works with larger tiles, but after I applied the grout with my float and did a couple wipe downs with my damp sponge, I let it sit for another 5-10 minutes and then I used a rag or paper towel to dry just the surface of the tile, being sure not to rub the grout lines themselves. It sounds more tedious than it was, because it really was only one quick swipe (almost like washing a window pane) and it basically wiped up all of the liquid that would eventually become grout haze. Again, it’s really most practical on larger tiles where you can safely wipe the tile without touching the wet grout, but it completely saved me from having to buff the floors or use a grout haze remover after the fact. And you know how much I love to eliminate extraneous steps! Long story short: next time you tile, grab some Mapei Flexcolor grout (maybe in Warm Gray) and think of me fondly when it makes things easier. PS: If you’re new to tiling and want to see the process from start to finish in one post, check out how we tiled this kitchen backsplash for $200. And here’s a post about all of our duplex tile choices & one about our beach house tile picks. The post The Only Grout We Ever Use (And How To Pick The Right Grout Color) appeared first on Young House Love. Via https://www.younghouselove.com/best-grout/
0 Comments
Minimalism can still feel like an “out there†lifestyle, so this week we’re bringing in expert Joshua Becker to share how dipping your toes into the minimalist waters can lead to big gains at home and in life. He shares how to stop the slow creep of household clutter, what minimizing can teach our kids, and how it might even help you achieve some of your biggest life goals that have nothing to do with organizing or paring down. Plus, we take you inside a part of our house that many of you have never seen before, and we share what we’re both doing in the pursuit of a better night’s sleep. You can download this episode from Apple Podcasts, Google Podcasts, Stitcher, TuneIn Radio, and Spotify – or listen to it below! Note: If you’re reading in a feed reader, you may have to click through to the post to see the player. What’s new
Joshua Becker, The Minimalist Home
We’re Digging

If you’re looking for something we’ve dug in a past episode, but don’t remember which show notes to click into, here’s a master list of everything we’ve been digging from all of our past episodes. You can also see all the books we’ve recommended on our Book Club page. And lastly, a big thank you to Agility Bed for sponsoring this episode. This week one of our listeners can week a free Agility mattress and a pair of Therapedic pillows by entering at AgilityBed.com/YHL. Giveaway ends February 8th. 
Thanks for listening, guys! *This post contains affiliate links* The post #128: Finding More Life In Less Stuff appeared first on Young House Love. Via https://www.younghouselove.com/podcast-128/ We’ve been eager to try a wallpaper accent somewhere in the duplex, and last week we finally installed not one, but two, removable wall murals! And I can’t begin to describe how much easier and cheaper it was than we expected, plus it turned out like ten times better than we had even hoped. 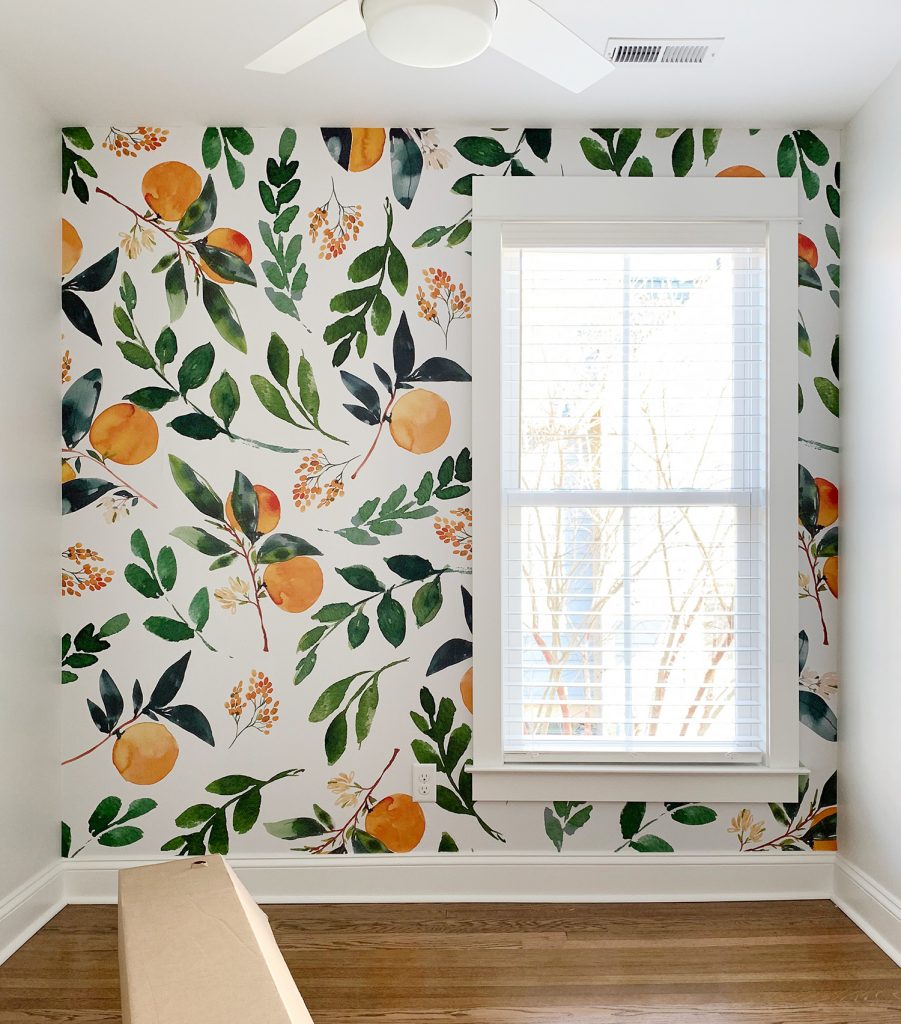 If you’ve listened toour podcast recently, you may recognize this space as one of the small sleeping nooks on each side of the duplex. The rooms are only about 8′ x 8′ and our goal is to turn them into fun bonus sleeping spaces. So they felt like natural candidates for a bold injection of color and pattern. We had our eyes on a few wallpapers, but then we stumbled across these removable wall murals on Society6. They’re effectively the same as wallpaper, except that their patterns can’t be repeated indefinitely (most are 8′ wide but some are 12′) so they’re perfect for smaller walls like ours. A few other things that we liked were:
*This isn’t sponsored – we bought them with our own money & found them on our own – just figured I should put that out there since clearly I’m gushing. We liked a lot of the ones that we found on their site, like these below:  But after a lot of debating, we ultimately decided on two painterly patterns: these whales (seen below) and these oranges (seen in the first photo of this post). 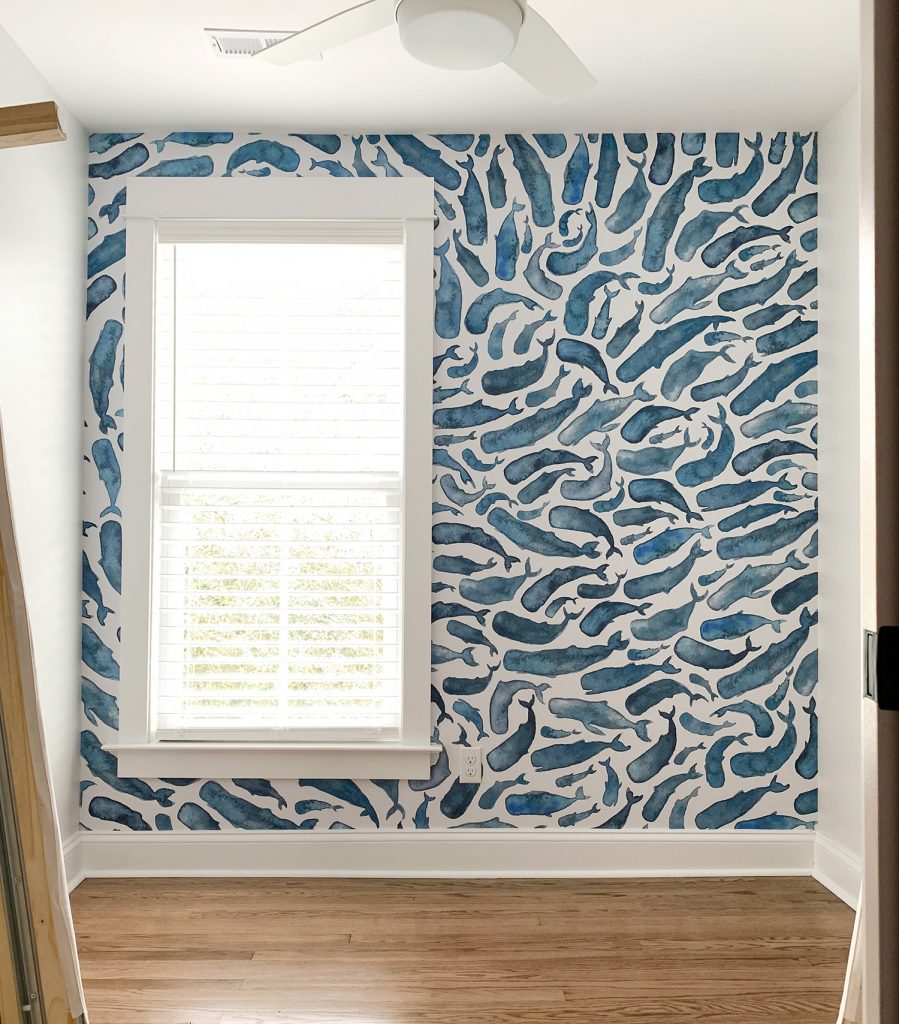 The colors fit well on each side where we used them. We paired the blue watercolor-looking whales with the side of the duplex with the pink doors (they’re White Truffle by Sherwin Williams by the way)… 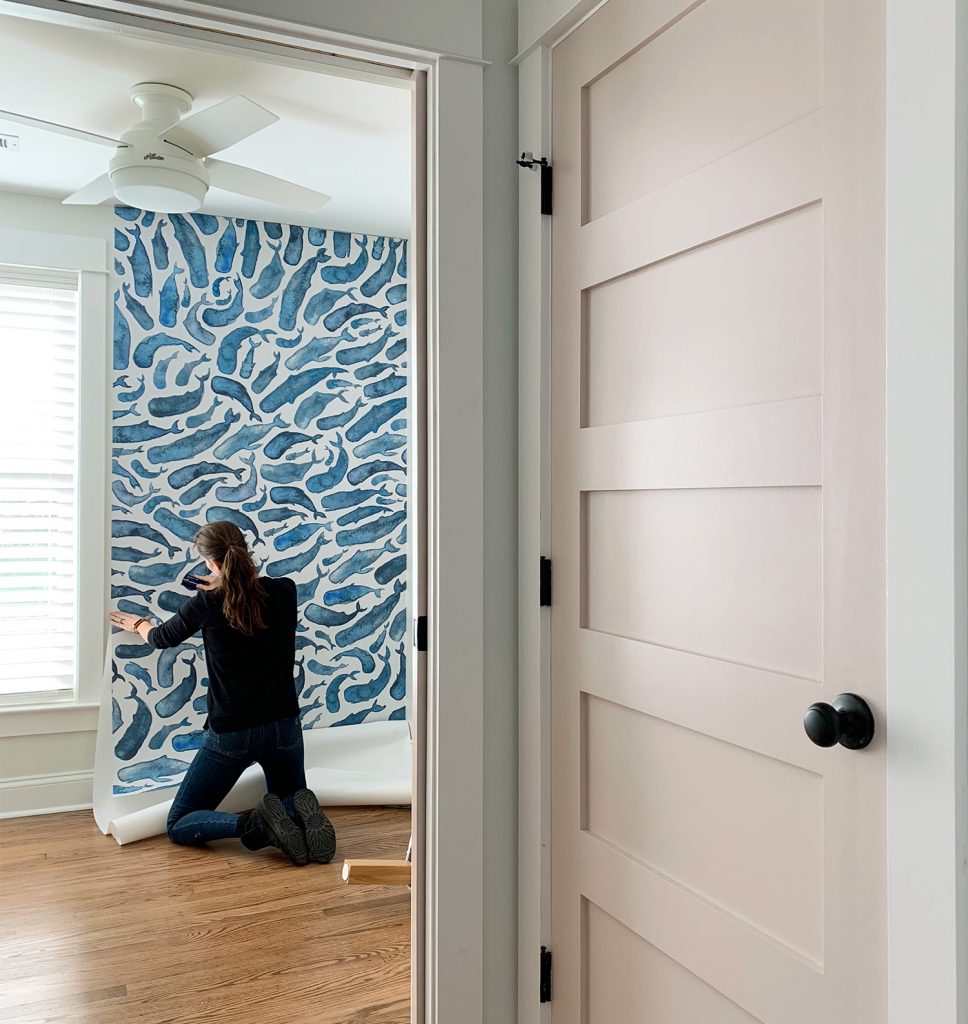 …and the leafy oranges with the side of the duplex with the greeny-blue doors (which are Oyster Bay by Sherwin Williams). 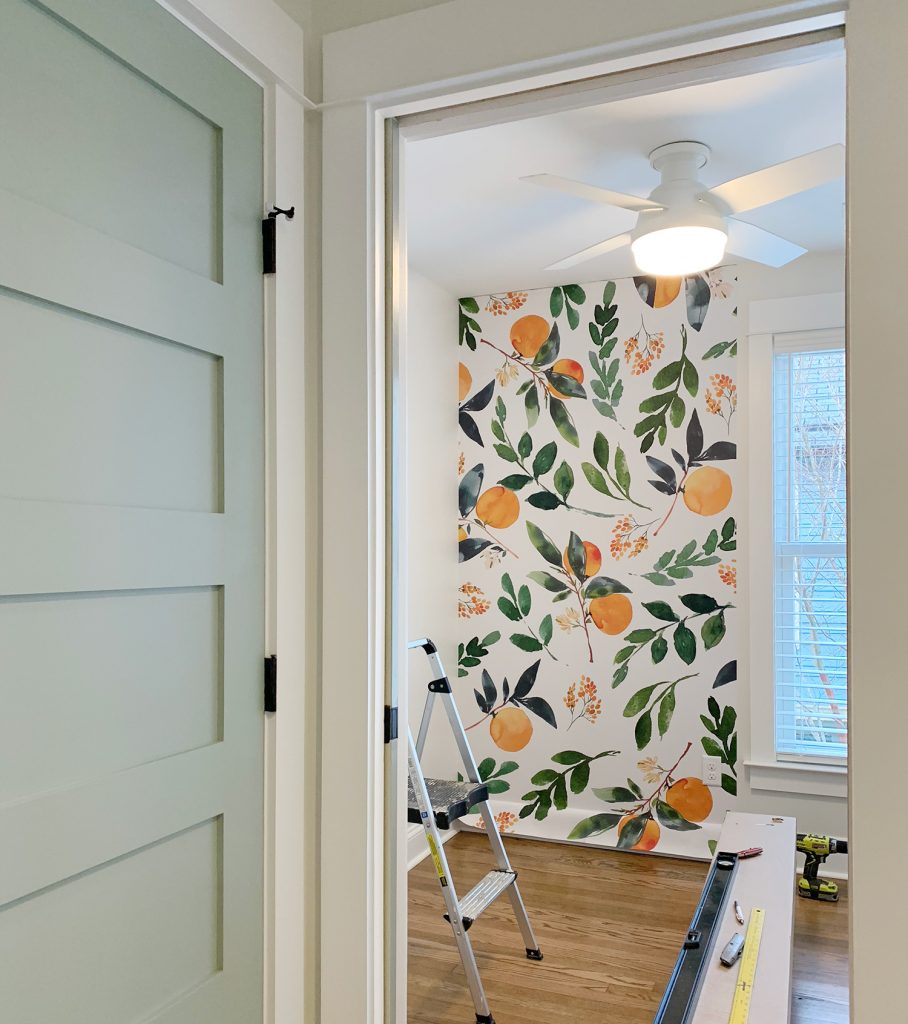 Plus, we snagged them during a 30% off sale at Society6, so we saved nearly $100 off their usual $299 price tag. As for installing them, here’s how it all went down (er, up?). Again, it was surprisingly straightforward to do – but it does require a bit of patience and care. The first one took us around three hours to complete, and the second one only took about two hours, so once you get the hang of it, it’s much less intimidating and goes a lot faster. Tools & Supplies NeededYou can install wallpaper or a wall mural like this with very few tools, but having the following will make it easier:
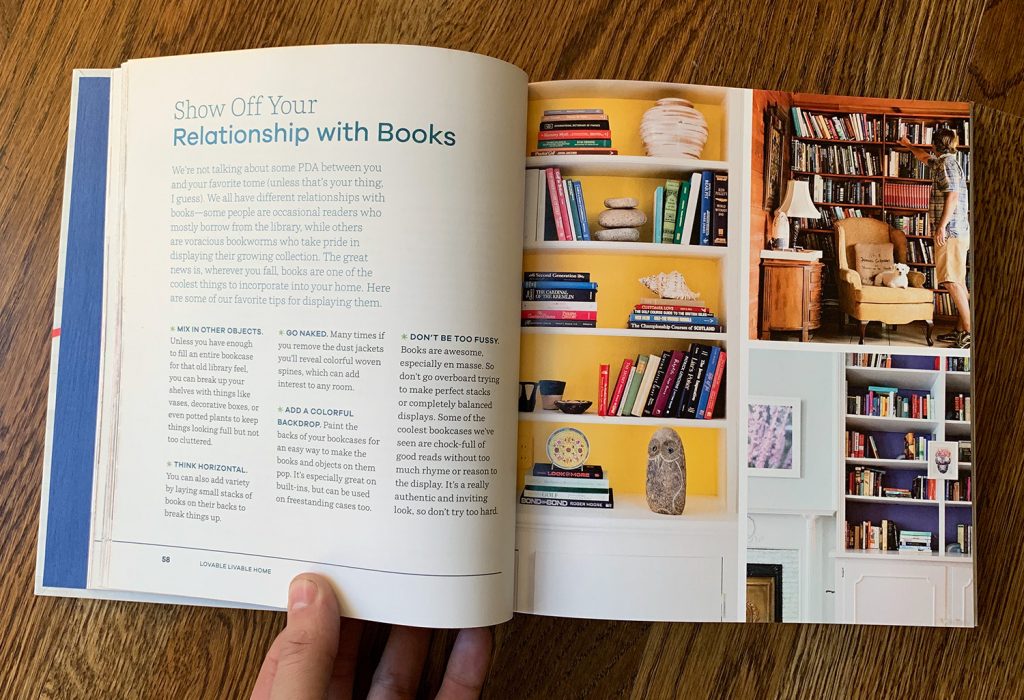
Step 1: Organize Your PanelsThe 8′ wide murals come with four 2′ wide removable panels all rolled together. Since the pattern isn’t repeating, be sure to identify the order in which your panels need to be hung! It would be a nightmare to hang one on the right side of the room only to realize it should have been hung on the left side for the other three panels to line up. We loosely unrolled ours in a nearby room and laid them across the bed to double-check that we were working in the correct order. Step 2: Carefully Position The First PanelEach wallpaper panel has a removable backing that easily peels off. Again, you don’t need any glue or paste to install these. So throughout the installation, you’ll want to peel back small sections at a time. We started by peeling back the first foot-ish of the first full panel (you can see it folded down behind the top part of the mural that we had stuck to the top corner of the wall in the photo below: 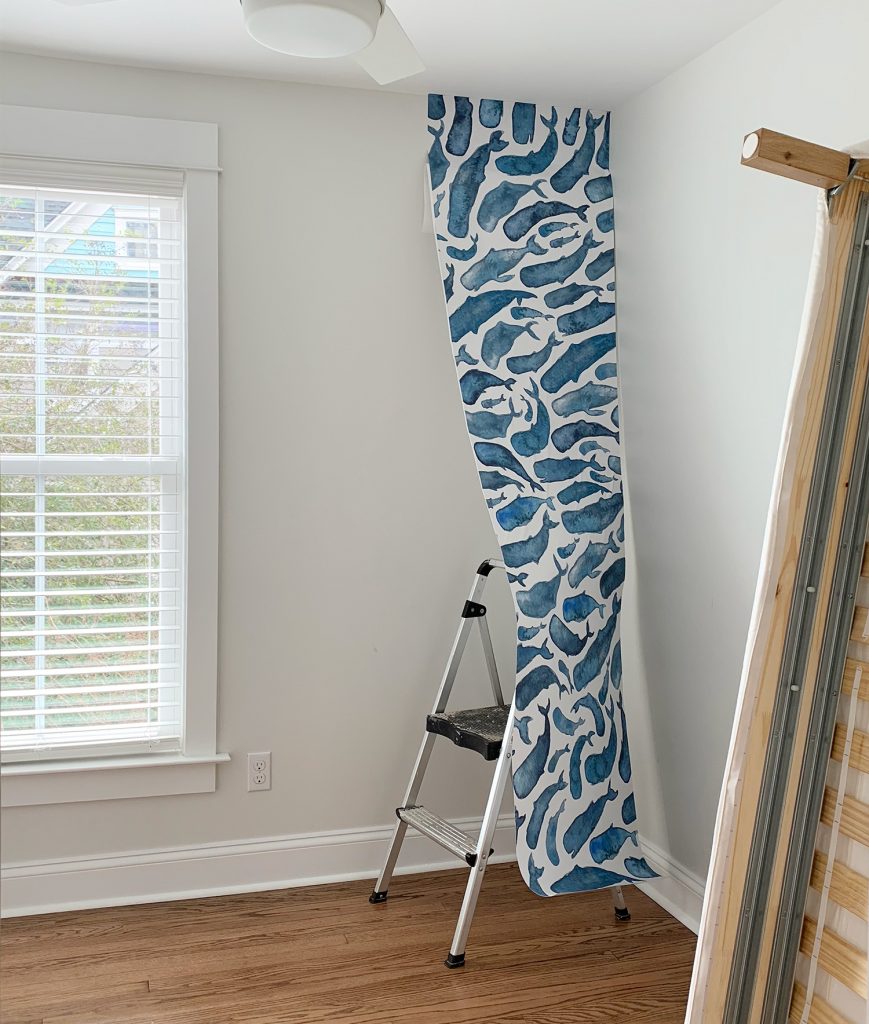 Not to psych you out, but getting this first panel hung correctly is a big part of the success of this project. The good news is that these panels are VERY FORGIVING. Seriously, we probably hung and rehung this first section 4 or 5 times while we figured out the best system. It didn’t lose any of its adhesion strength each time that we stuck, unstuck, and restuck it – and it didn’t wrinkle (even if we accidentally stuck it to itself a few times, we could carefully peel it off and it was fine). You’ll be tempted to use your ceiling or wall as your level reference point for this first panel. DON’T. Most rooms – including ours – aren’t perfectly straight, so relying on your first corner to be completely square could lead to crooked panels which, even worse, could lead to gaps at the top or sides of your mural as your ceiling or wall bows in or out slightly. Instead, you’ll want to mark a vertical line using a level to give you a reference point for the outer edge of your first panel. You could do this all the way down the wall, but we found that doing just a couple of feet at the top was enough to get us started. 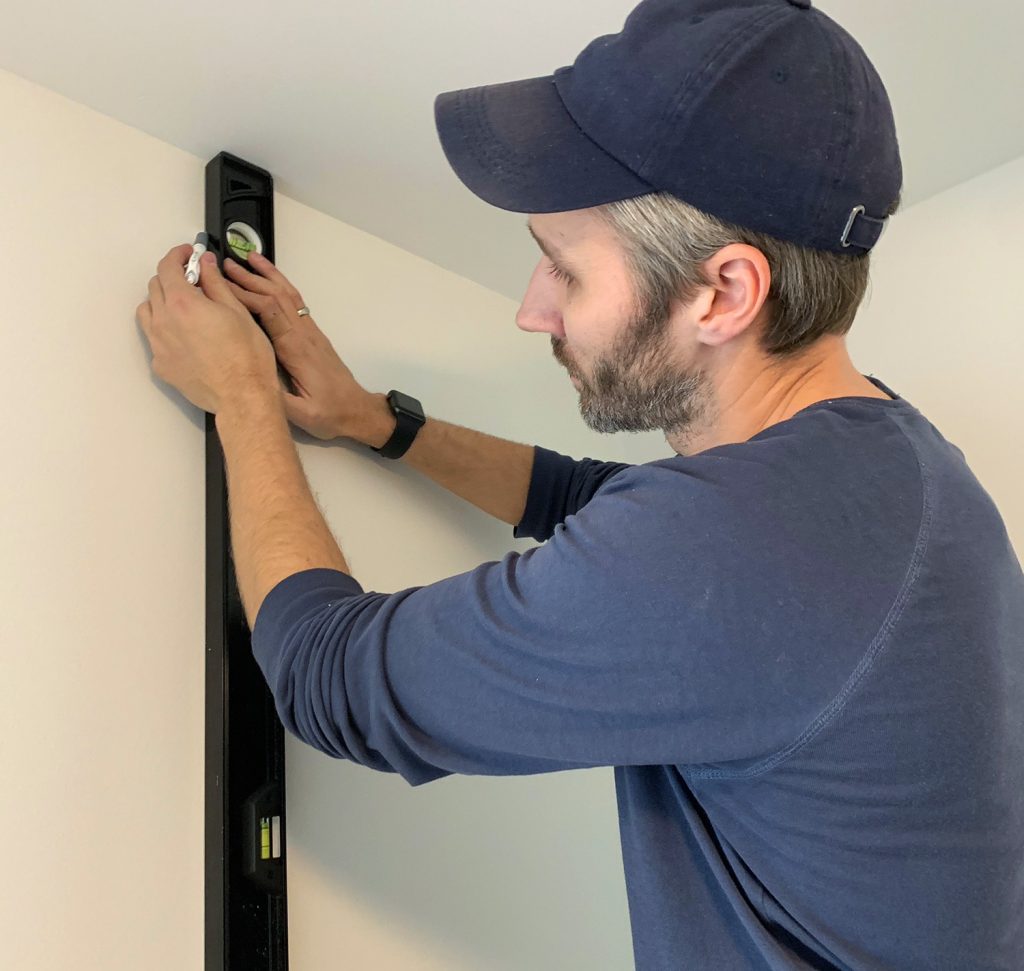 We marked ours about 23.5″ inches from the corner, so that our 24″ panel would overlap the side wall a smidge (again, to make sure we didn’t see gaps anywhere that the wall bowed out). We’ll show you how we cut off all of the overlap a little later. Then we hung the panel along that vertical line but made sure that it overlapped the ceiling by about an inch as well. Even though our ceilings and the panels are both 8ft tall, we could spare this inch since the baseboards make the actual wall space around 7’6″ – and again, most ceilings aren’t perfectly level all the way across, so we wanted to make sure we had excess to bridge any gaps if the ceiling is slightly higher a little further down the wall. 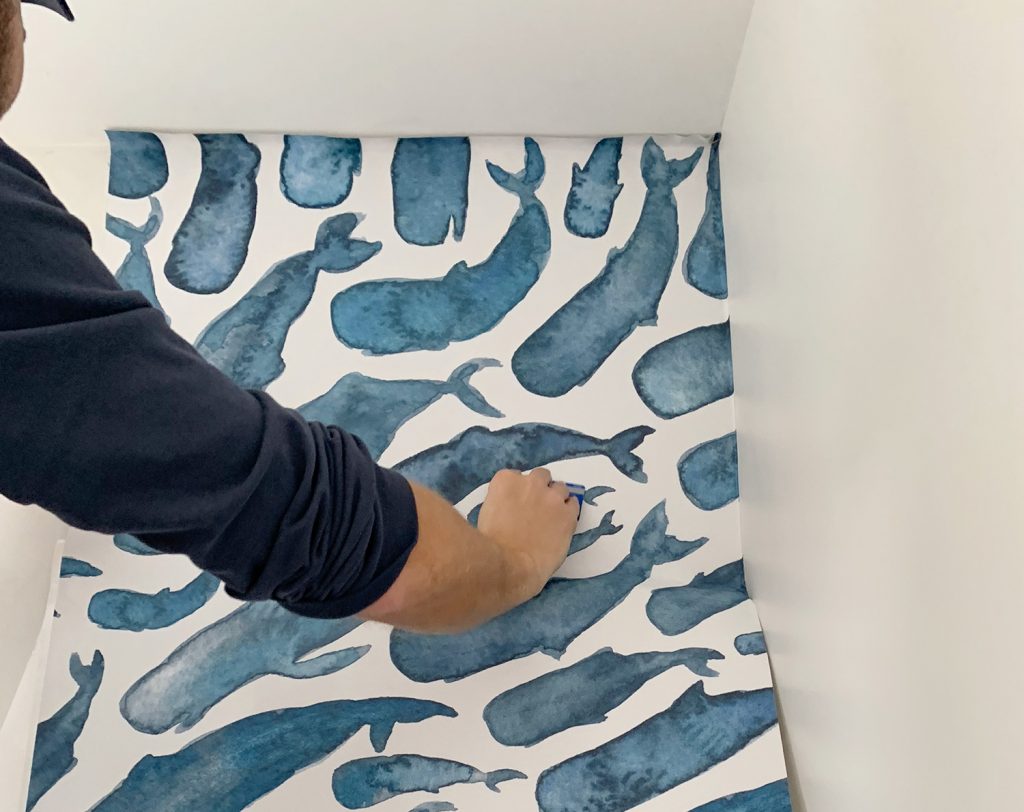 Step 3: Peel, Stick, and SmoothOnce you feel good about the position of your first panel, you can begin the process that you’ll rely on most for this wallpaper installation: peeling off a bit more backing, sticking it to the wall with your hand, and then smoothing out the bubbles. You can see the slight ceiling overlap we mentioned in the photo below, which we will take care of later on. 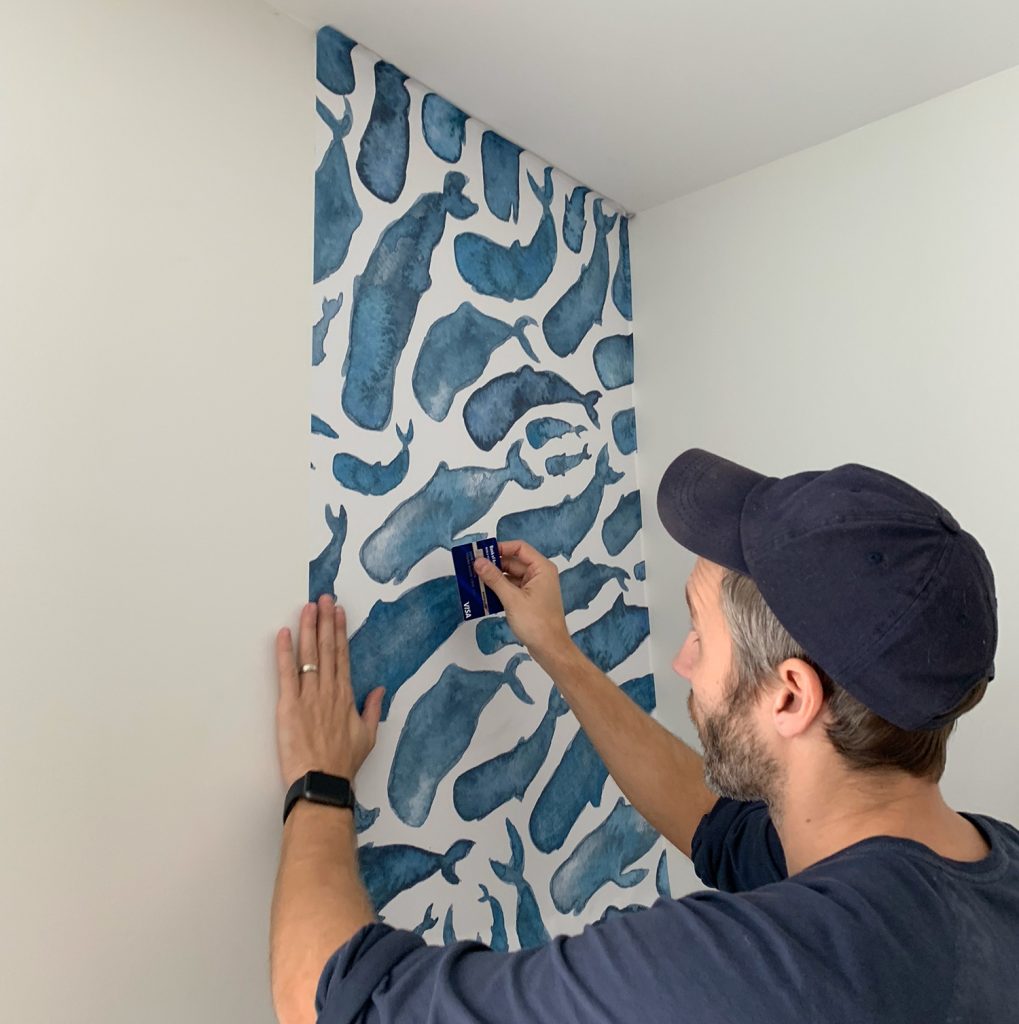 You can buy a smoothing tool meant for this task, but we forgot to bring one with us to the beach, so we pulled a credit card out of my wallet and it did the job just fine. Our main tip here is to work from the middle out toward the edges, both when you’re sticking things with your hand and when you’re smoothing things afterwards. Also, don’t be afraid to peel it off and restick it if you’re not happy with your placement or if it’s starting to wrinkle. Remember, this particular material is VERY FORGIVING. Continue to apply the first wallpaper panel in this manner until you get to the baseboard at the bottom. We’ll trim that later as well. Step 4: Line Up The Pattern On Your Second PanelIf you’ve carefully placed your first panel, this part shouldn’t give you any trouble. These designs aren’t printed with an overlap, so you’ll be butting the second panel up along the edge of the first panel. Just peel a small section of backing off and take your time aligning the pattern. You can peel it off and restick it as many times as you need to get it just right so they line up pretty seamlessly, like you see below: 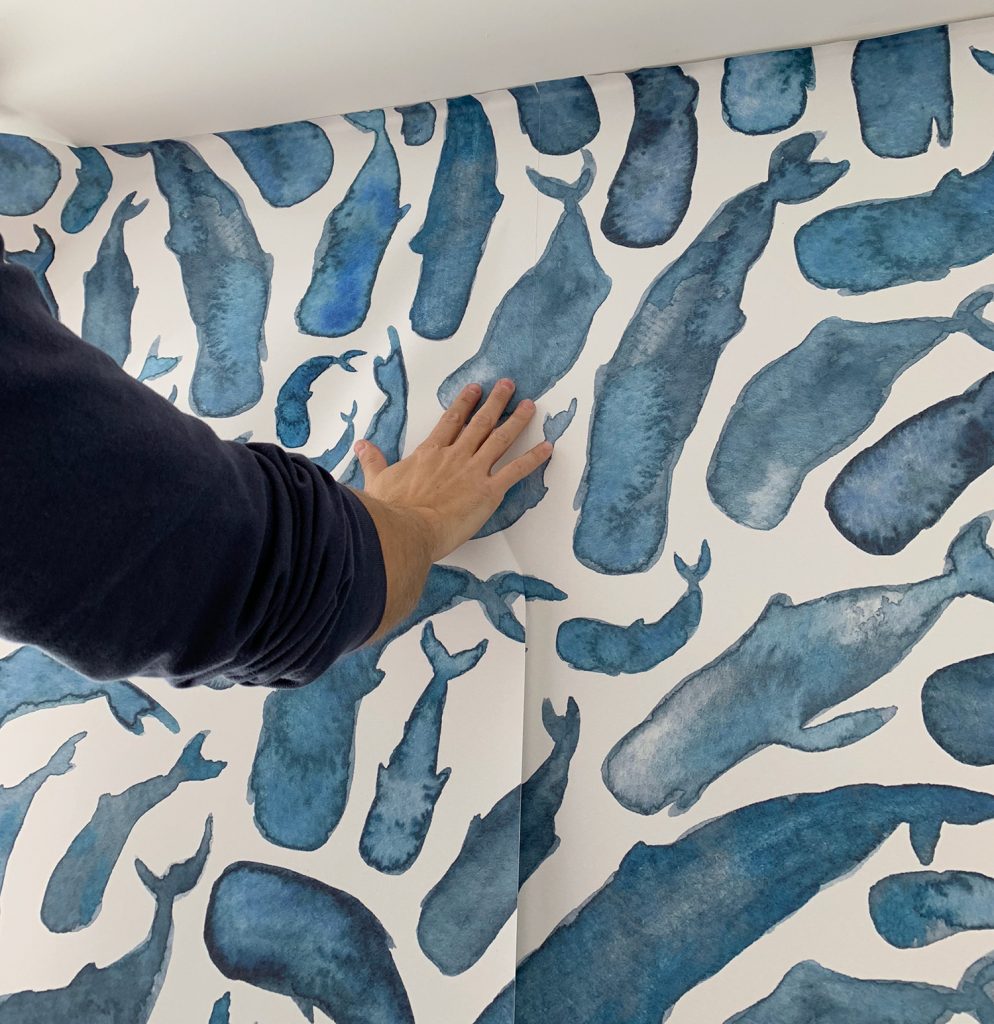 We did notice that the material has a little stretch to it, so as you smooth it down the wall, it can cause your pattern to travel a bit – meaning your pattern alignment may seem “off†as you go down the wall if you’re pulling and stretching one panel more than the other one. 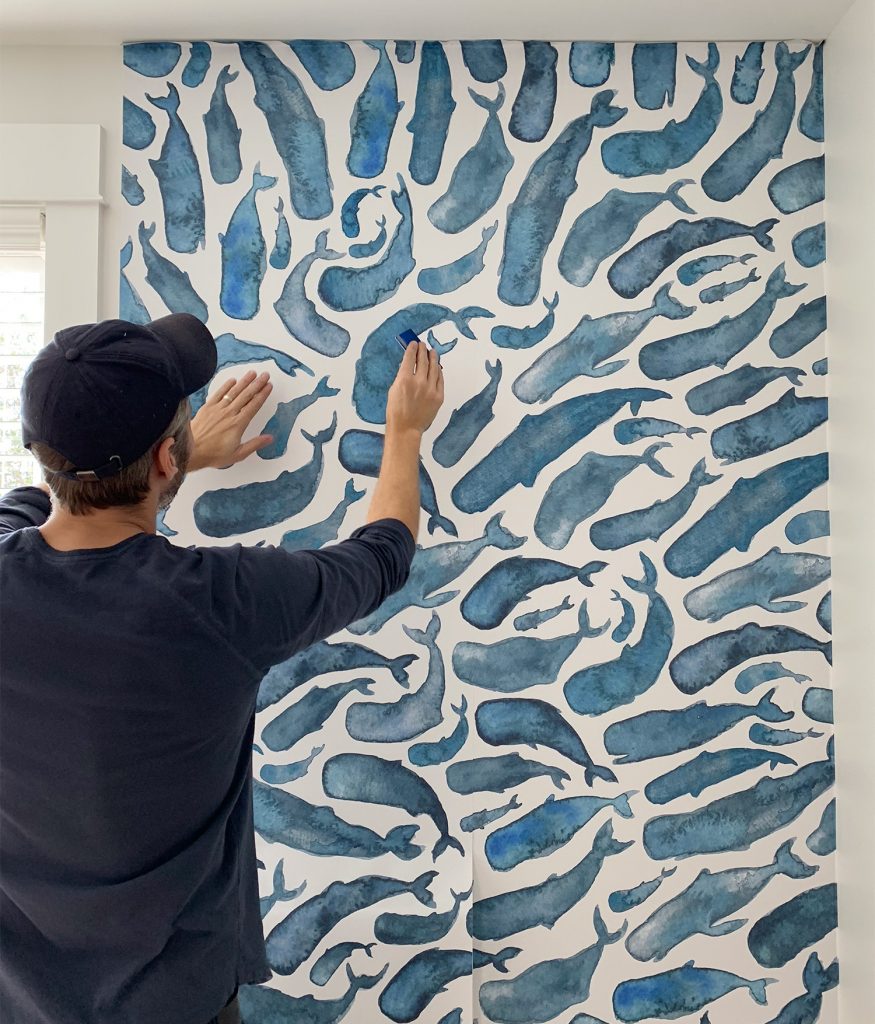 We combatted this by trying NOT to pull or stretch the material with too much force. And just by generally being vigilant the whole way down. If we didn’t like how anything lined up, we just peeled it back up and tried again. Step 5: Cut Around Small Obstacles Like Outlets & SwitchesIf you run into an obstacle like a light switch or wall outlet, don’t worry – it’s super easy. Just turn off the power to that switch or outlet, and once you’re ready to stick the wallpaper around it, use a flathead screwdriver to remove the cover plate. Then loosely stick the wallpaper panel OVER the outlet (if it’s a traditional switch that protrudes a lot, you may need to cut a small slit to allow the switch to peek out so the wallpaper can sit flatter against the area). You should be able to feel the outline of the obstacle through the paper, so use your utility knife to carefully cut along the edges – being careful not to cut any areas that won’t be covered by the switch plate or outlet cover. 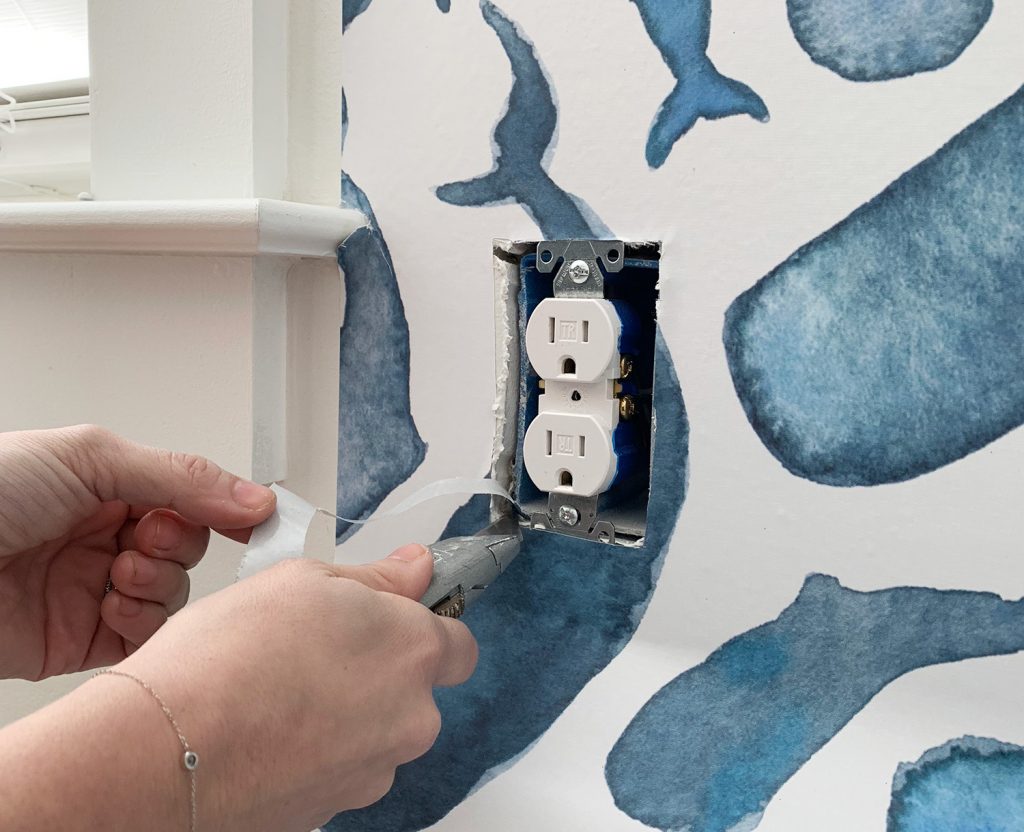 It doesn’t have to be a flawless cut, just be sure to remove enough that the outlet or switch could be easily removed if/when needed. Then just smooth the area down and screw the cover back on so it looks polished and finished (you can see the finished outlet in the picture below). Step 6: Cutting Around Large Obstacles Like Windows & DoorsHanging our last two wall mural panels presented the added challenge of cutting around a large window that would interfere with significant sections of the pattern. 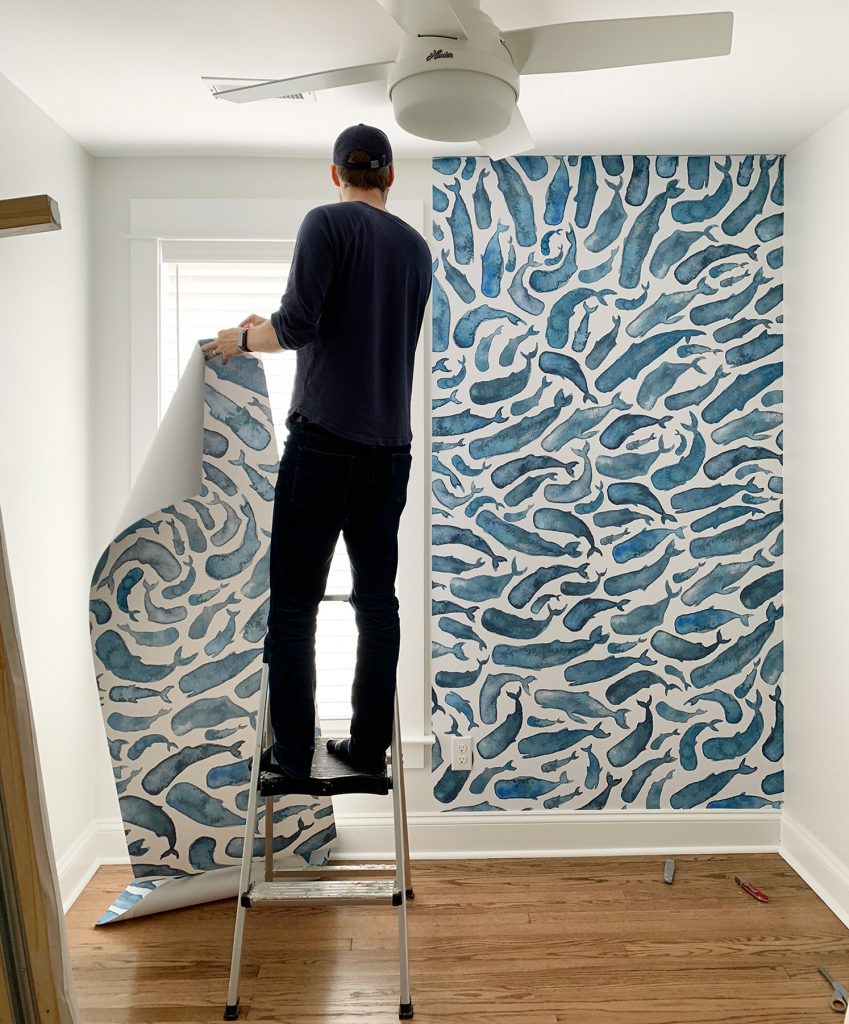 We started each one of them the same way we did the full panels – peeling back a small section at the top and aligning the pattern. But once the window trim preventing the panel from hanging flat, we broke out the scissors and roughly cut out the area that would have covered the window. 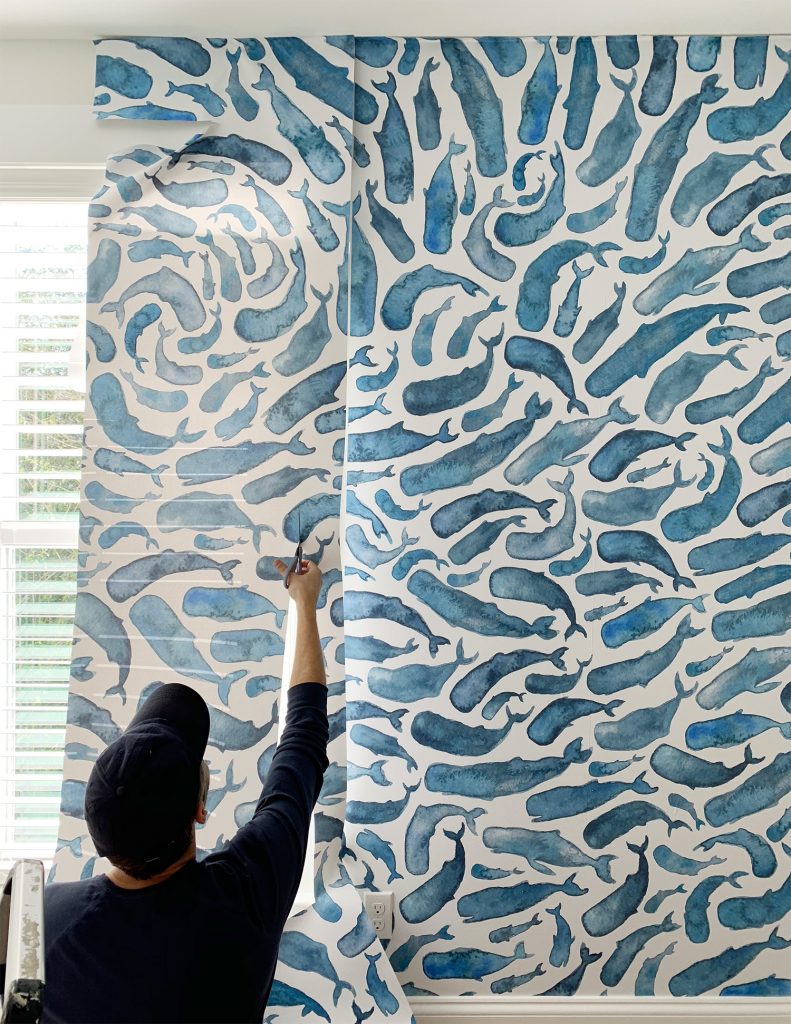 We were VERY CONSERVATIVE in doing this, leaving 3-4 inches of excess, and trimming more as we felt more confident we weren’t cutting off too much. It’s a little tricky getting around corners (you kinda have to cut a diagonal slit in it). 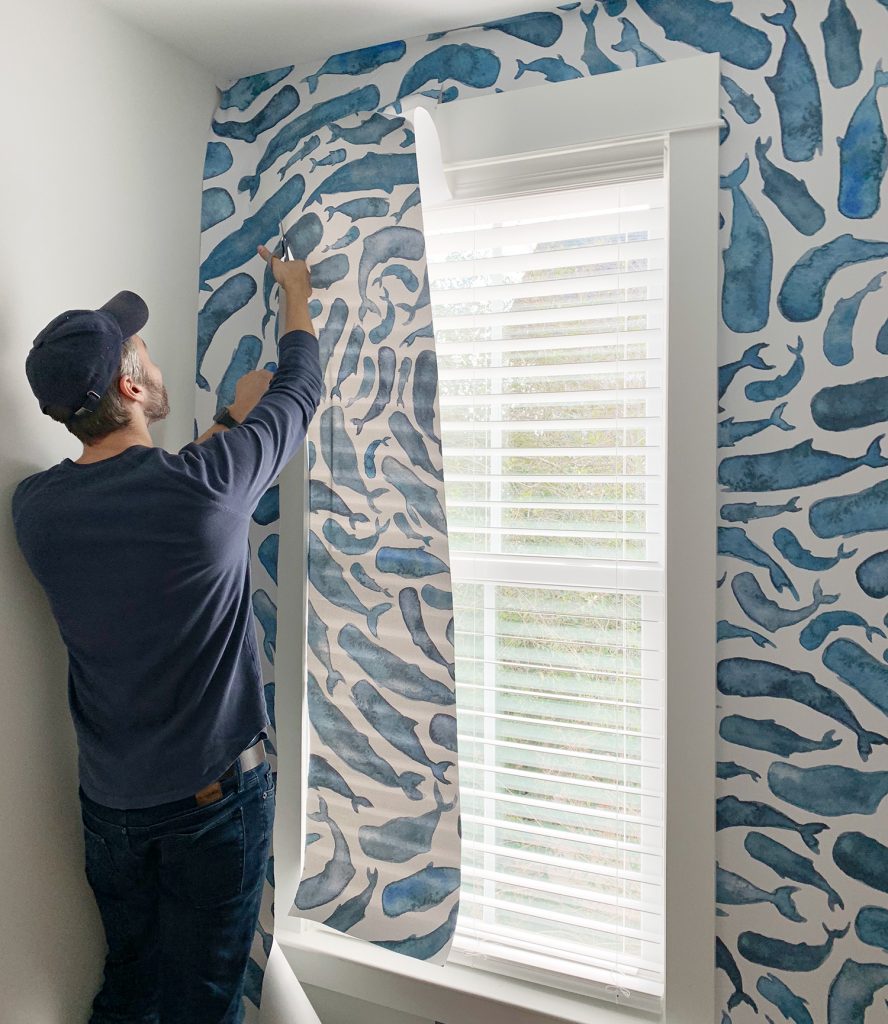 Once enough is trimmed off so that you can press it flat onto the wall, then it’s just a matter of (say it with me!) peeling, sticking, and smoothing. You’ll still have some excess overlapping the trim, but just like the excess along your baseboard, side wall, and ceiling, it’s just fine. You’ll trim it off later. 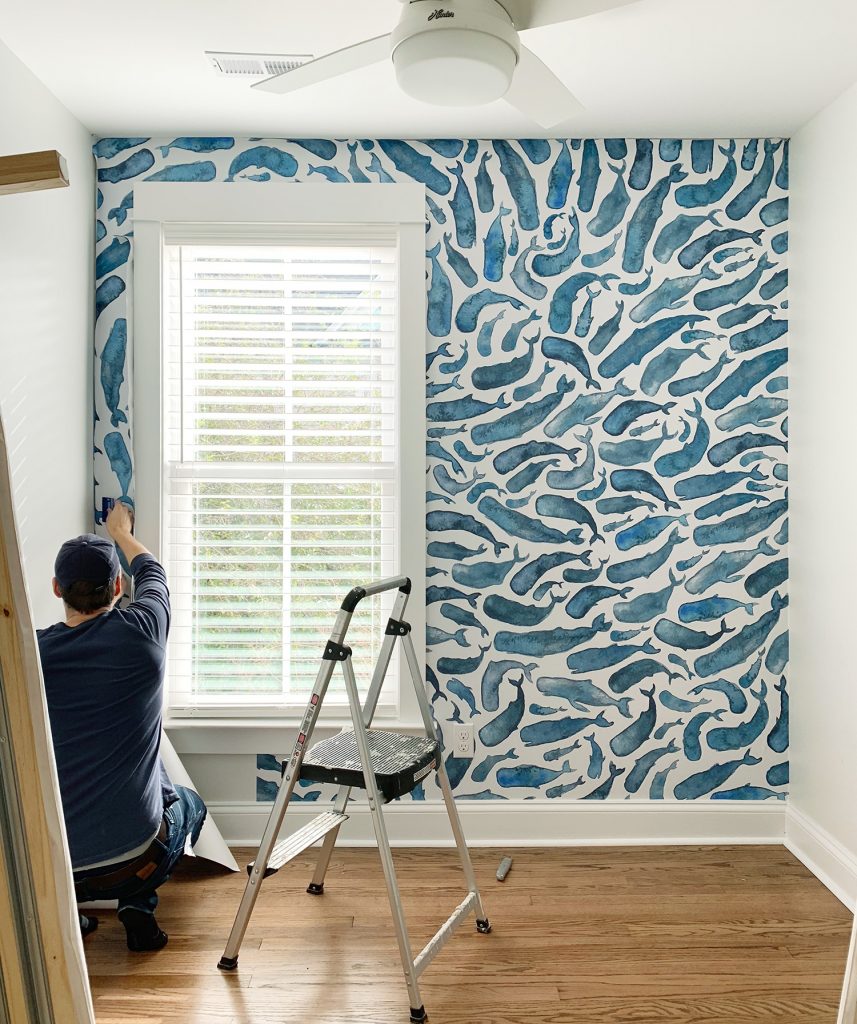 Step 7: Finishing Your Final Wallpaper PanelI’m not gonna lie: aligning that final part under the window was a little tricky. But I’ll show you how we cheated to keep ourselves from going crazy. Because of the window, we hung our fourth panel (which was pretty much just a tiny strip between the window and the wall) without being able to align it with the pattern on the previous panel. So by the time we got to the bottom, it didn’t perfectly match up. And if we did match it up – it always left a big bubble or wrinkle, no matter how many times we stuck or restuck it. We tried unpeeling, shifting and resticking it half a dozen times, but with minimal improvement. So we decided the main priority was aligning the pattern under the window so the vertical seam disappeared. Then we actually sliced the panel apart (gasp!) at a narrow spot between the window and the wall where there was mostly white space. That way, instead of a big wrinkle, we had a smooth, barely-visible overlap. 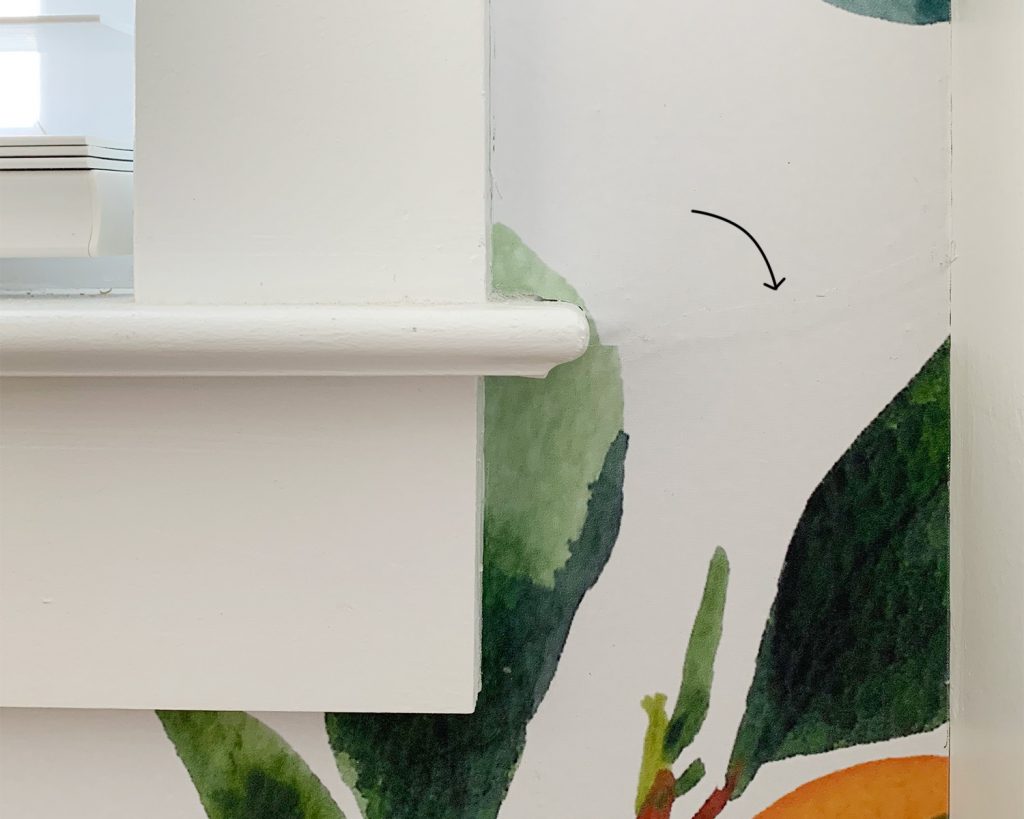 I forgot to take a picture of the overlap on the whale side, but you can see it above on the orange side. It’s suuuuuper subtle (and will be completely blocked by a bed anyways) but we wanted to show you so you didn’t stress yourself out about getting things absolutely flawless. And again, here it is from further away – you’d never notice that small imperfection in the scheme of the entire room, even if it weren’t covered by a bed. Step 8: Cut Off The Excess With Your KnifeYou don’t actually have to wait until the end to trim off all of your excess wallpaper around the ceilings, end walls, and baseboards, but doing it last is a nice insurance policy in case you have to do any major repositioning (we didn’t – but it still felt smart to play it safe). Once you cut it, you can’t un-cut it ;) 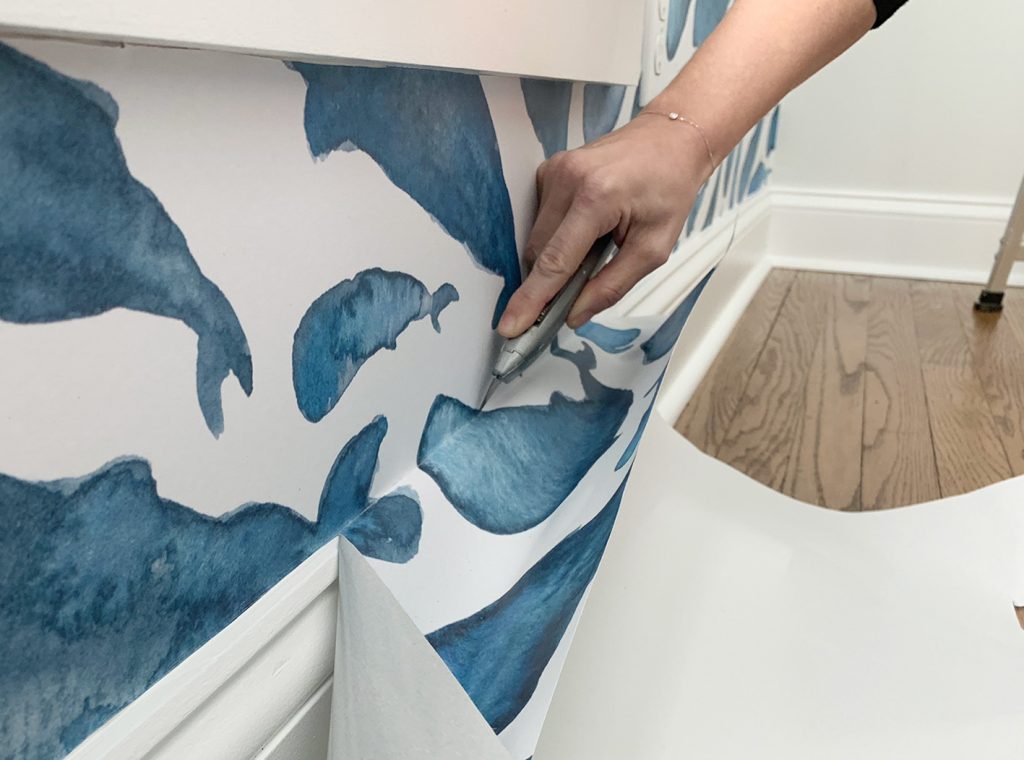 Sherry and I had different techniques for this part. She smoothed everything really well one more time, almost forcing a crease into the edge, and then freehanded the cut along the crease. I felt a little better smoothing and then actually pressing my smoothing tool (aka credit card) into the crease as I cut, almost using the card as a guide. I think my method worked better in “softer†corners like along the ceiling, but Sherry’s worked speedily along “harder†edges like where the baseboard met the drywall. Step 9: Repeat!Okay, not really. Most of you will not have to repeat the process in another room like we did. Unless you were so wowed by the result that you’re already planning another project. It is kind of addicting… In all seriousness, we’re so happy with how these turned out AND how painless the installation was, we ARE trying to figure out if there’s another spot we could install one in the beach house or our own house. And as for these rooms, they still need to be fully furnished. We’ve built the two twin bed platforms in each space (they’re these from Ikea), the mattresses are coming, and we’re currently looking for some bedding to finish them off. 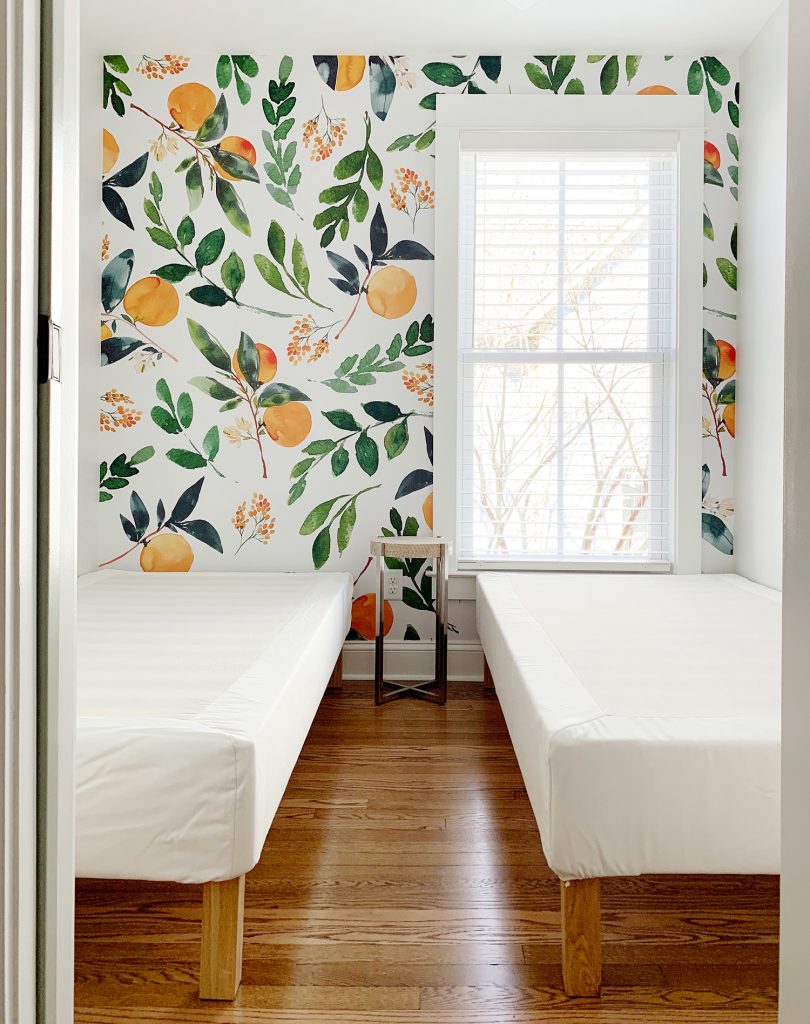 You can see in the above photo that we’ve placed a temporary side table in there, just to get a sense of the layout (the aisle isn’t as small as we feared after all, which is great news). 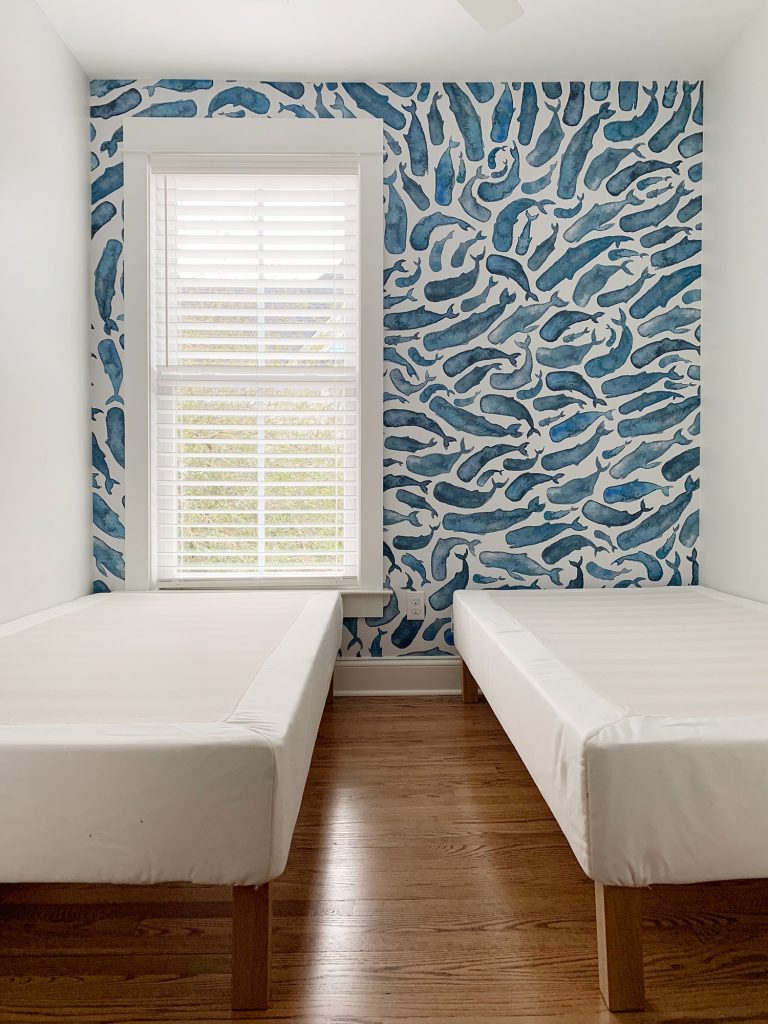 More on these rooms to come! But for now we’re just enjoying how a few hours spent sticking these murals up on each side completely changed how they look. They’re a lot closer to charming little bonus sleeping nooks than they were last week! P.S. To see other projects that we’ve done at the duplex, here’s how we started laying down rugs & building the kitchens, how we tiled 6 rooms, how we hung operable shutters, and here’s the entire duplex category on our blog if you want to look back on all of our progress. *This post contains affiliate links* The post How To Install A Removable Wallpaper Mural appeared first on Young House Love. Via https://www.younghouselove.com/how-to-install-removable-wallpaper/ This week we’re sharing a simple kitchen change that made it WAY more efficient for us (we’re kinda kicking ourselves for not doing it sooner). There’s also an update on some duplex delivery drama and we’re sharing three specific tips for book lovers who actually want books on their shelves (as opposed to filling them with a ton of decorative objects). Plus, the new show on Netflix that’s debatably as life-changing to us as Marie Kondo’s (we LOVED it – and we also chat about Marie’s show too). You can download this episode from Apple Podcasts, Google Podcasts, Stitcher, TuneIn Radio, and Spotify – or listen to it below! Note: If you’re reading in a feed reader, you may have to click through to the post to see the player. What’s New
Updates

 Can We Just Talk About

Listener Question
We’re Digging

If you’re looking for something we’ve dug in a past episode, but don’t remember which show notes to click into, here’s a master list of everything we’ve been digging from all of our past episodes. You can also see all the books we’ve recommended on our Book Club page. And lastly, a big thank you to Annie Selke for sponsoring this episode. Be sure to check out her new rug collection with Bunny Williams at annieselke.com/YHL. And take 15% off any order with code YHL15. 
Thanks for listening, guys! *This post contains affiliate links* The post #127: The Real Housewives of Airbnb appeared first on Young House Love. Via https://www.younghouselove.com/podcast-127/ I was surprised how many questions I got about the little dollhouse sneak peeks I’ve shared on IG stories over the last few weeks as I fixed this up with the kids. And then I polled you guys to see if you wanted a post about it, and 91% of you voted yes, so here it is! You can read more about how these came to be on this podcast from a few weeks back, but the gist is that the kids really wanted super detailed dollhouses to fix up, and we got two of them secondhand on Facebook marketplace to “renovate” together. 
This little makeover was lots of fun for us all, since the kids were at the wheel picking all the colors and helping me paint and glue and arrange stuff, and although this technically lives in our son’s room, both kids definitely had a hand in making it over (we have another one that lives in our daughter’s room that we’re also working on together – which you can see below on the left of the photo). The lesson: even tiny houses take a village to fix up. 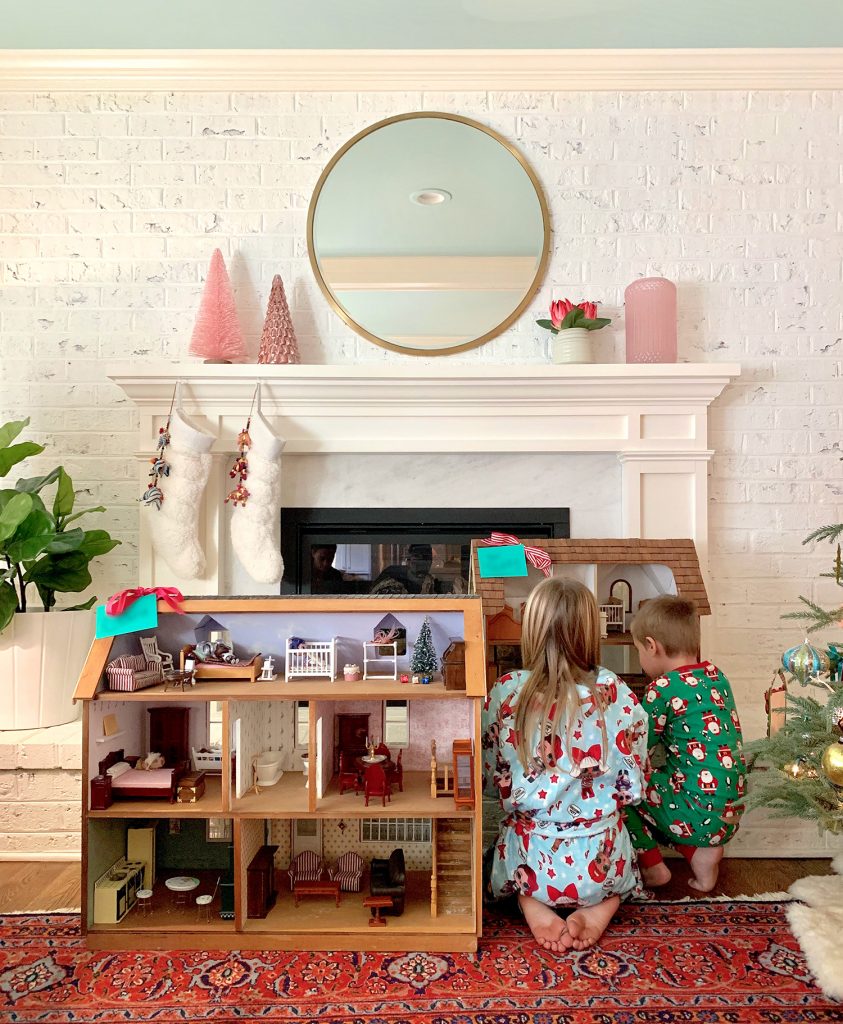
The quick pic I snapped below shows what this one looked like when we got it (I barely remembered to snap the before photo, hence that dash of white paint on the facade since we had already started painting). Our son was adamant that he wanted it to be white with light blue shutters and gold trim along the peak (this is the gold I used – be sure to shake this thoroughly for the best coverage). The kid knew what he wanted and was unwavering. Ha! So his vision came to fruition thanks to a whole lot of painting. We just used simple craft paint from Michael’s and we all pitched in (we had the entire interior and exterior to do). The kids could easily do things like the floor, walls, and exterior house color and I helped with the more detailed jobs, like the trim (I just used a small craft brush). Also we made up a song as we went, which went a little something like this: “Ahh, don’t get paint on the roof! Go slow! Whew! We can do this! Ahhhh, avoid the roof!” Catchy, eh? If you’re super worried you can cover it with plastic and tape it off, but our song seemed to work for the most part. 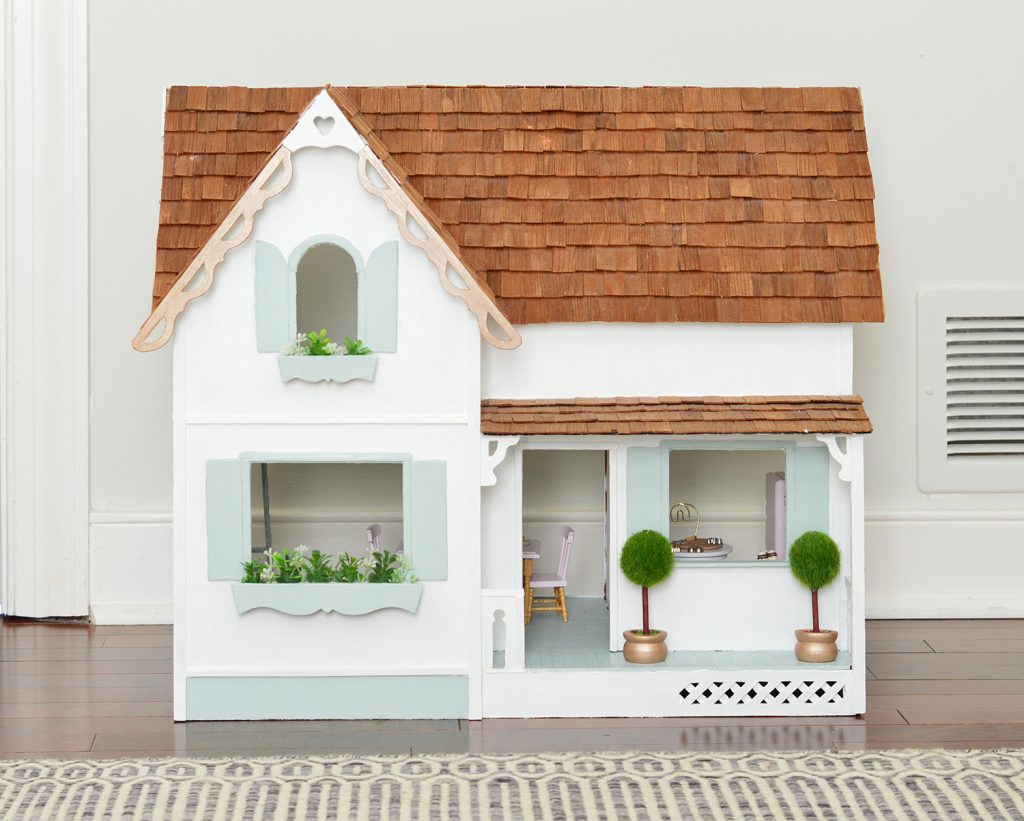
Oh and that decorative trim around the peak came with the dollhouse, it just broke off and I re-glued it back on with wood glue (this glue works great – I just taped them in place while they dried so I didn’t have to stand there holding them for an hour). I loved getting to reuse some things we’ve had for ages (way back from our daughter’s first dollhouse), like those topiaries that you see on the front porch. The funny thing is that I found those in the wedding aisle at Michael’s 6 years ago, and they’re actually meant to be place cards (there’s a small wire loop at the top to stick name cards in). Cute miniature things are EVERYWHERE if you look close enough.
As for the “greenery” in the window boxes above, I just bought this small faux plant “mat” from Michael’s (don’t forget your 50% off coupons – they saved me so much money when I was grabbing the acrylic paint, craft glue, and the little faux green mat). Here’s a Burger-for-scale shot for ya. He was VERY INTO trying to help, but sadly dogs can’t paint very well. Oh and we have since fixed the steps, so I’ll have to share a little update video on Instagram stories about how we did it. Super simple – you just slice thin craft wood (like this) with an exacto knife to make the steps, glue them into place with wood glue, and paint them to match. Truly so easy! Like 10,000% easier than building a human-sized staircase ;) 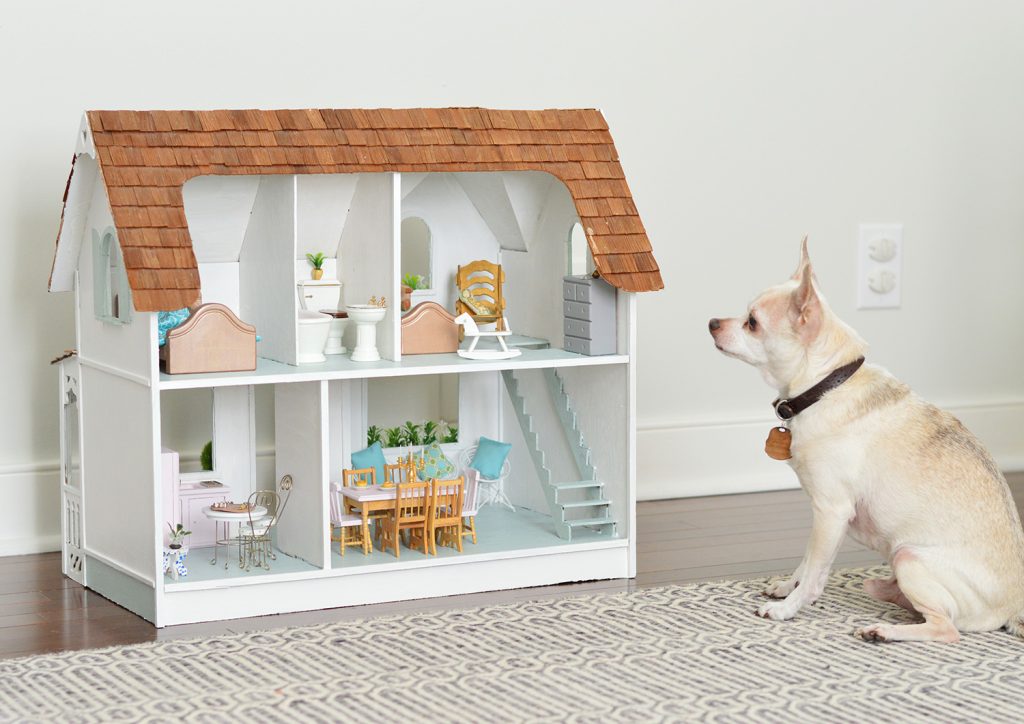
This is where this dollhouse lives, right in the corner of our son’s room. For those who listened to the podcast about “Operation Acquire Two Dollhouses”, you may remember that I thought this was a much smaller dollhouse (like shoebox sized) and was shocked when it was almost as big as his extra high dresser – and then we picked up the one for our daughter… and… well… it was massive. Ha! But they LOVE them, so I guess it all worked out. Even if dollhouses now make up 8% of our actual house’s contents now. 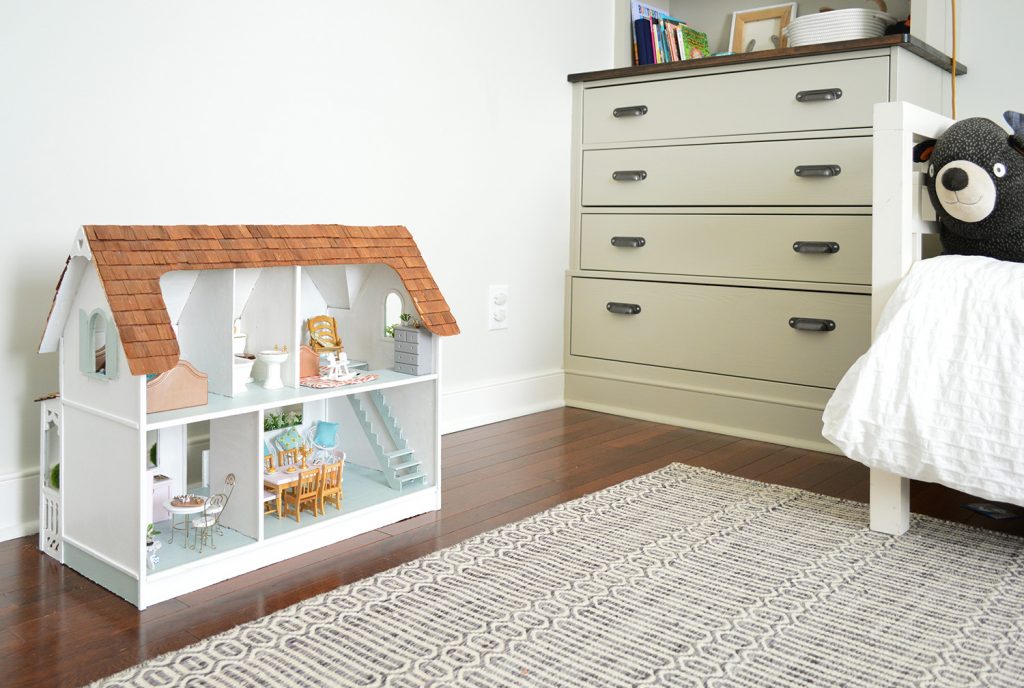
As for how we fixed things up inside, this is what we started with. All the furniture in each house was collected over two bulk purchases on Facebook Marketplace (we spent around $30 total for enough furniture to fill TWO houses!). This before shot of the back of the house and the furniture isn’t completely congruent with the next after shot since I took this photo on Christmas Eve, and then the kids came down on Christmas morning and had all sorts of furniture swaps and rearranging parties. 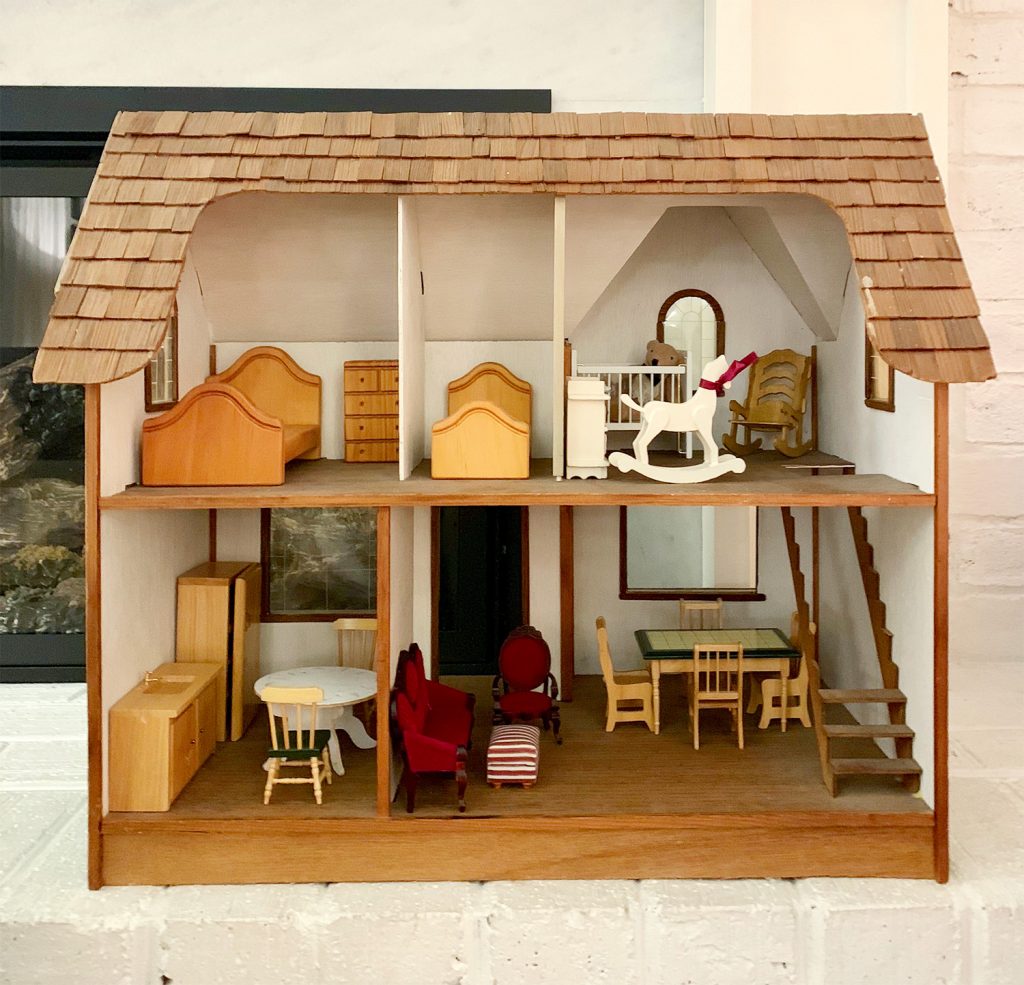
But you get the general gist that the floors were wood, the walls were sort of a cream-white color and a lot of the furniture was wood, deep red, green and cream, etc. Once again our tiny homeowner knew exactly what he wanted for the inside: white walls and light blue floors – just like the shutters and trim (this is the exact blue color we used by the way). 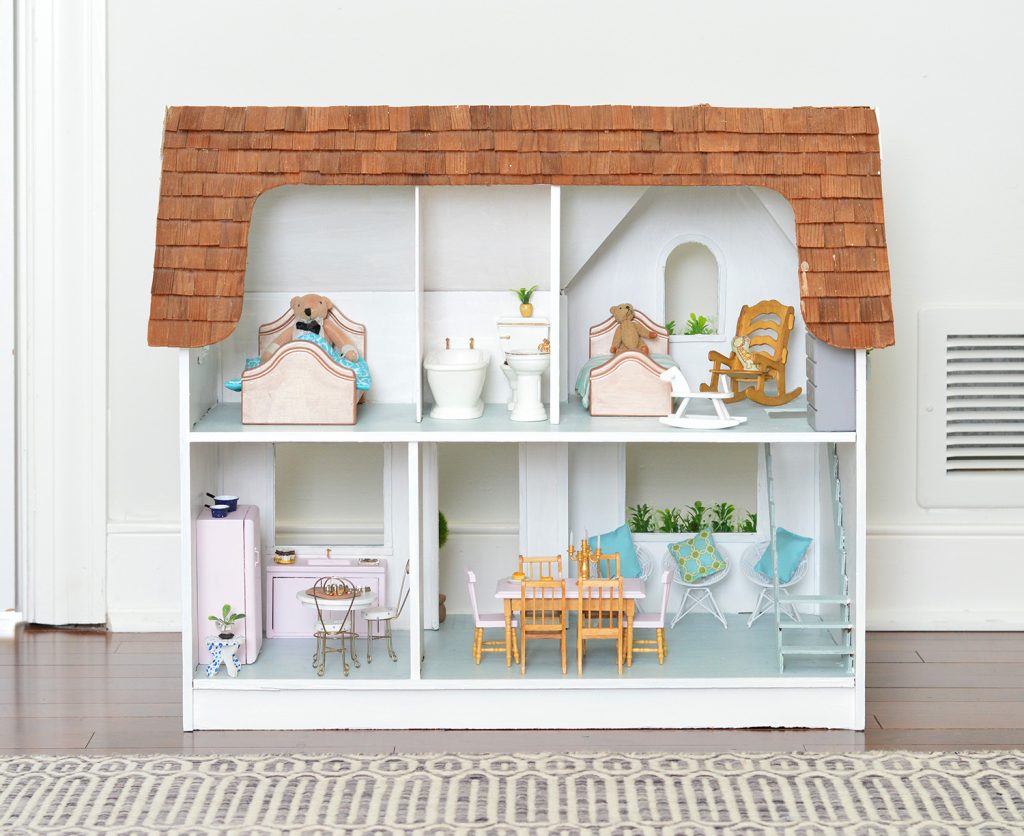
We all got to work painting those (again, just with craft paint from Michael’s) and once the floor & walls were dry we had some fun painting the beds gold, adding a pink top to the table and two of the chairs – whatever the kids wanted – we did! And the funny thing is that they both said the sink and the fridge had to be pink like the stove at the pink house! You know I didn’t argue with that ;) 
The little pillows were things our daughter already had from a small doll she had gotten ages ago, and even the “bedding” on the two beds were cloth bags I had saved in our gift wrapping closet (one is from Kendra Scott jewelry and it’s the perfect “sleeping bag” size and the other is a plain blue cloth bag that something else came in). 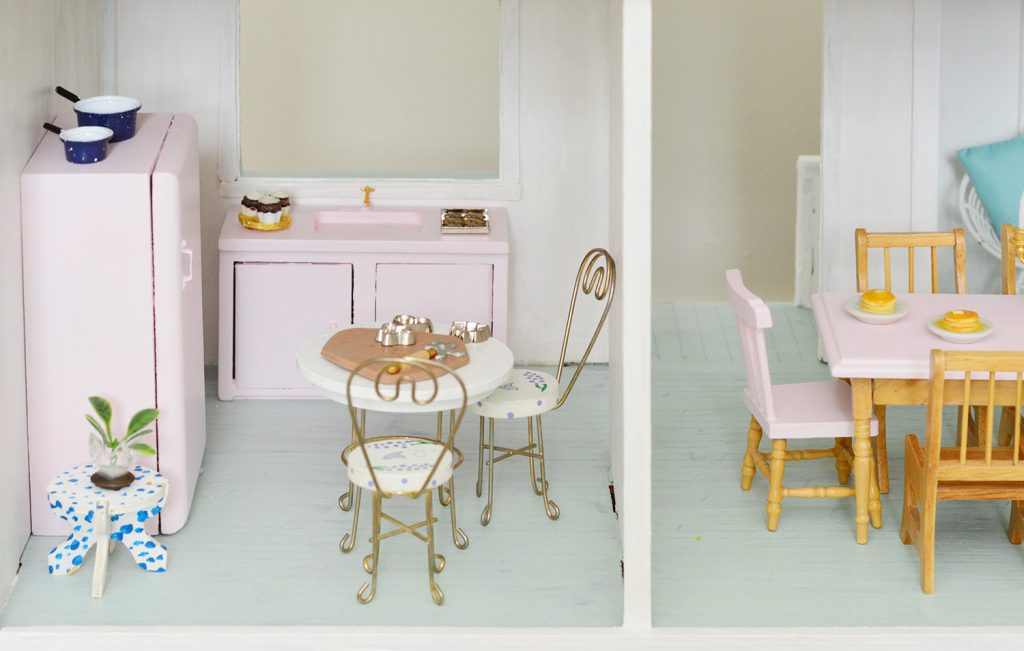
There were a few special purchases that we made with the kids. They had an Amazon gift card and some Christmas money to spend, so after a loooooooong deliberation they decided that two plates of pancakes (you can see those on the right of the photo above) and a little gingerbread making kit (seen below) were the best things to buy, along with this set of pots & pans (you can see them in the photo above on the fridge). They’ve never been so excited to check the mail every day until they arrived. 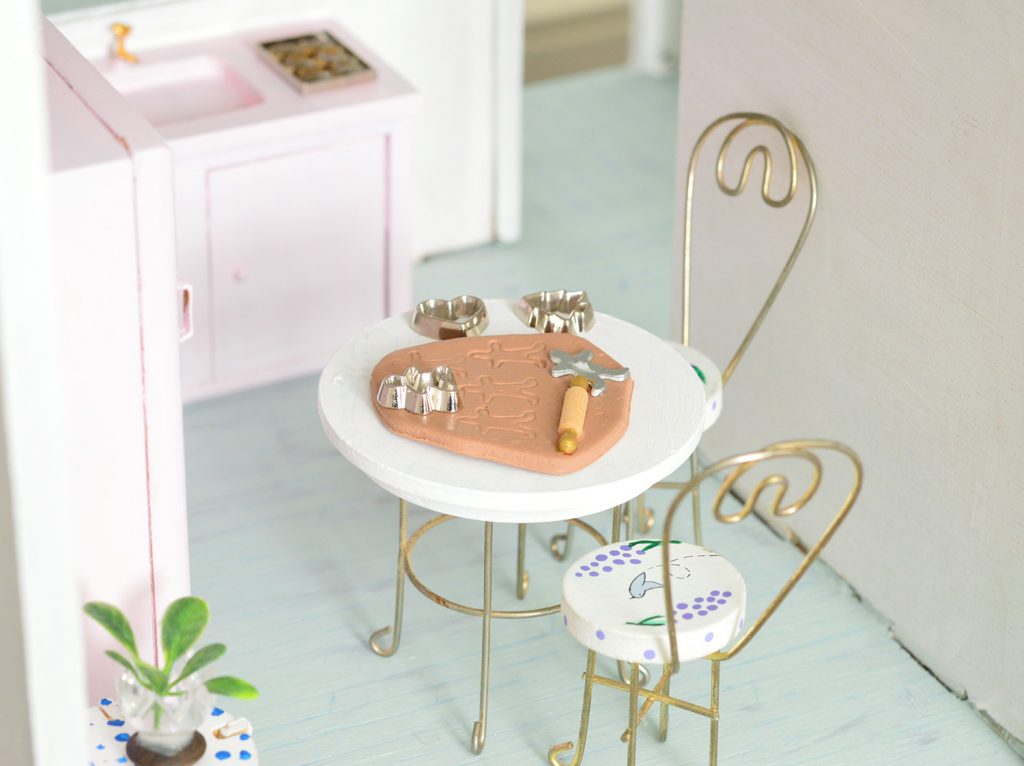
Oh and that little candlestick has real wax candles! It came with one of the sets of old dollhouse furniture we bought secondhand – and you might remember those round wire chairs from our daughter’s first dollhouse too (originally they were little decorative chairs meant as shelf decor from West Elm years ago). 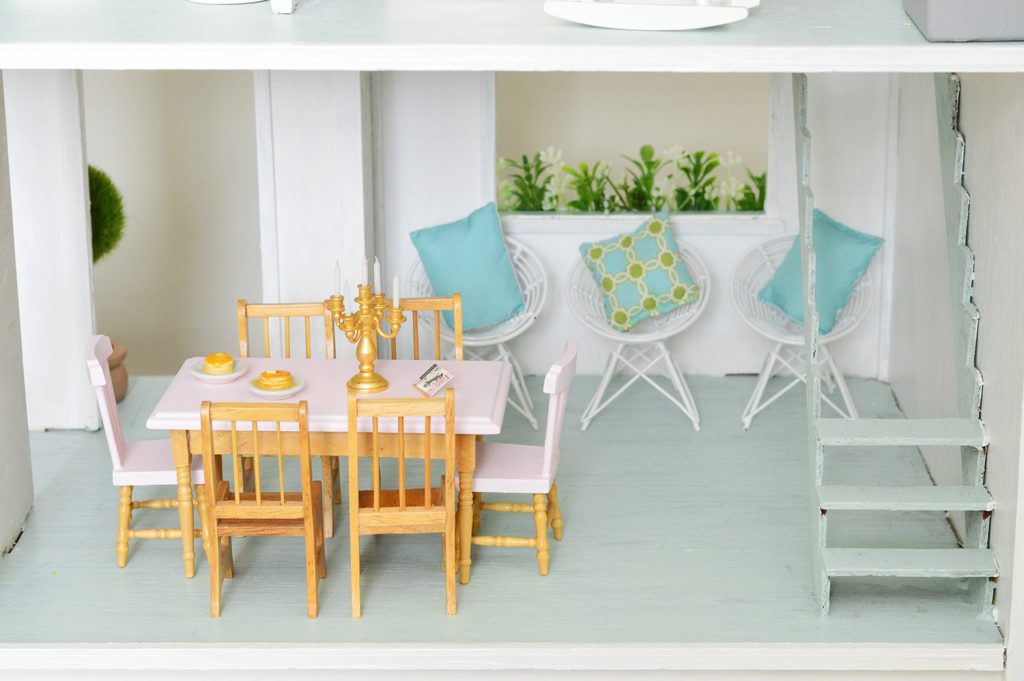
You know it super bugs me that I took all these photos like a day before I fixed those stairs, right? #TypeA 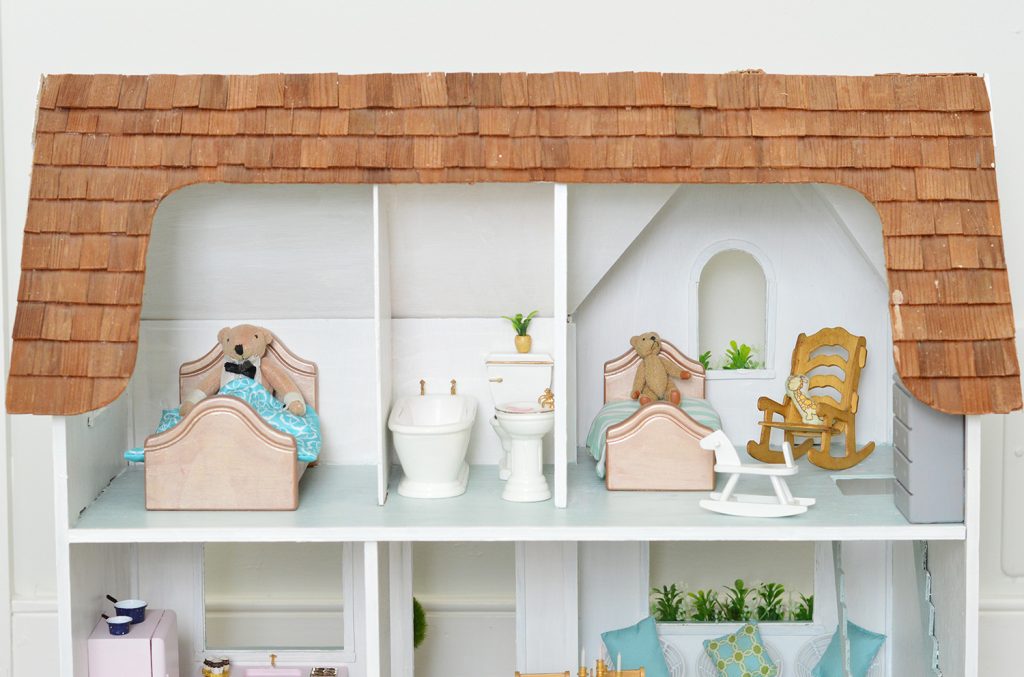
Along with DIYing the greenery in the window boxes, I also made a few house plants from scratch. It was really simple and fun, I just took small clippings from the same faux green mat thing I bought for the window boxes, and I glued them into various small things that look like pots. One was a wood bead (see that one on the top of the toilet in the picture below?) and one was a small white flowerpot I found at the craft store. 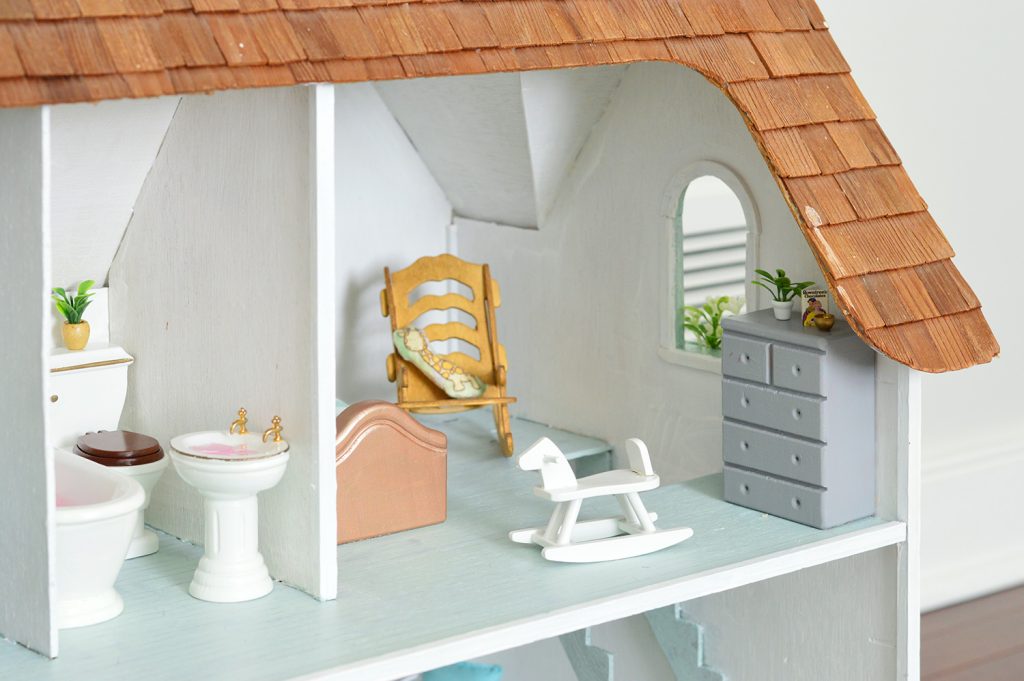
I also used a clear bead + a brown flat button to make the little plant you see in the photo below. Just glue the bead and the button together and it looks like a little glass vase sitting on a brown coaster – and then add the small clipping to the bead with another small dab of glue.
Another fun added touch is to dump some colorful beads or large sequins into the bath tub and the sink to create some “fake water.” I found some blue ones a little later on, but already had these pink sequin things from a jewelry kit we had around the house, so I tossed them in and the kids had a lot of fun “bathing” their little dolls and teddy bears in ’em. Much better than them putting real water in their tub and sink ;) 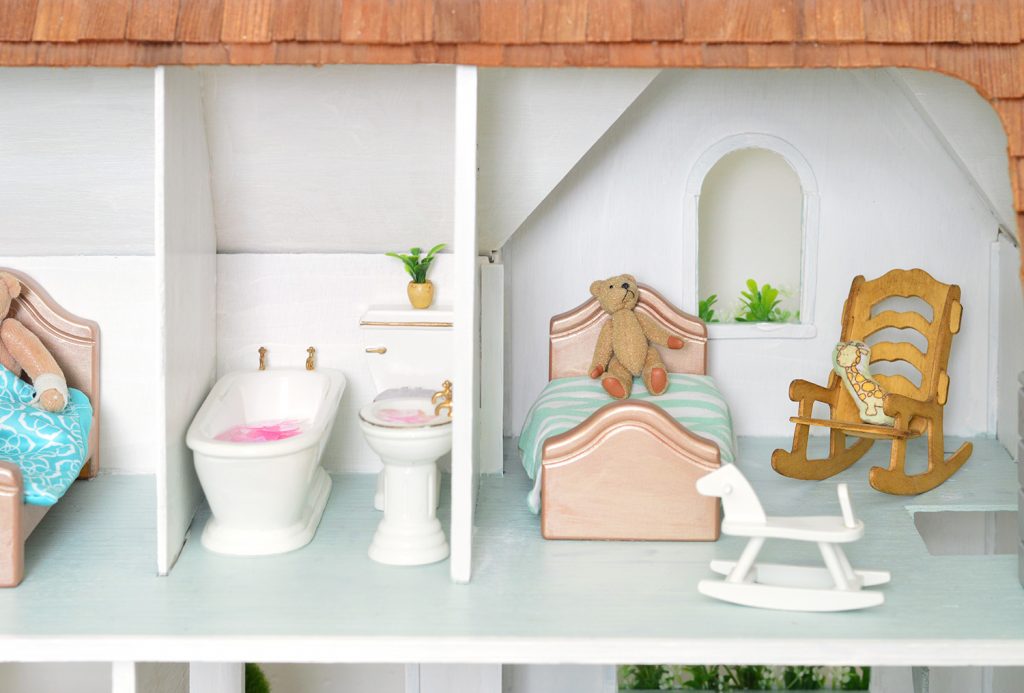
You can see it a little better in this photo below, along with my homemade potted plant. 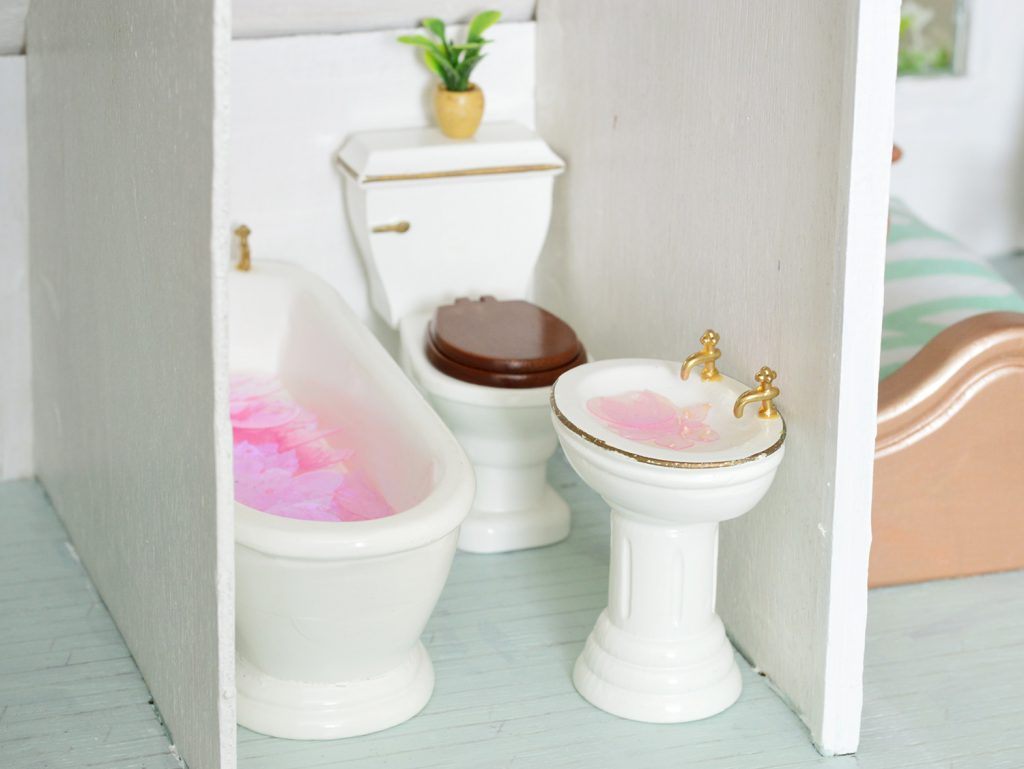
The kids also especially like “interactive” additions to their houses, like the rocking horse & rocking chair, which both get a lot of use from their little figures. Our daughter’s house also has a Christmas tree and some tiny fake wrapped presents to go around the base of it – and they LOVE that too. Anything they can weave a story around seems to be a real hit – and stuff that moves like drawers that come out and chests that open add excitement-factor too (they also love that the toilet cover goes up and down). So that rounds out the tour of House #1 for ya. We hope to eventually share our larger and more detailed renovation of the bigger house for our daughter’s room someday. She wants electricity and all that good stuff, so it might take a while, but hopefully I’ll be back with all the details in the next year or two. You never know how long these whole-house renos are gonna take ;) 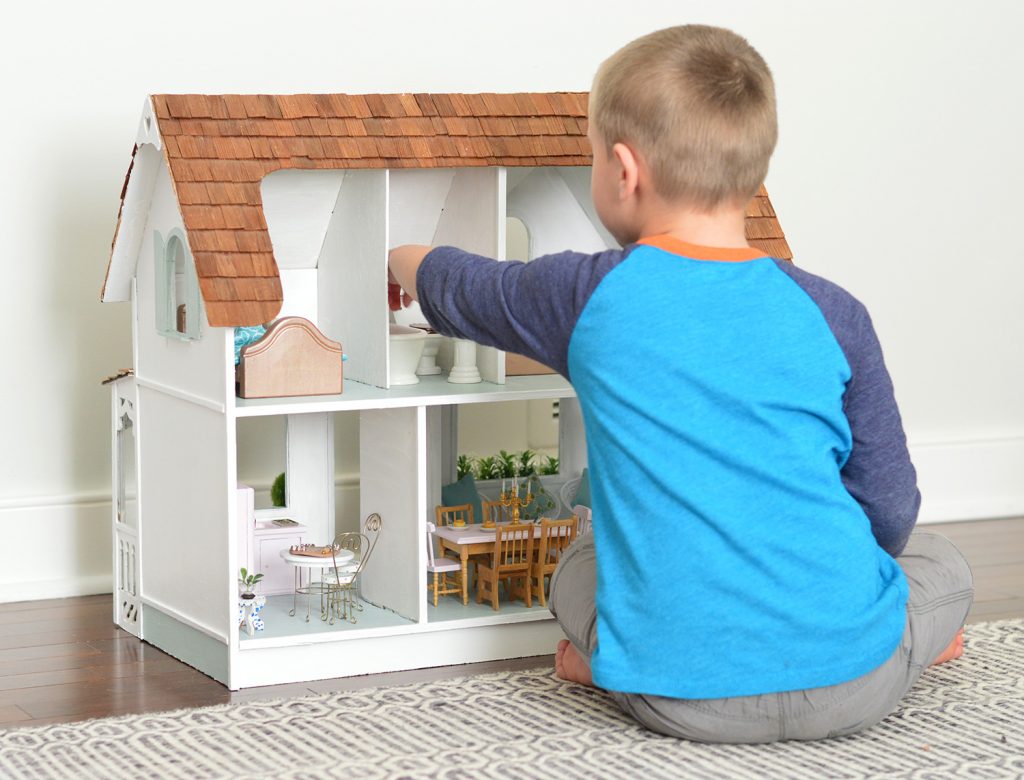
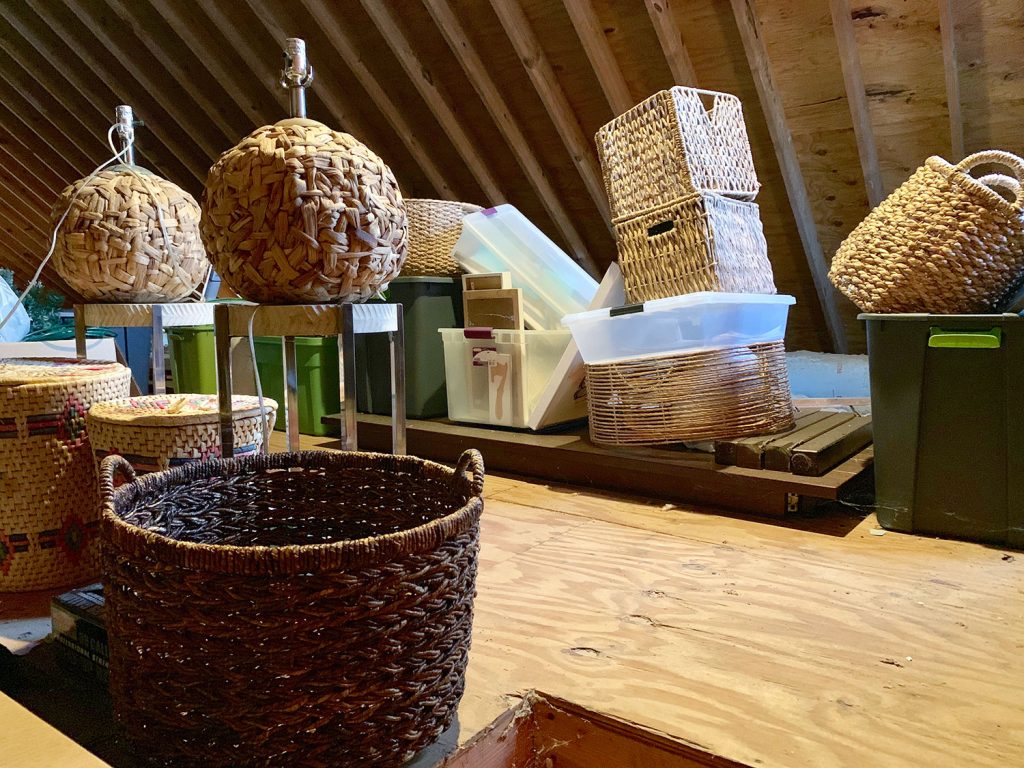
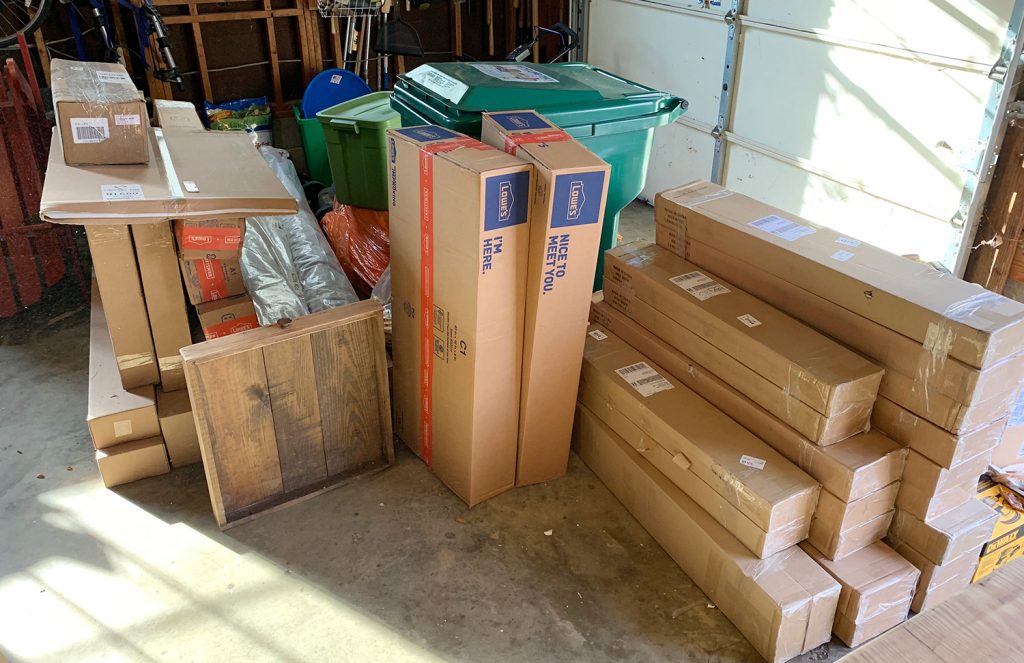
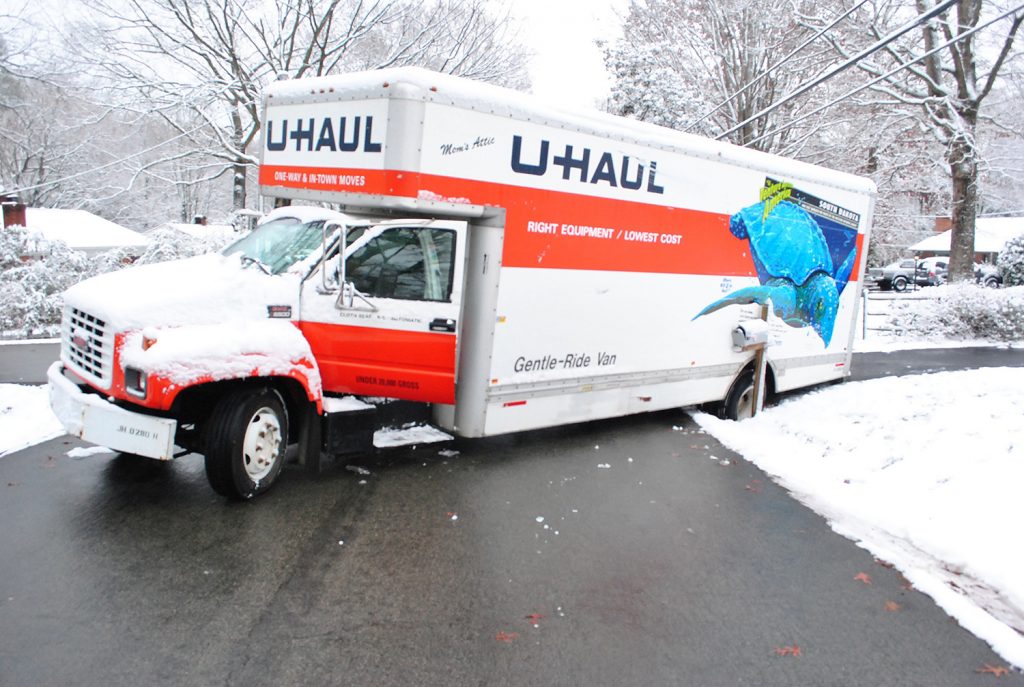
Also dollhouses are not just for girls. So many little guys who come over to play run right up to them and LOVE it. Psst – To check out how to make a much less detailed dollhouse for younger kids, here’s how we built one, and how we decorated it. And to hear more of the story about how we came across these two dollhouses that we’re fixing up now, you can tune into this podcast (all the details are in the first 10 minutes or so). *This post contains affiliate links* The post A Tiny House Makeover (Ok, It’s A Dollhouse) appeared first on Young House Love. Via https://www.younghouselove.com/a-tiny-house-makeover-ok-its-a-dollhouse/ Lots of us want a more organized home, but are we going about it the wrong way? Today we’re talking with a home efficiency expert about how rethinking our approach to organizing could end up making us all happier – and maybe even help us be more patient partners and more present parents. She also explains why we should treat our kitchen like an operating room, how Sherry’s minimized closet could be better, and why garages are so hard to keep under control. We’re also sharing how a random phone call and a dicey forecast sucked the momentum right out of our duplex progress, but we’re still finding some silver lining in the news. Plus Sherry falls hard for some fairies. You can download this episode from Apple Podcasts, Google Podcasts, Stitcher, TuneIn Radio, and Spotify – or listen to it below! Note: If you’re reading in a feed reader, you may have to click through to the post to see the player. What’s New
 Stephanie Sikora, Life Made Simple
We’re Digging

If you’re looking for something we’ve dug in a past episode, but don’t remember which show notes to click into, here’s a master list of everything we’ve been digging from all of our past episodes. You can also see all the books we’ve recommended on our Book Club page. And lastly, a big thank you to Grove Collaborative for sponsoring this episode. Sign up at Grove.co/YHL to receive their FREE gift: a trio of Mrs. Meyers cleaners, a set of walnut scrubber sponges AND a tin cleaning caddy. Yup, all of that’s FREE! 
Thanks for listening, guys! *This post contains affiliate links* The post #126: Is Your Home Making You Grumpy? appeared first on Young House Love. Via https://www.younghouselove.com/podcast-126/ |
