|
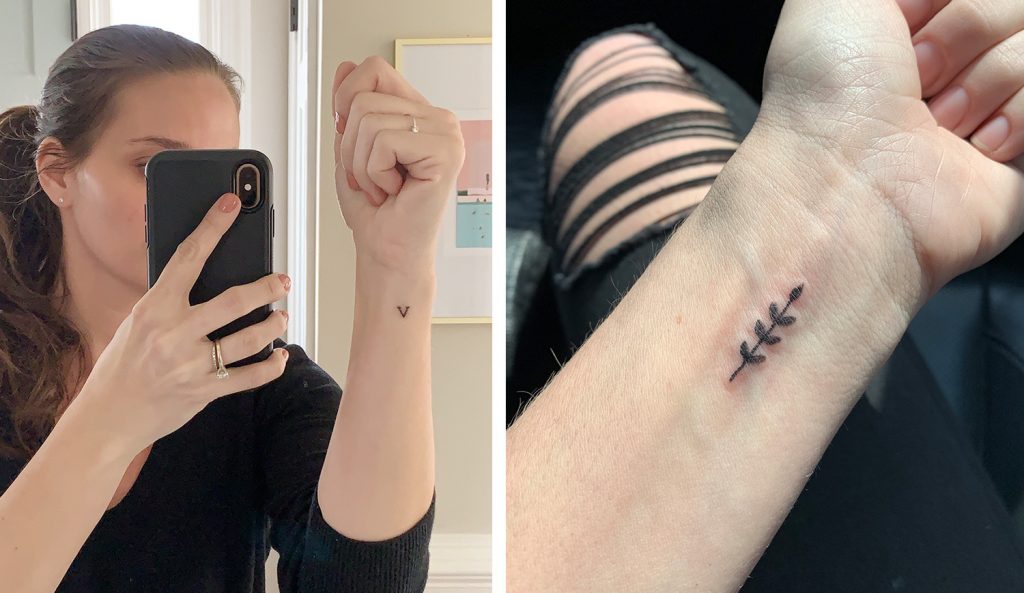
This week we’re talking to Joyful author and expert Ingrid Fetell Lee about some simple ways to inject joy into your home without breaking the bank. She also explains why joy is easier to achieve than happiness – and how seeking it at home can actually help you unlock your decor style. Plus Sherry marked her recent birthday by getting a long-awaited tattoo (actually, two of them!) so she’s explaining the meaning behind them, how much it hurt, and what finally convinced her to go for it. We also share our latest escape room attempt, how we’re battling car clutter, and a BIG change to the podcast that you won’t want to miss. You can download this episode from Apple Podcasts, Google Podcasts, Stitcher, TuneIn Radio, and Spotify – or listen to it below! Note: If you’re reading in a feed reader, you may have to click through to the post to see the player. What’s New
New Intro Song
NOTE: If you’re reading this in a feed reader, you may need to click through the post for the embedded video to show. You can also watch here on YouTube.
NOTE: If you’re reading this in a feed reader, you may need to click through to the post for the embedded video to show. You can also watch here on YouTube.
NOTE: If you’re reading this in a feed reader, you may need to click through the post for the embedded video to show. You can also watch here on YouTube.
Ingrid Fetell Lee, Joyful

 
We’re Digging

 If you’re looking for something we’ve dug in a past episode, but don’t remember which show notes to click into, here’s a master list of everything we’ve been digging from all of our past episodes. You can also see all the books we’ve recommended on our Book Club page. And lastly, a big thank you to Cree LED Light Bulbs for sponsoring this episode. Find out why better lighting matters at CreeBulb.com and learn more about why they’ve become our go-to bulb in our light bulb resource post. 
Thanks for listening, guys! *This post contains affiliate links* The post #136: Maximizing House Joy (For Minimal Money) appeared first on Young House Love. Via https://www.younghouselove.com/podcast-136/
0 Comments
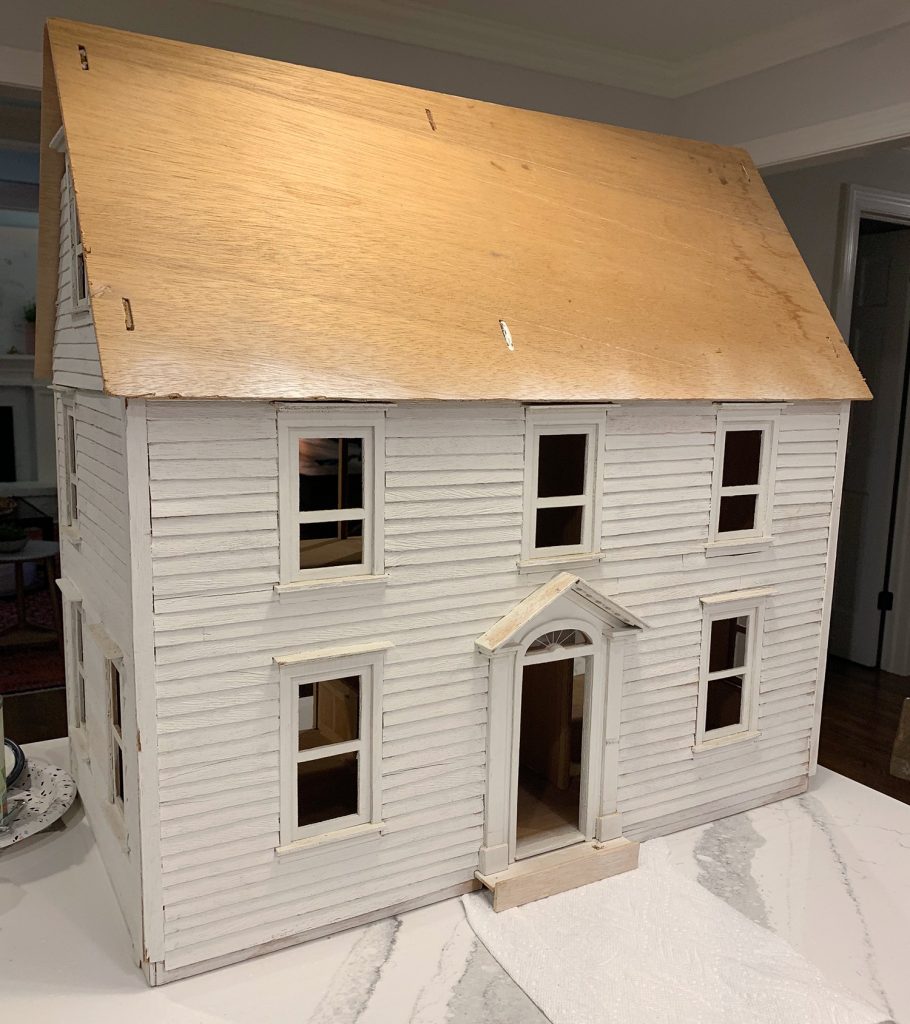
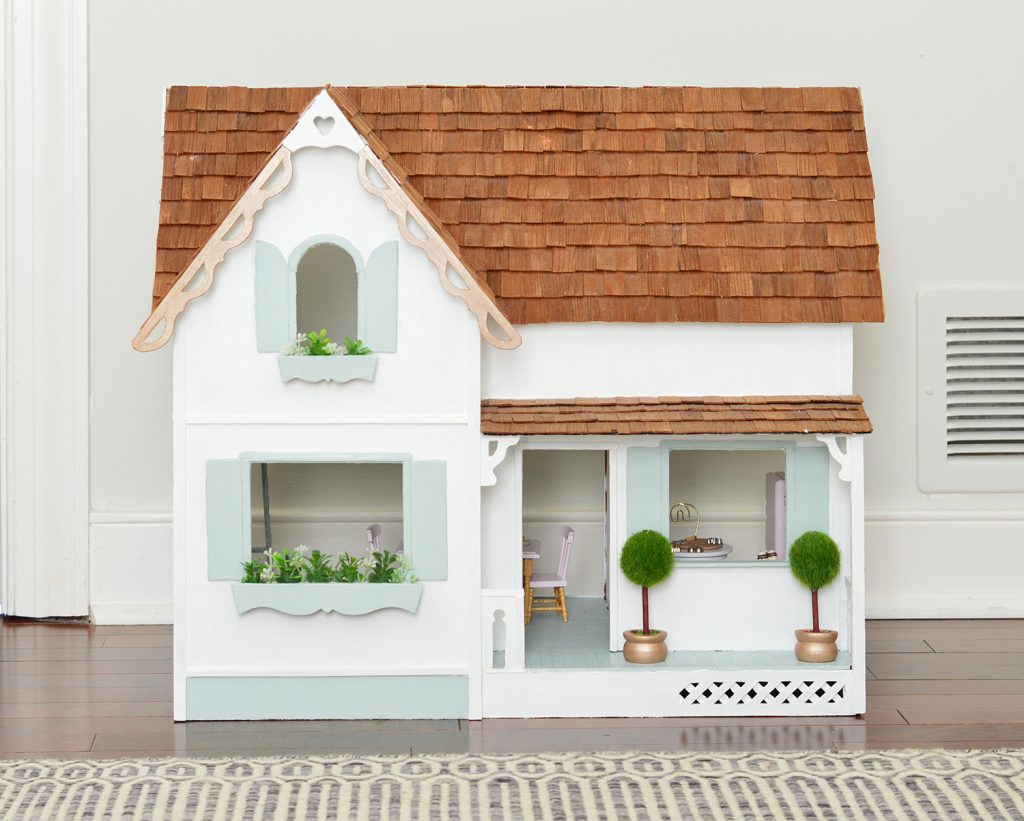
Earlier this month we showed you the front porch makeover of the duplex, and today we’re taking you around back to show you how the backside has been transformed (hindquarters? rear? rump? let’s just stick with backside). And yes, you can finally see my beloved diamond doors in all of their glory! Along with the little metal awnings we added, our new back steps, and even those outdoor showers (covered by an extra long metal awning for privacy). Ok and also cute-factor because apparently I’m just really into awnings.  There’s actually a lot of work being done to the back yard at the moment (sheds, patios, and fences are in progress as you read this!!!!) but I’m so glad we snagged these photos before it turned into a chaotic work zone again. Otherwise you’d be seeing sawhorses and wheelbarrows everywhere in these photos. Once the backyard landscaping/hardscaping makeover is done we’ll obviously share a big post full of photos – but for today let’s focus on the back of house itself and how far we’ve come. Because baby, it’s almost unrecognizable.  Yes, that picture above was what the back of the duplex looked like when we bought it: rotten siding, rickety railings, cinderblock steps, strange old vents and wires, inoperable HVAC systems where our outdoor showers now reside. And lower-level bump-outs on each side where the old kitchens used to be (one actually had a toilet just sitting right next to the back door without any walls closing it in… about two steps from the kitchen sink). Besides fixing all of that stuff – one of the biggest changes has been extending those bumped-out areas up to the second story. As you may remember from our floor planning posts, we got approval from the historic review board to add those small second-level additions so each side’s rear bedroom could have an en suite bathroom attached to it (that’s why the window up there isn’t full size). 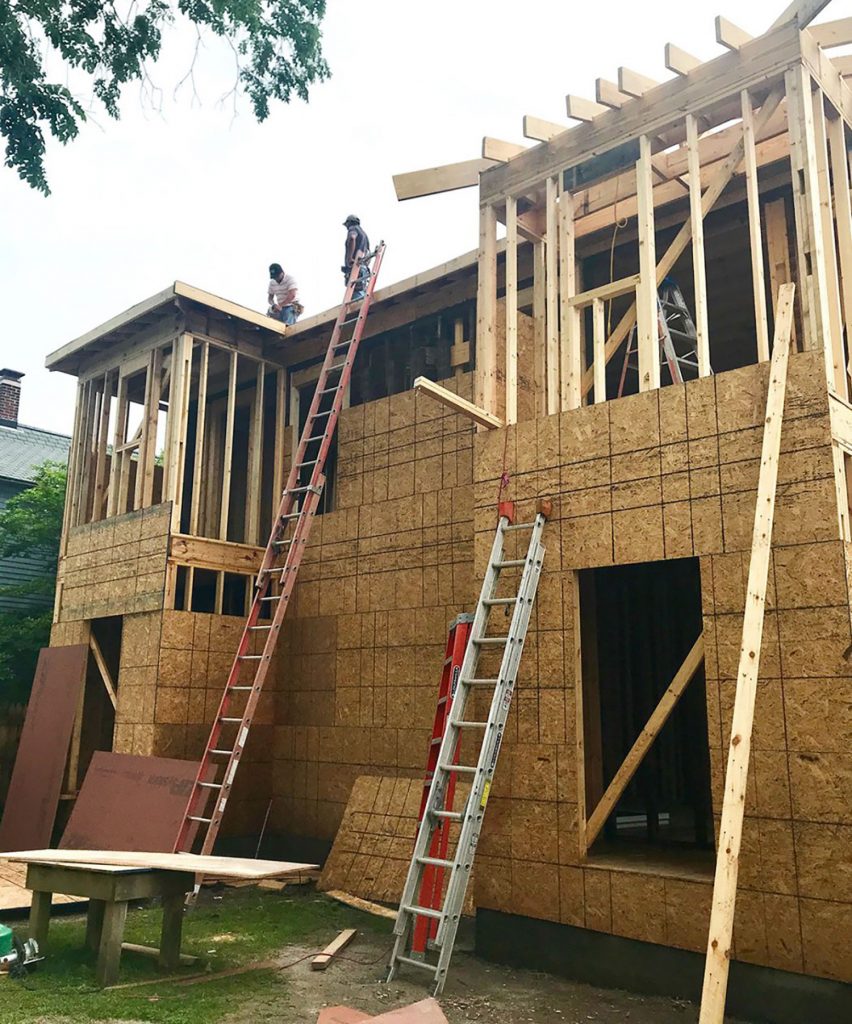 Between those two new master baths and the two powder rooms we added under each staircase, we took each side from having just 1 full bath to 2 1/2 baths each. Well, I guess the left side previous had 1 full bath and 1 random kitchen toilet. Does that count as a bath and a quarter…? Predictably, all of my favorite features are the ones that add extra architecture and character – like the corbels along the roofline (which also wrap around the front of the house), and my precious diamond doors (remember how I hunted them down secondhand because the diamond windows in the front of the house just made them feel like the perfect touch for the backyard?). 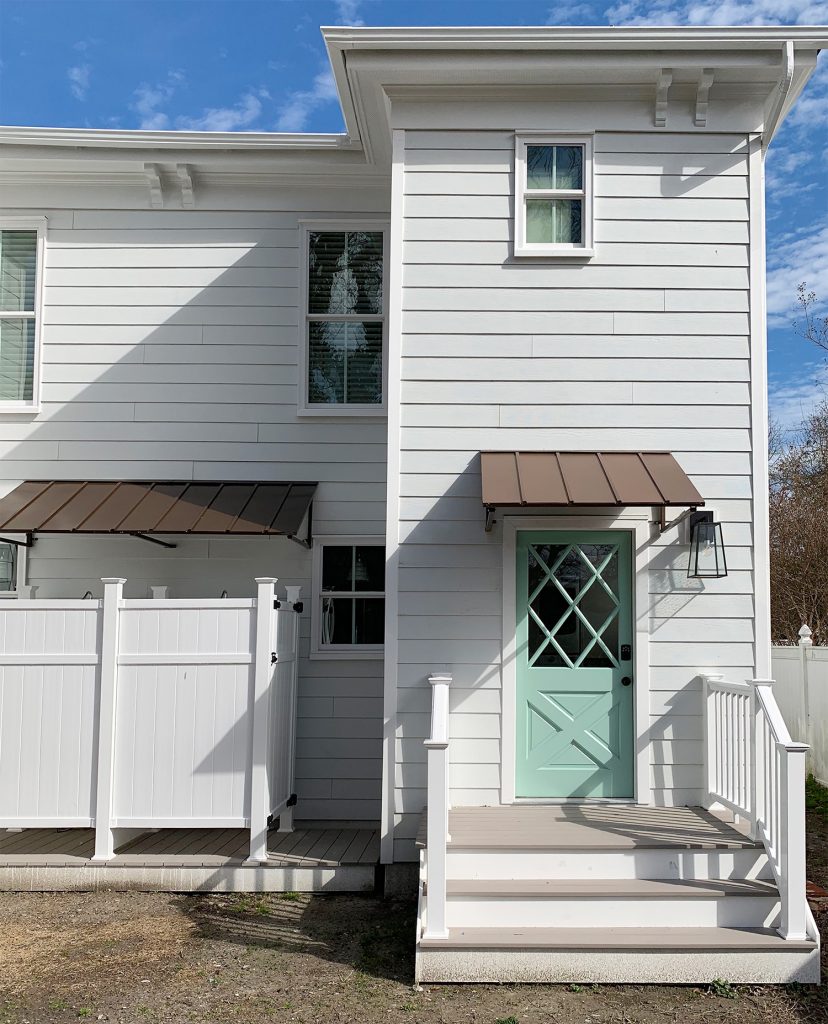 You may recall that we had to keep the original doors on the front, but the back was up to us – and the diamond doors are 100X more fun than the 90’s metal doors someone added at some point. So not only have we carried the diamond pattern from the front windows around back, we also painted the back doors the same mint color as the front shutters (Sherwin William’s Pale Patina).  We also used the same lanterns out back to keep things feeling consistent. And we spent a little more money upfront to have the back porches, stairs, railings, and showers constructed in no-rot materials like vinyl and Azek. After it took several days last summer to stain our wood side stairs and back stairs at the pink house, we regretted adding that sort of maintenance to our to-do lists (over time the stain + time spent on upkeep will surpass the one-time upcharge to have them made from no-rot materials).  So keeping things lower maintenance and more failsafe at the duplex was an easy choice. (*Cut to me loudly wailing “If I Could Turn Back Tahhhhhhm For The Beach House Stepsâ€*). Oh well, at least the front steps on each house are brick. The awnings are actually just stock metal awnings that we bought online (we went with the bronze color). We originally just bought the two smaller awnings over the doors, but later added the larger one that runs over the showers when we realized you could partially see into the showers from the windows above them. Uh yeah, CREEPY. Fortunately, it turned into a nice accent to carry across the whole back of the house, and the showers + the awning in the middle make that space feel less dented in and more dimensional, so I’m calling it a win.  Since the duplex is two separate vacation rental units, we’re adding a dividing fence that’ll divide the two yards (it will basically follow that central line where the outdoor showers meet). BUT, since we know there will be instances where the same family or a group of friends rent both sides of the house – we’re putting a big six foot gated area so people can throw open the gate if they want to merge the two backyards (or keep them closed for full privacy if they don’t know each other).  The funny thing is that the original duplex backyard was divided by a fence like that, but it didn’t have the flexibility of a large 6′ gate to open if you wanted to share the space, so that should be a nice addition, along with the two paver patios and sheds that we’re adding.  Looking at that old before picture above makes me RIDICULOUSLY excited for the rest of the work back here to be completed and for things to start greening up again. Look how lush the trees and the grass are! Even though it’s a before picture, it’s amazing how much charm flowering trees and green grass can add. Our entire impending yard makeover (including landscaping, fencing, patios, furniture, sheds, EVERYTHING!!!!!) should be done in the next month or so, and then renters will be able to enjoy it all this summer. And since every time we mention the duplex we get asked when we’ll start booking, our goal is to have it on Airbnb by next month for weekly vacation availability this summer. You’ll definitely know when it’s listed ;) I should also note that I’m pretty jealous that the duplex outdoor shower stalls have been completed long before ours over at the pink house (we’ve had an open-air outdoor shower since last year, but no stall around it for coverage – so it’s currently a zero privacy experience). But hopefully not for long! P.S. To see all of our duplex adventures, from buying it and planning the layout to completely updating the inside, adding floor tile and a kitchen, etc – this entire category has you covered. And here’s one for our beach house adventures. *This post contains affiliate links* The post Before & After Of The Back Of The Duplex appeared first on Young House Love. Via https://www.younghouselove.com/duplex-back-before-and-after/ If you think our podcast has tackled this question already, JUST YOU WAIT! The universe recently tested Sherry’s dollhouse fixation and whether she passed or failed it, well, may depend on who you ask. We also share what item Ikea was mysteriously selling in bulk – but only in America (we laughed out loud at the big reveal) and we hear from some listeners about how space makeovers can affect behavior in a fascinating way. Plus some interesting lessons someone learned when they challenged themselves to dress in only one color. And we talk about the always emotional topic of textured walls. Buckle your seatbelts. You can download this episode from Apple Podcasts, Google Podcasts, Stitcher, TuneIn Radio, and Spotify – or listen to it below! Note: If you’re reading in a feed reader, you may have to click through to the post to see the player. What’s New

 Updates


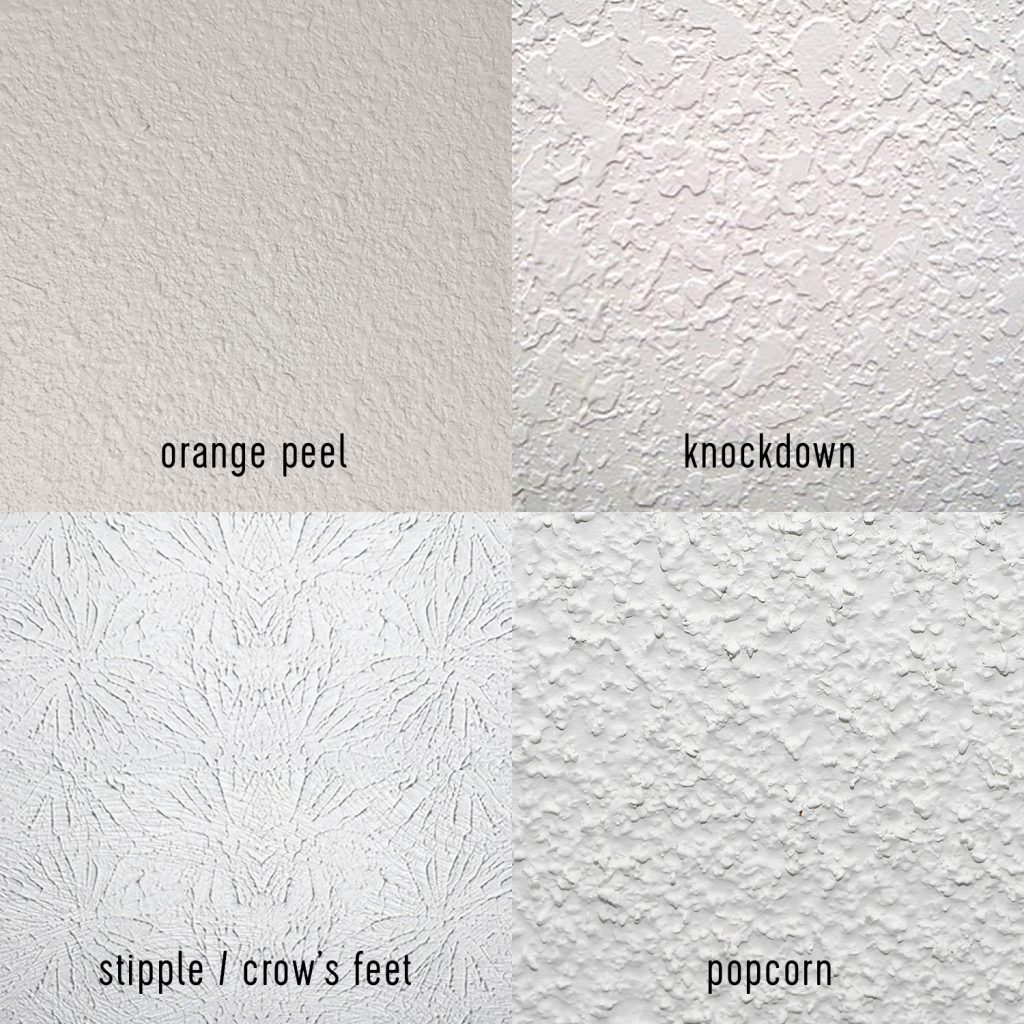
Can We Just Talk About Textured Walls?

We’re Digging

If you’re looking for something we’ve dug in a past episode, but don’t remember which show notes to click into, here’s a master list of everything we’ve been digging from all of our past episodes. You can also see all the books we’ve recommended on our Book Club page. And lastly, a big thank you to Rothy’s for sponsoring this episode. Use code YHL at Rothys.com to get free shipping with no minimum order! 
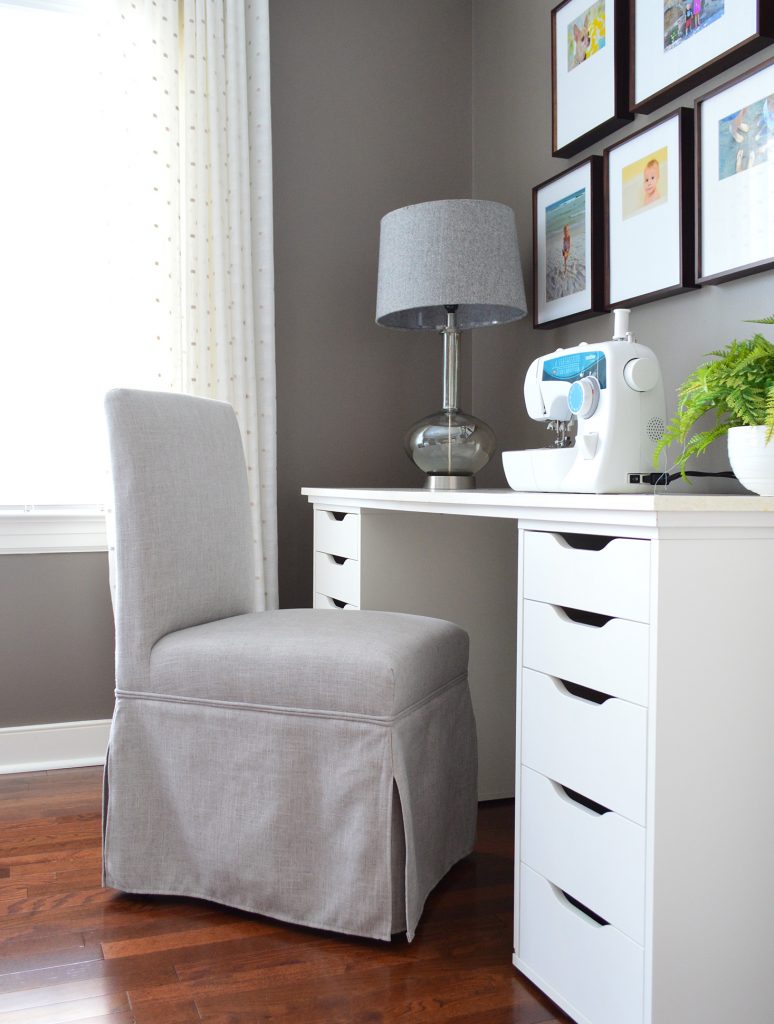
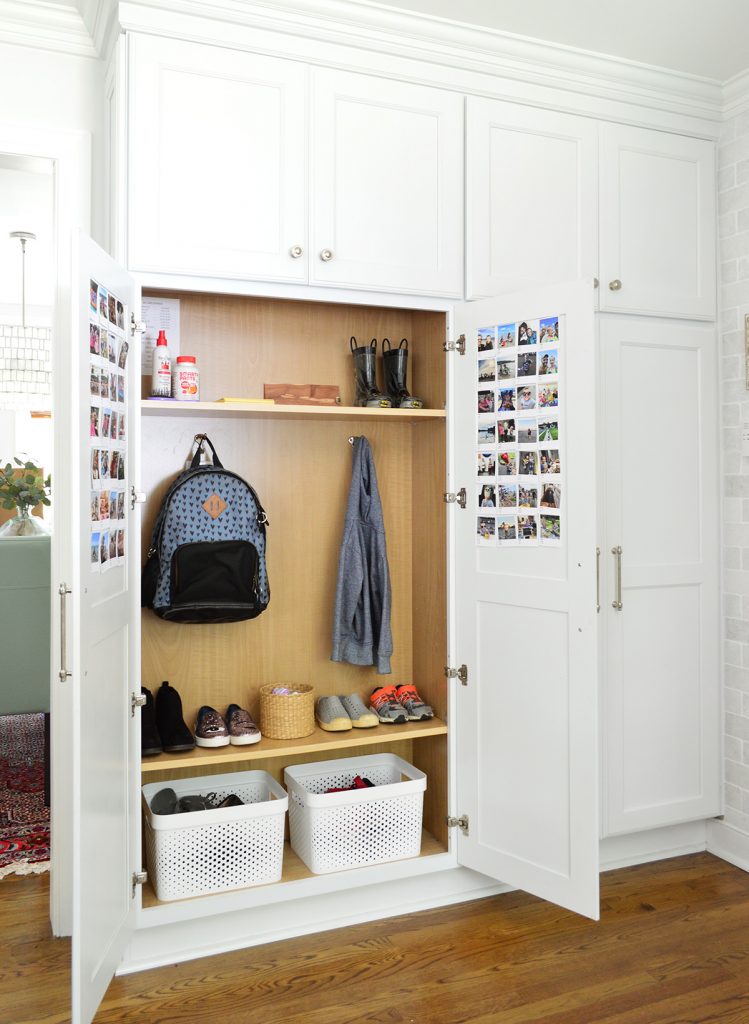
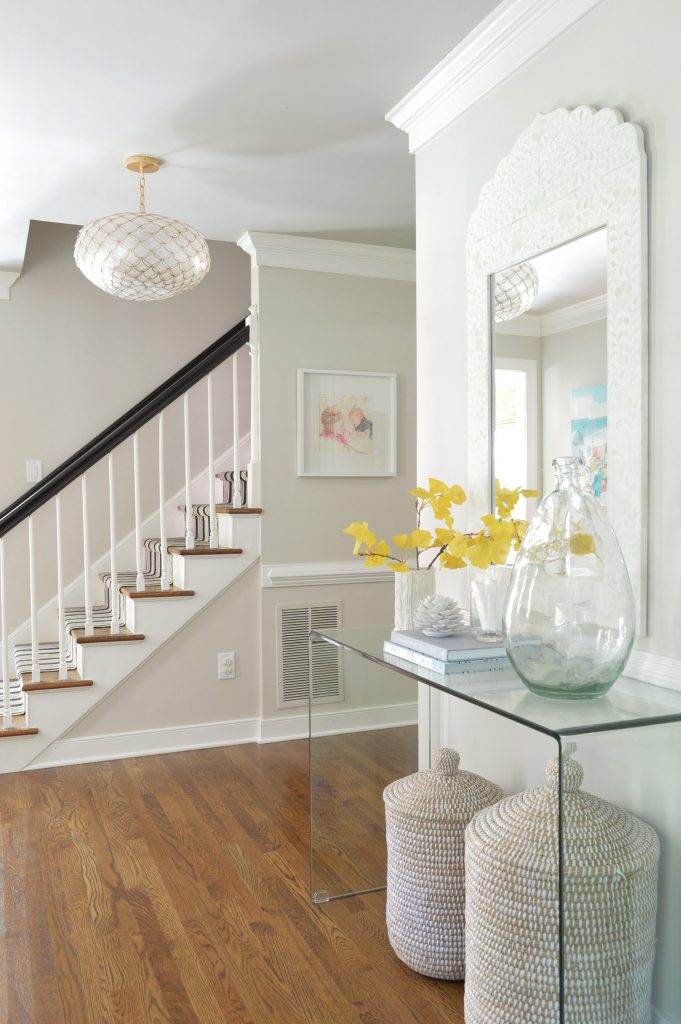
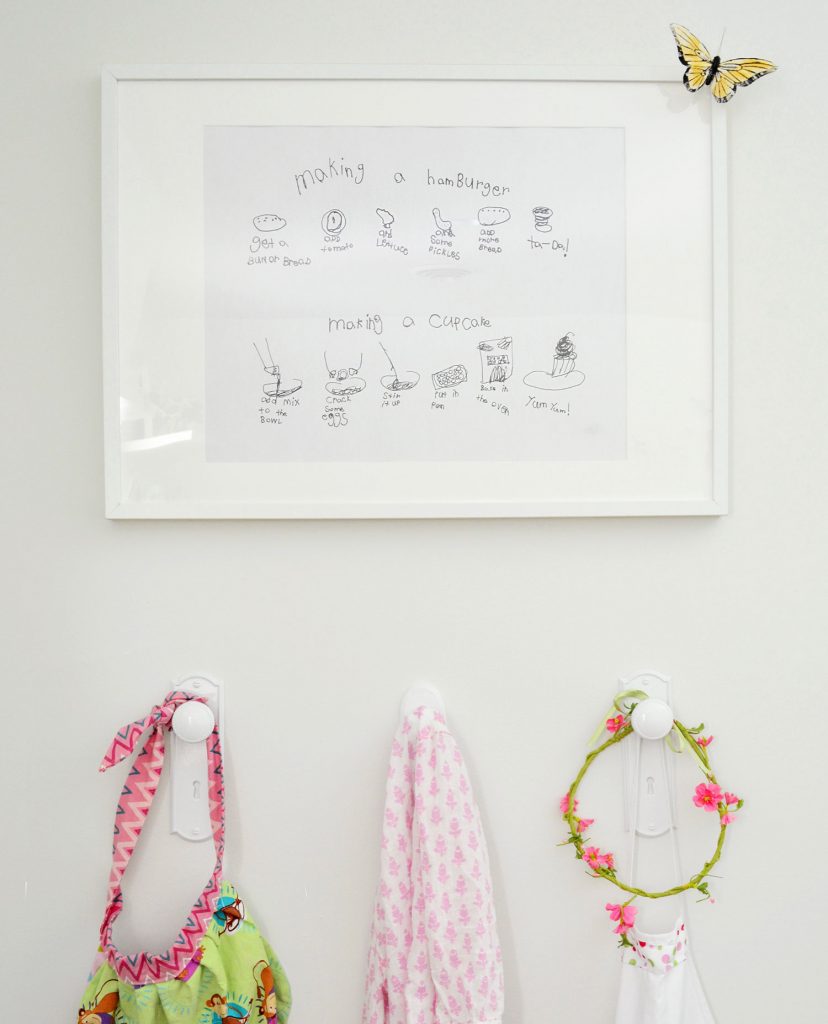
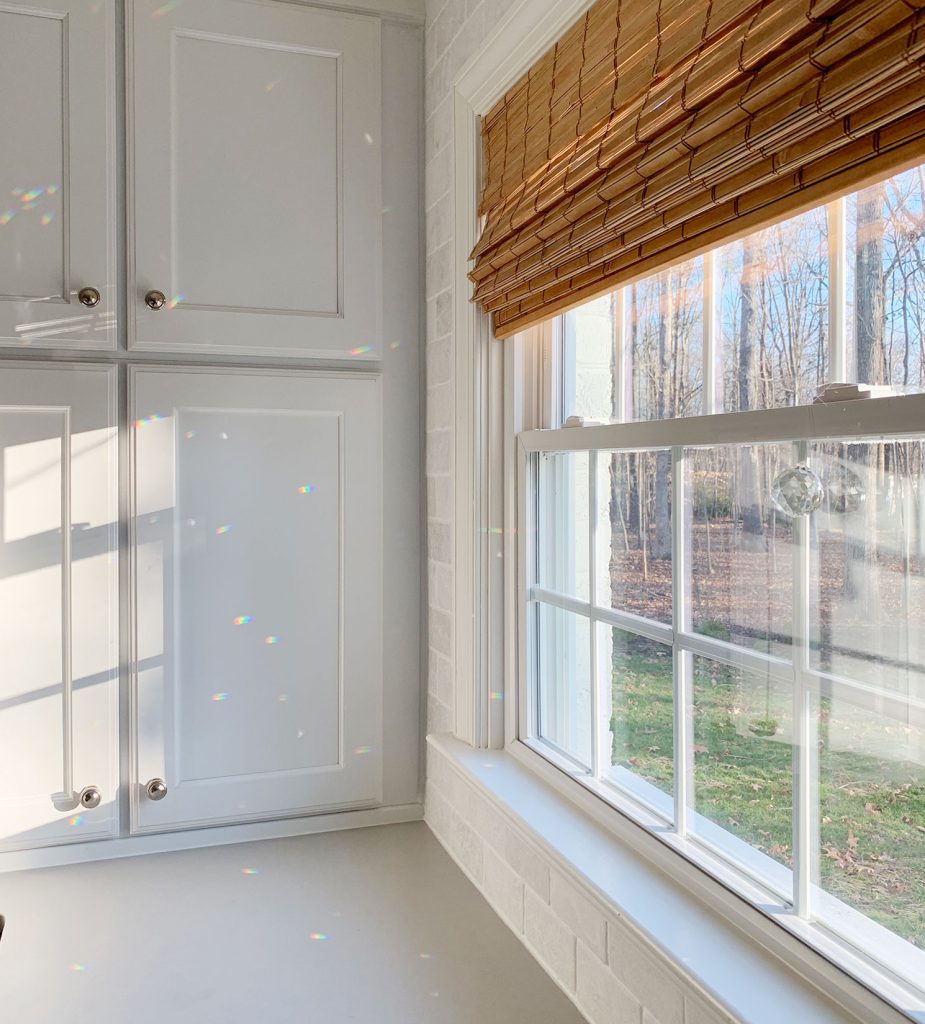
Thanks for listening, guys! *This post contains affiliate links* The post #135: How Many Dollhouses Is Too Many Dollhouses? appeared first on Young House Love. Via https://www.younghouselove.com/podcast-135/ Last fall we shared our trick for hanging affordable Ikea curtains so they look a lot more expensive than their $14 price tag per panel would suggest (across an entire house you can save thousands with that trick & these curtains alone!!). But since we were just replacing our old bedroom curtains when we wrote that post, we skipped the crucial step of actually hanging the curtain rods themselves. And since we just installed approximately one million curtains at the duplex (okay, 16 of them, but that’s a pretty notable amount to hang all at once) we wanted to share a new trick that we used to speed things up, keep everything looking level and equally spaced, and make it much easier and less overwhelming in general. 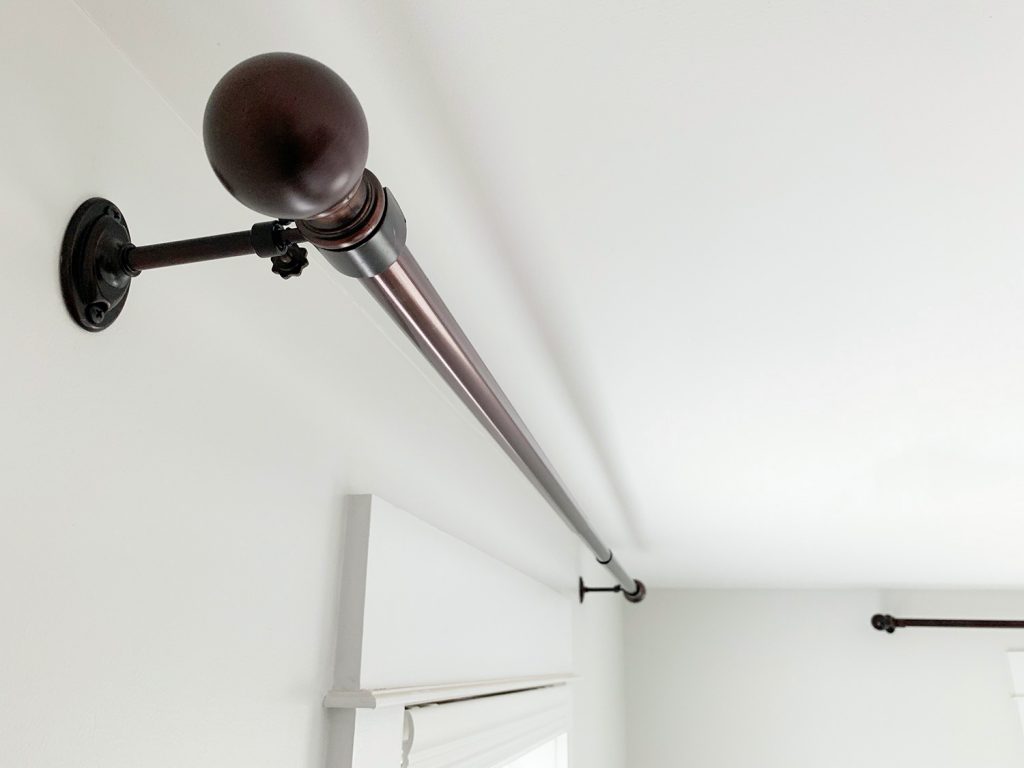 But first, let’s establish some quick curtain basics: How HIGH Should You Hang Curtain Rods?Like anything in decorating, there’s not a hard and fast rule for this, but most people agree that curtains look best when they’re hung (say it with me!) HIGH AND WIDE. As in, higher and wider than the window itself. This not only creates the illusion of a bigger, grander window, but it also makes your room feel taller and draws the eye up. This is a 9′ room below, and you can see how nice it is for the window trim to get to breathe a little, and the eye goes from floor to almost-ceiling thanks to those long white curtains and that highly hung rod. 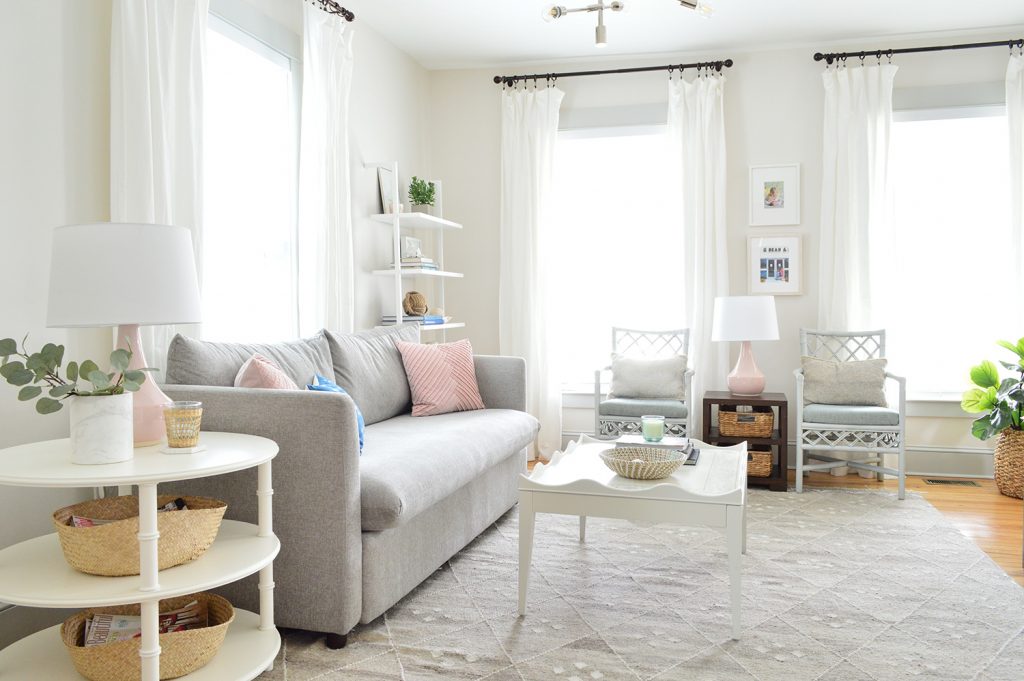 Speaking of the floor, most experts say that your curtains should usually touch or nearly touch the floor itself. This is all personal preference (some like them to hover slightly above the ground, others love a dramatic pool of fabric at the bottom) but we typically like them to graze the floor ever so slightly – like below in our showhouse’s dining room. We find this helps keep them in place better (when they don’t quite touch they tend to just hang randomly, but when they graze the ground they ground themselves and stay put if that makes sense).  Having them just touch and not be extra long and pooled makes them easier to move for vacuuming and ours don’t get all dragged around and gross on the bottom since they’re not excessively long (bonus: remember these curtains are 100% washable! In fact one of the first steps of getting them is to wash them to preshrink them so whenever you wash them again later, they don’t shrink on ya and the rod is still in the right place – more on that here). 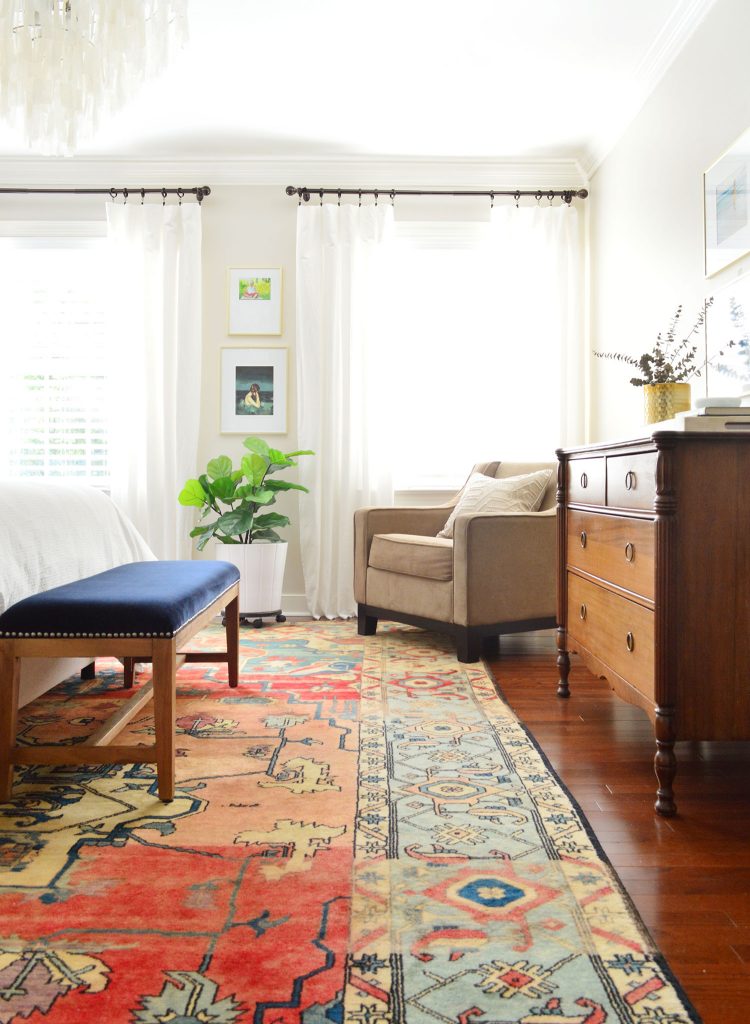 But back to the rod. The precise placement of yours depends on a few factors (ceiling height, curtain length, trim & molding style, etc) so I can’t give you a hard and fast measurement for where your rod should always go… but generally, we like to hang ours about 3-4″ below the ceiling or, if there’s crown molding, 3-4″ below the bottom edge of the crown. 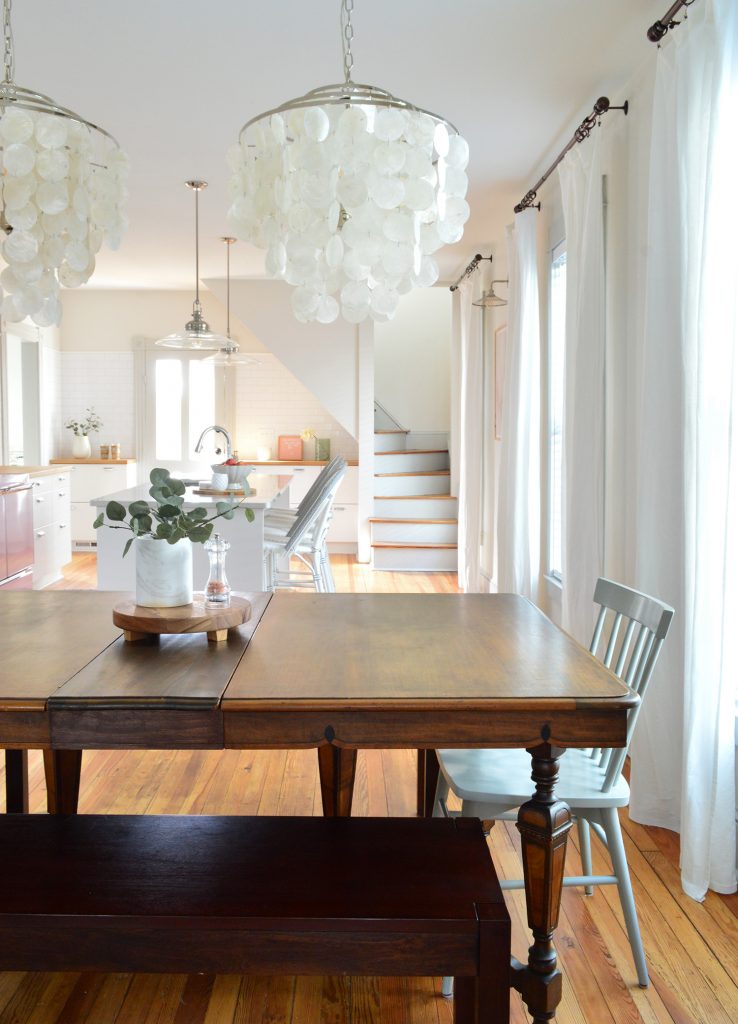 This allows the curtain rod to “reside†fully (including finials) within the painted area between the window and the ceiling, which always looks SO NICE. But the important thing to note is that we’re hanging them in relation to the ceiling, not the window. It’s the assumption that your curtains need to relate to the window that causes a lot of people to hang their curtains too low. Heck we have seen rods drilled right into the window trim itself, which is just another way to make things feel really squat and cramped. Remember, trim looks so nice when it’s allowed to breathe without any rods looming over it or being drilled right into it. That being said – sometimes the window trim is really close to the crown, and in that case we like going into the wall above the trim if possible – since the crown or the trim might look tortured with a rod sticking out. This is another picture from the showhouse we designed a few years back to demonstrate what we mean: 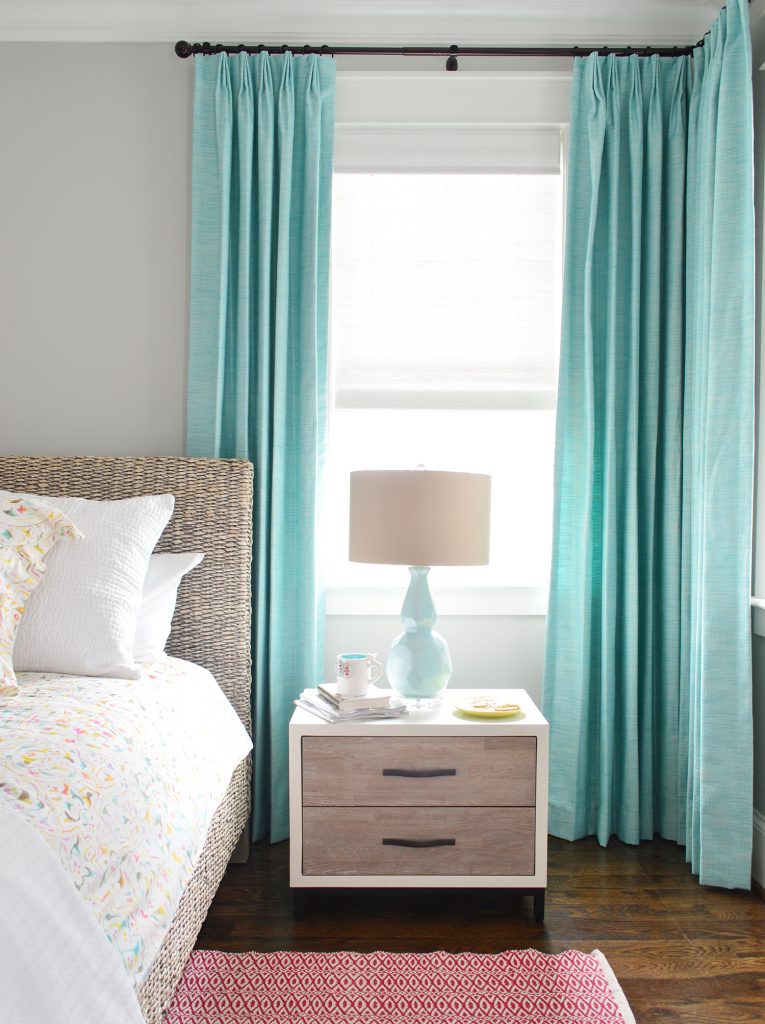 Your best bet is to have someone hold half of the rod up with one curtain panel attached (after you’ve washed, ironed, and done whatever else might change the height of your panel – except for hemming, that should happen once they’re hung so you can get the perfect length). If you step back and view it while someone holds it up for you, you’ll be able to decide what looks best to your eye – and using that 3-4″ below the ceiling or crown molding guideline can help. Of course there are super tall cathedral ceilings, or rooms where the ceiling height slopes, etc – so this guideline probably works best when the ceilings are 10′ or lower without much of a slope. All super tall rooms or spaces with sloped ceilings are special cases – but again, looking with your eyeballs as someone holds half a rod with a panel on it can really help you visualize what looks best.  How WIDE Should You Hang Them?This is another thing that’s influenced by a variety of factors, like the size of the window itself, what else is on the wall (especially if there are OTHER windows nearby), and how tight or loose you want your panels to look. Generally we like to place the rod hooks about 8-11″ from the outer edge of the window trim. 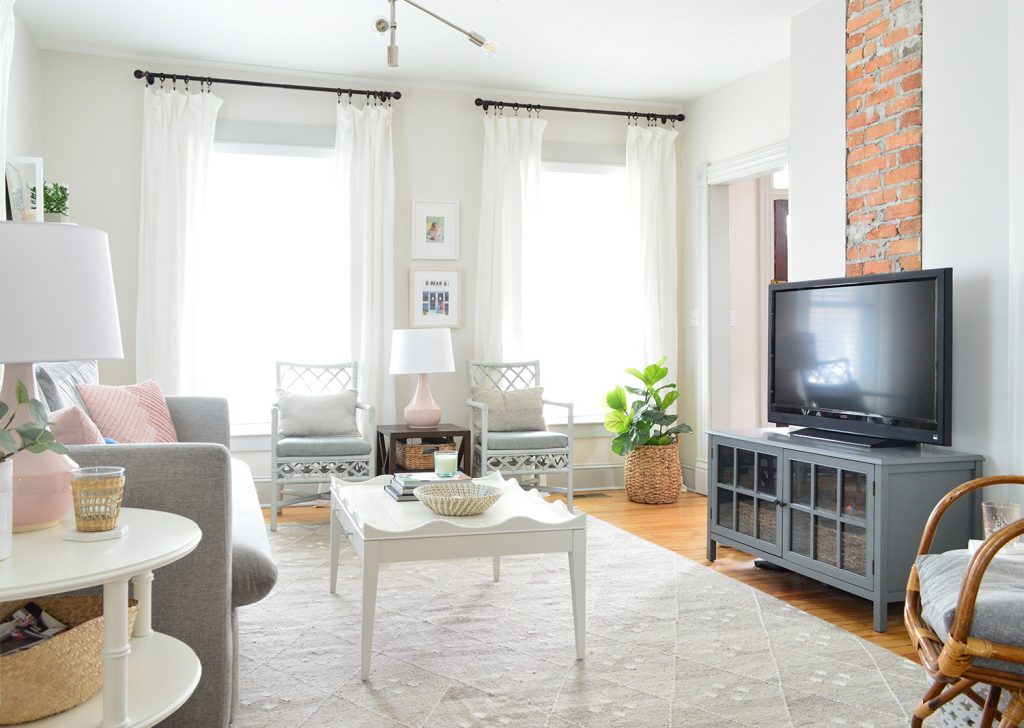 This gives us the loose, breezy curtains we like, while still allowing us to barely cover the window molding, which is what creates the illusion that the windows are wider than they really are. In other words: THE CURTAIN PANELS ARE HANGING IN FRONT OF THE WALL NEXT TO THE WINDOW – NOT IN FRONT OF THE WINDOW (which makes it look smaller and blocks light). Sorry for shouting, but it makes such an insane difference when people stop hanging their curtain panels right in front of their windows. We might hang the rods less wide if there are windows that are closer together than usual (like in our bedroom below – where they’re just a few feet apart, plus that one window on the right is very close to the right wall). We don’t want them looking cramped so in the instance below we didn’t go as wide with the rods – but we definitely made it so that as much of the curtain panels as possible could hang in front of the walls around the windows as opposed to blocking the windows themselves. 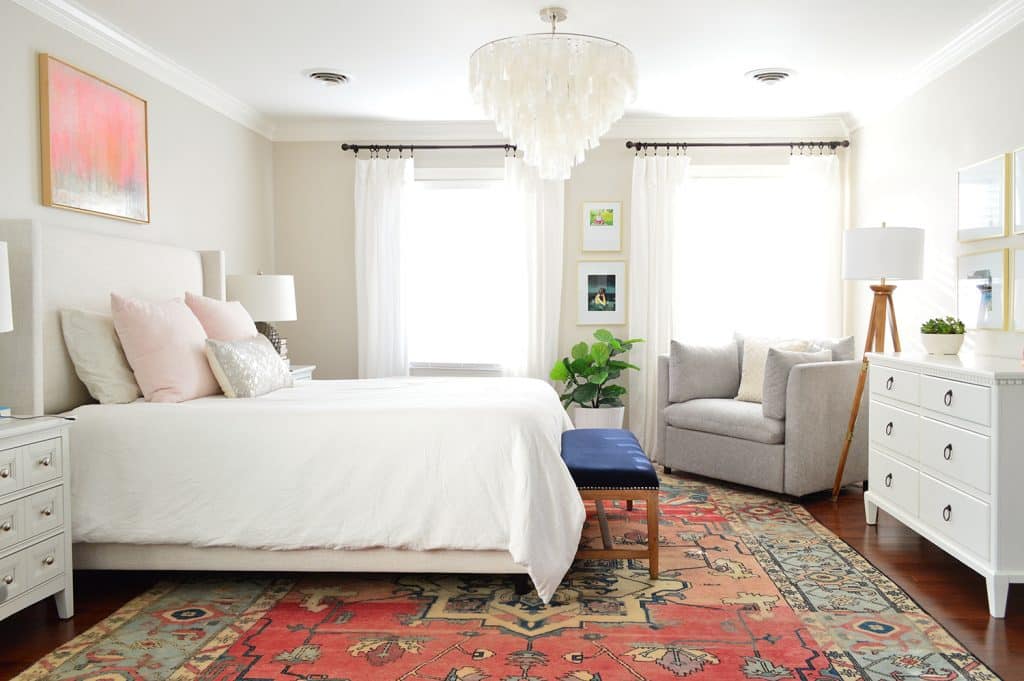 Conversely, we might hang them even wider than 8-11″ beyond the outer edge of the window trim if we’re trying to fill a large wall space. We might even hang the rod wider on one side than the other if we’re trying to make a window look less off-center (more on that here – it can make all the difference!). So it really is flexible. Ok, But Now For Our Curtain Rod Trick That’ll Save You Time (On Video)The reason for all that mumbo jumbo is because knowing the width (your desired distance from the window trim) and height (your desired distance from the ceiling) is what makes this easy trick possible. John demonstrates it all in this video below (also watch for my super cool footwear cameo). There are more photos after the video for those who can’t watch right now, but I’d strongly recommend coming back to view it when you can – things are so much easier to “get†when you see them in action on video – and this skill is handy to have forevermore. NOTE: If you’re viewing this in a feed reader, you may need to click through to see the video. You can also watch it here on YouTube. Step 1: Determine Your MeasurementsJohn and I determined that for the duplex we wanted to place our curtain rods 10.5″ from the outside of the window trim (weirdly specific, I know) and 3″ down from the ceiling. I should note that these are our measurements to the screws (the top screw, to be exact) since we find it easiest to work with the measurements of where you’ll actually need to drill. Watch as John models exactly what I mean below: 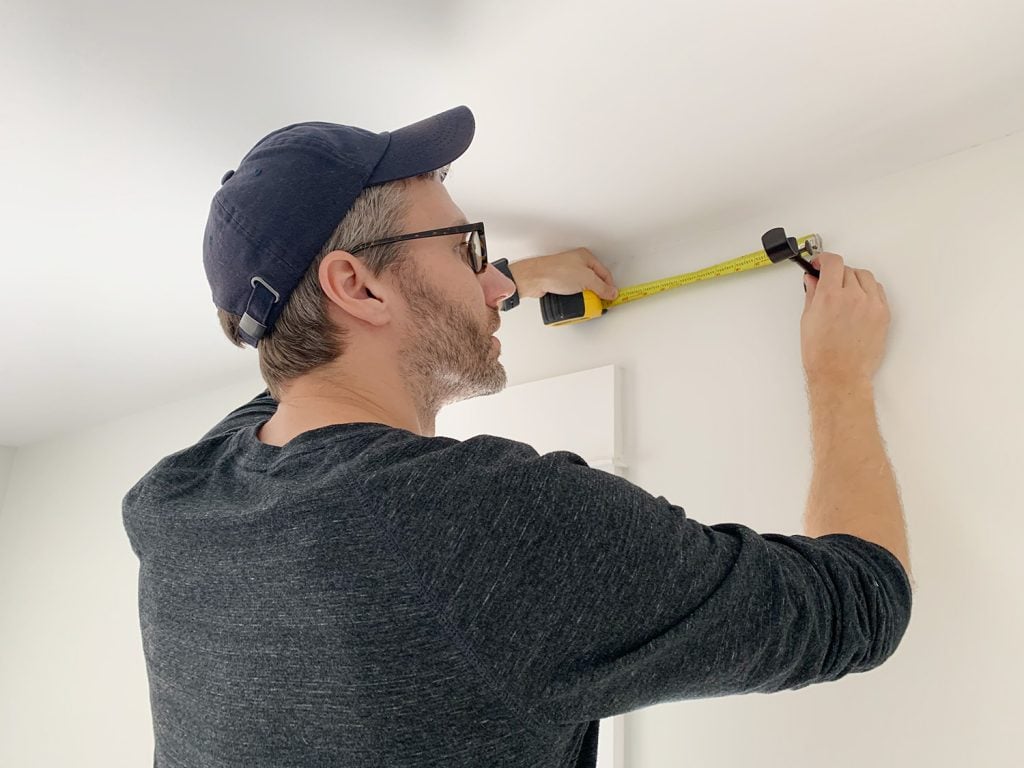 Step 2: Make Your TemplateWe used a scrap piece of cardboard to make our template – marking 10.5″ from each side and 3″ down from the top. This was actually the cardboard that came in the curtain package, so you might have something like it on hand already! Once we marked our lines (you’ll see them labeled below), we lined up the curtain rod hook and marked the two screw holes on BOTH 10.5″ marks. 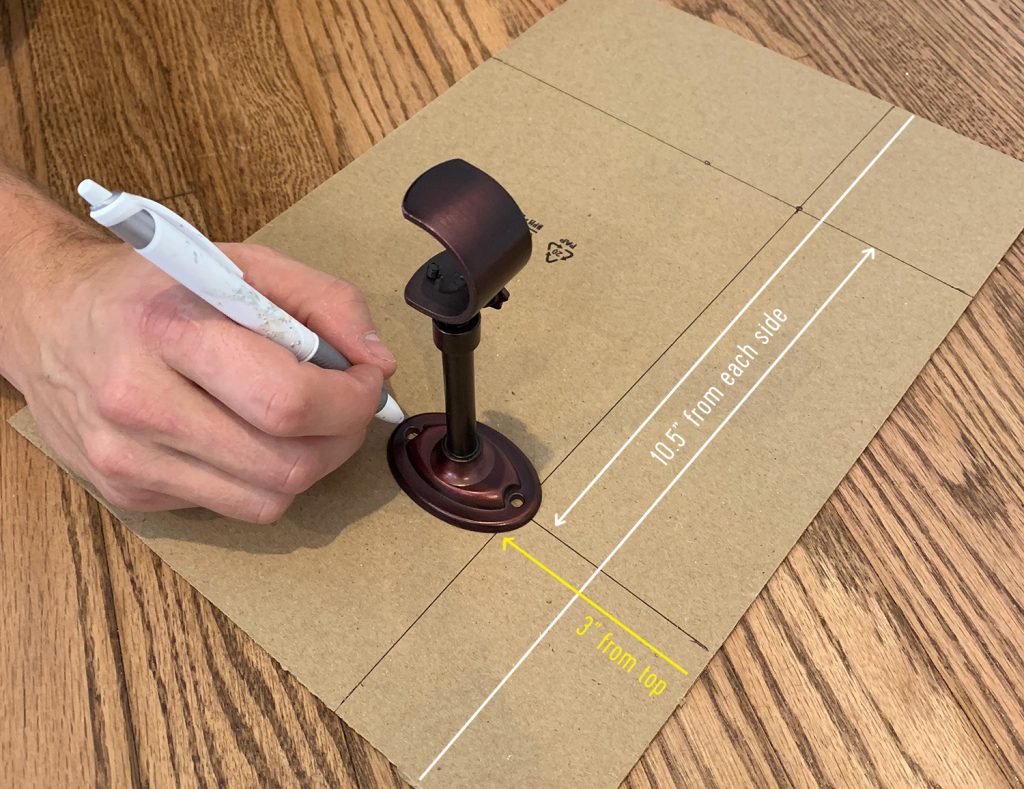 3. Drill Pilot HolesYou can pre-poke holes along these two marks, or you can just do it when you mark your first window. Load up your power drill with a small pilot hole bit (we used a 3/32″ one) and hold your template above your window with the edge lined up with the outside edge of the window trim and the top held flush to the ceiling. Then you can just drill small pilot holes through your two template marks.  Now, a note about keeping things level: CEILINGS AREN’T ALWAYS LEVEL (I’m looking at you, duplex) so using the ceiling as your guide might seem ill-advised. What if your ceiling is sloped and your curtains end up being sloped too?! Well…. we have actually found that when you’re hanging the rod close to your ceiling, you actually want the rod to follow any slope in the ceiling exactly! It will be your eyes’ closest reference point for a straight line, so it will appear level even if it isn’t!! Meanwhile if you hang the curtain rod level but the ceiling slopes, the rod will actually look wrong! Or emphasize that the ceiling is wrong! So yeah, using the ceiling as your guide actually works well for wonky ceilings (again, the duplex has plenty of those – as does the pink house!). 4. Drill Larger Holes & Add AnchorsNext you’ll want to make your pilot holes on the other side the window using the other half of your template (this is why you marked 10.5″ from BOTH sides of the cardboard) – so you can use it as a template on both sides of each window. Assuming you don’t hit any studs, you’ll need to add anchors after making those pilot holes, so swap out your drill bit for the correct size that works with your anchors (the provided anchors for our rods needed a 3/16″ drill bit) and drill into each premade pilot hole to make larger holes that fit your anchors. Bonus – the template acts as a great way to catch drywall dust. John was very excited when he discovered this. Just look at the joy on his face.  With all of your anchor-ready holes drilled, gently tap in your anchors in with a hammer or mallet. As I passionately interject in the video, your anchor holes shouldn’t be too loose or the entire curtain rod will be rickety and won’t hold up. And you shouldn’t be able to push your anchors into the wall by hand or the holes are way too loose (which can cause your rod to sag or fall out of the wall). So using the correct drill bit size for your anchors is important. It should be indicated in your curtain rod’s instructions or on the box that your anchors came in. 5. Screw Your Hooks To The WallThe rest is pretty straightforward – hammer in your anchors and secure your curtain rod hooks to the wall using the provided screws. I insisted on filming John as he demonstrated this part too, so if you want to see it in action you can catch it in the video above. Truly I think watching these things get done in real-time is worth a thousand blog pics & words – so check out the video whenever you have a second. 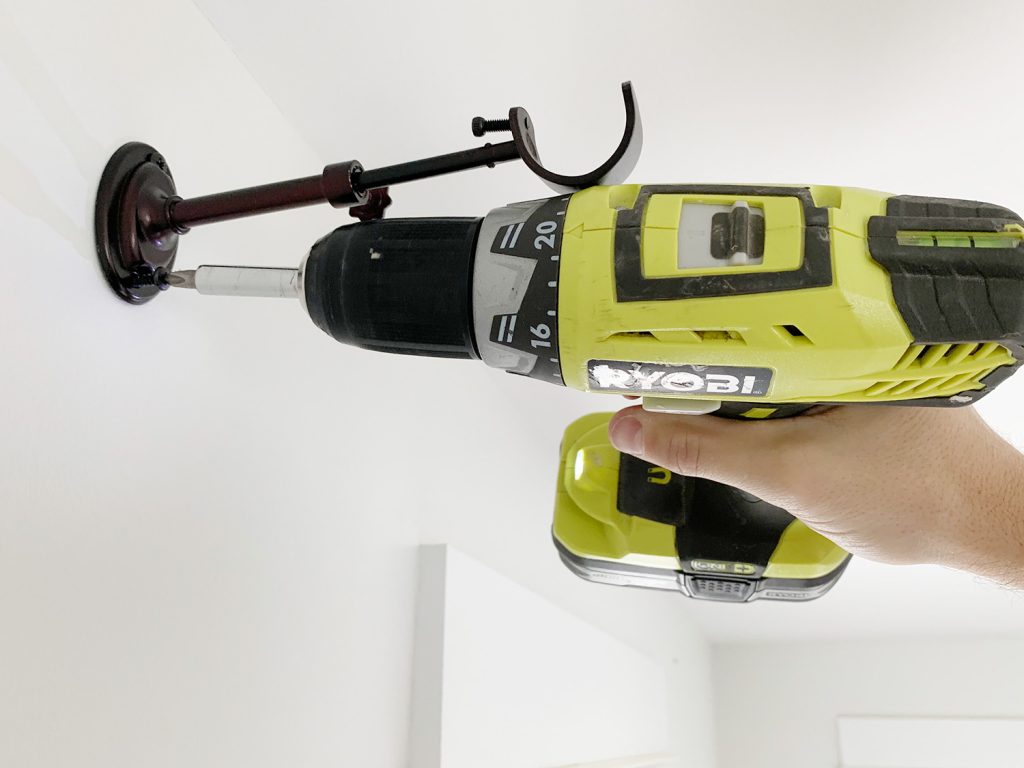 Bonus Tip: Correct Any Rod SaggingI’m gonna throw in another little hack here. Depending on your rod and how wide it is, you may notice that it appears to sag a little bit in the middle – especially where the smaller rod piece connects into the larger ones. Even if it’s super secure to the wall, it’s just that the skinnier middle rod looks like it’s sloping down to your eye – and I’m Type A to notice this and hate it. Your package may come with a third hook to hang in the center of your window if you reach a certain span with the rod, but often ours aren’t super wide so another support bracket would be overkill – so we rely on this weird little hack instead. Emphasis on WEIRD. 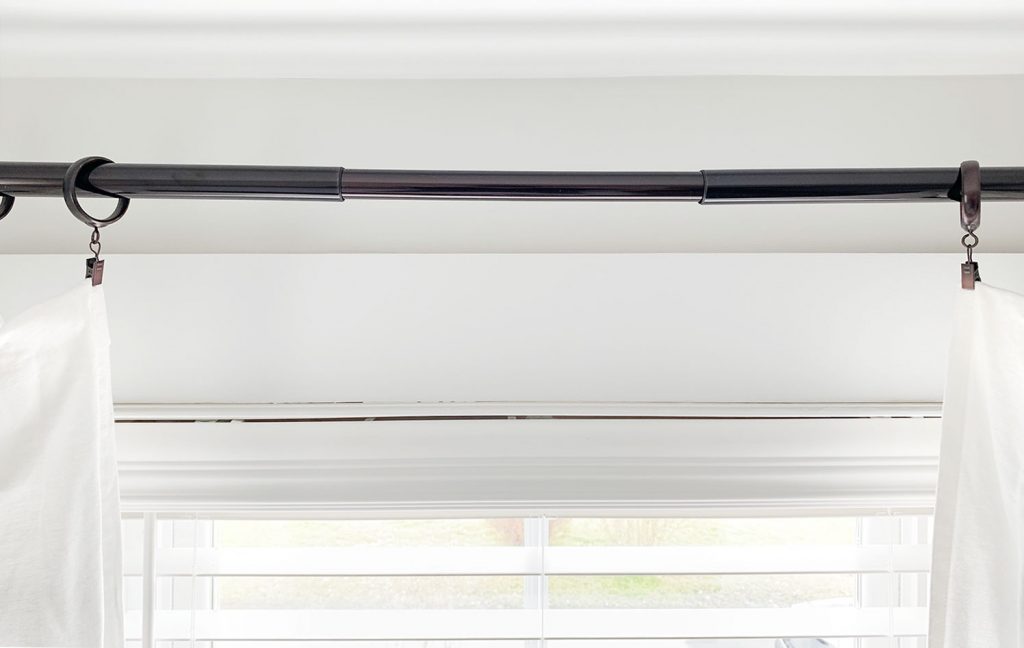 First, I take some of the protective plastic end caps that come on the curtain rods (they’re just packaging) and use a utility knife or scissors to cut off some small slices. 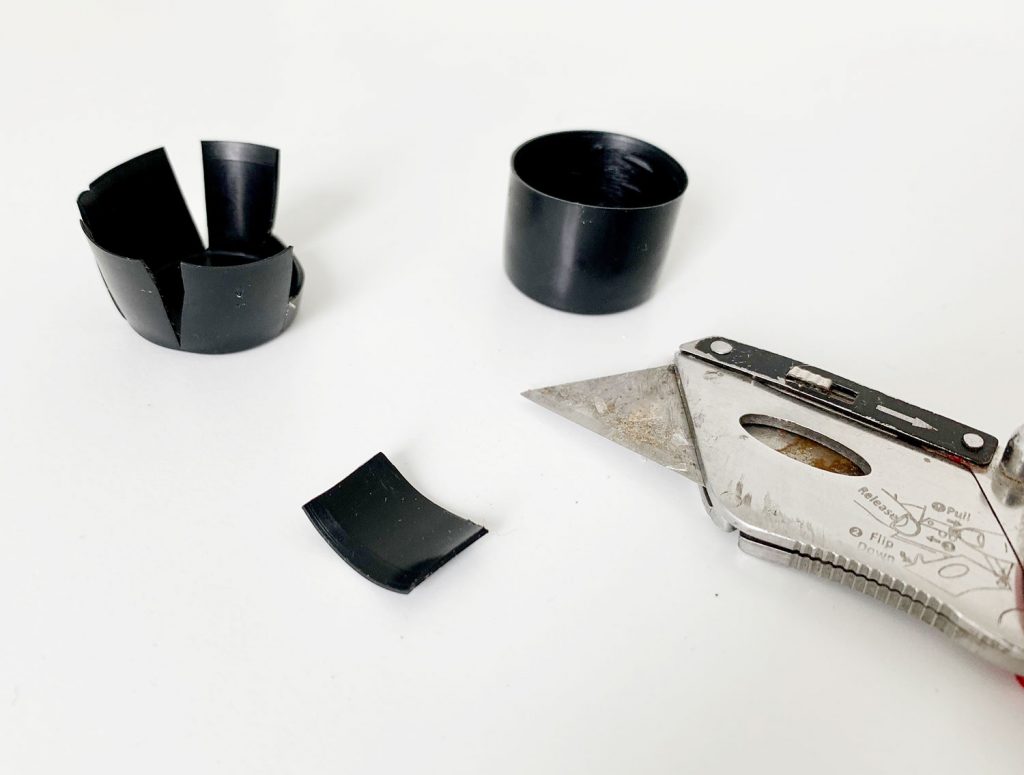 Then we tuck a piece inside the curtain rod at whatever connection point is sagging. It’s important that you put it on the TOP side of the rod and if you can’t slide it all the way in, just rotate your rod slightly so it’s hidden from view because no one is viewing your rod from the top. I know it’s REALLY weird, but it has been an easy way for us to correct a little bit of rod sag which makes my heart very happy. Just trust me – there is a noticeable difference and it no longer looks like it’s sad and droopy. Plus it’s free and I’m scrappy. So yeah. Five stars, would recommend. 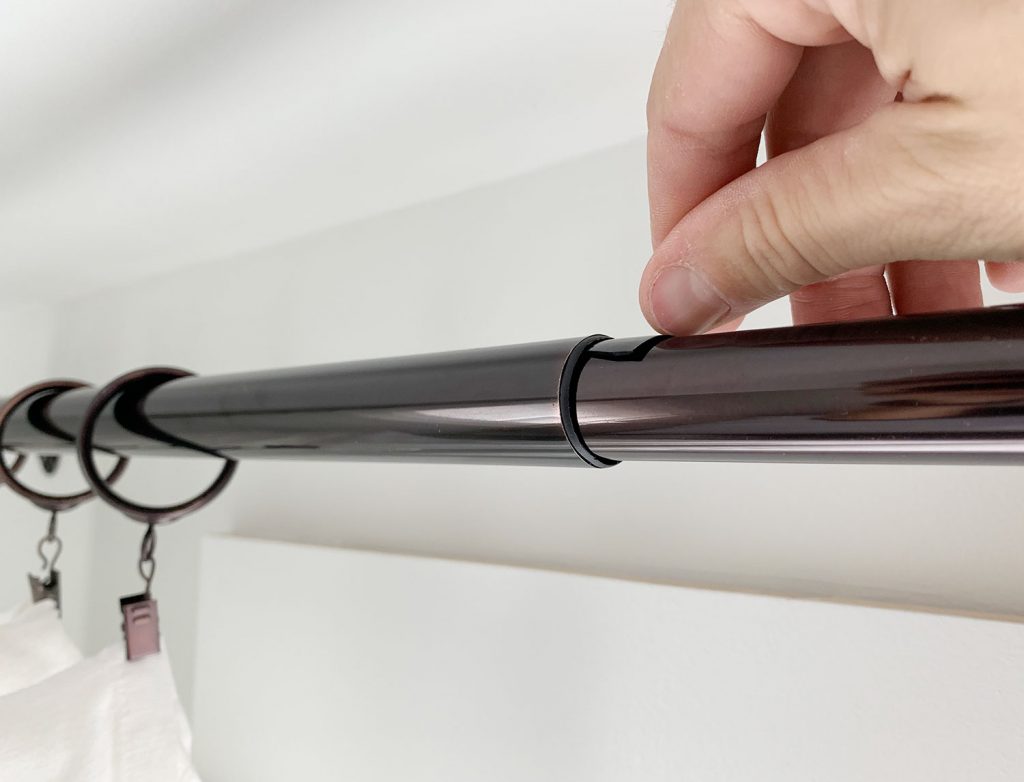 That should pretty much do it for hanging the actual rod itself. And again, you can check out the post from last fall with our tips for actually preparing & hanging these inexpensive white curtains themselves. Between this post and that one you should be able to add curtains that are extra affordable (and washable!) along with tackling a whole bunch of windows at once, which might have felt overwhelming or nerve-wracking before. And you’ll definitely be faster with our little template trick too ;) 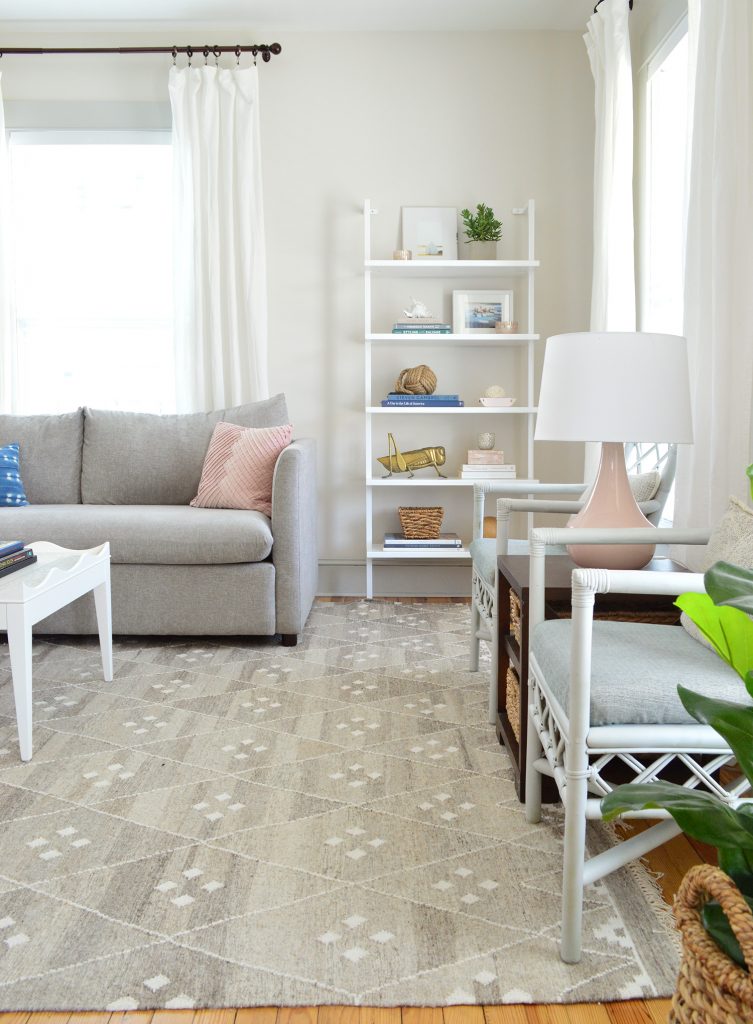 Oh, and the curtain rods we typically use are either these oil-rubbed bronze ones with these ring clips (ordering them online means you don’t have to run from store to store to find enough that all match) and sometimes we grabthese Allen + Roth rods from Lowe’s in person if they have enough (their stock is often spotty). When NOT To Use Curtains“Wait, what if I have baseboard heaters or a built-in bench or something under my window? I get this question a lot so I couldn’t end this post without touching on it. Some spots just aren’t great for a curtain panel. If it can’t hang all the way to the ground, sometimes it can make a room feel awkward to hang a not-quite-full-length curtain panel. There are definitely exceptions where cafe curtains can look really sweet, but we generally just go whole-hog (full curtains from floor to almost-ceiling) or skip curtains entirely in that spot. Take our dining room, for example, which has two heat registers right where curtains would hang, as well as a window that’s super close to the corner – so the panel would cover a lot of the window instead of having a wall to hang in front of: 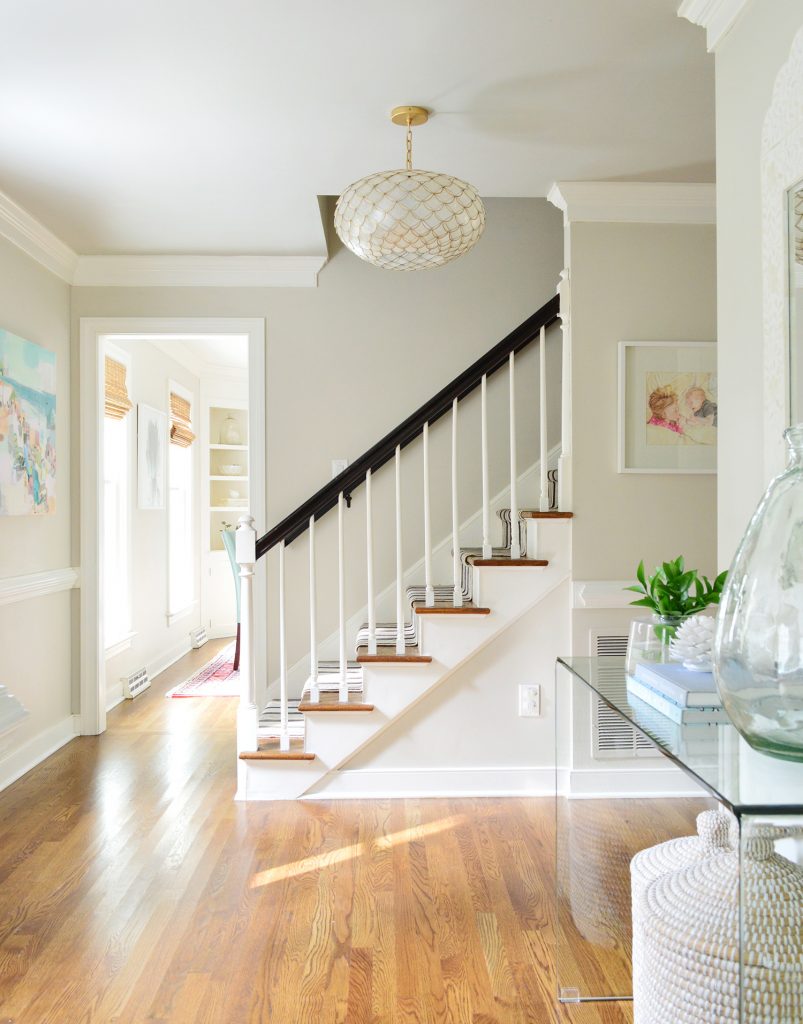 We just skipped curtains in there and went with woven shades. The room still flows nicely with other rooms nearby, since we kept the woven shades consistent throughout the first floor of our house. For example, these are the same shades in the kitchen (you can read more on our curtain reno here): 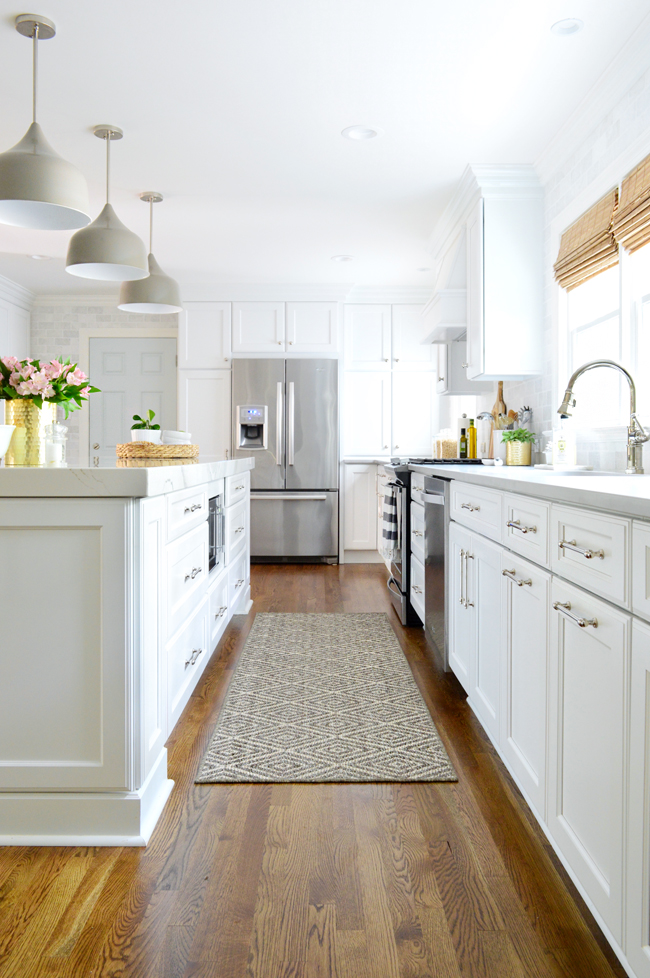 Clearly we couldn’t have long curtains hanging down from those kitchen windows since they’d hit the counter – so we just went with the nice warm texture that shades added. And here’s the living room, which DID have room for nice long curtains (and we love the softness they add), so we did BOTH in here. The woven shades tie into the other spaces that also have them with or without curtains… 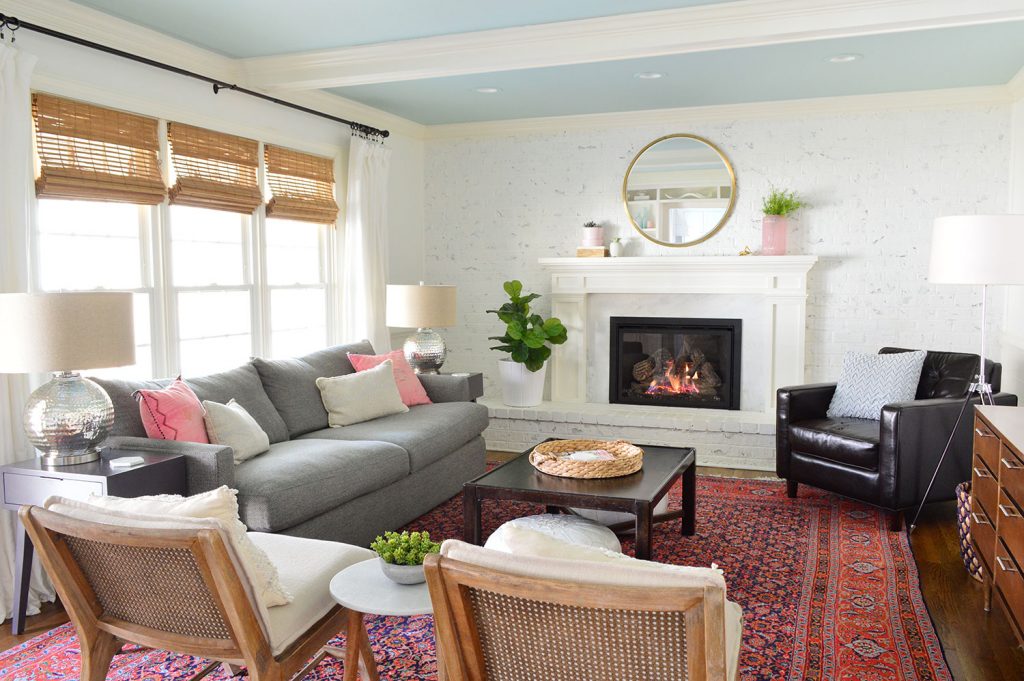 … like our home office, which also has both. 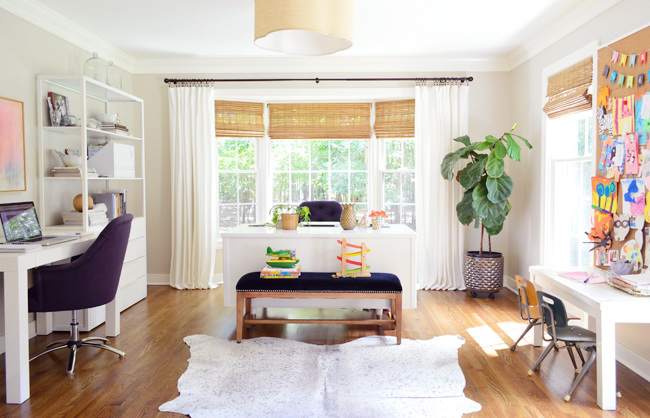 Our home office is actually a nice room to use as an example that you don’t have to treat all windows in the same room the exact same way. See how the windows along that right wall wouldn’t have room for curtain panels and the cork board (they’d basically cover the area where the cork board is, if we hung them wide so they didn’t entirely block the window?). So we just skipped them on that wall. Still looks fine having them around the bay window and not around those front windows, which also have heat registers that the curtains would have blocked on both sides. So it worked out just fine. It’s kinda like the bay window is the star, and the front windows are just supporting actors. 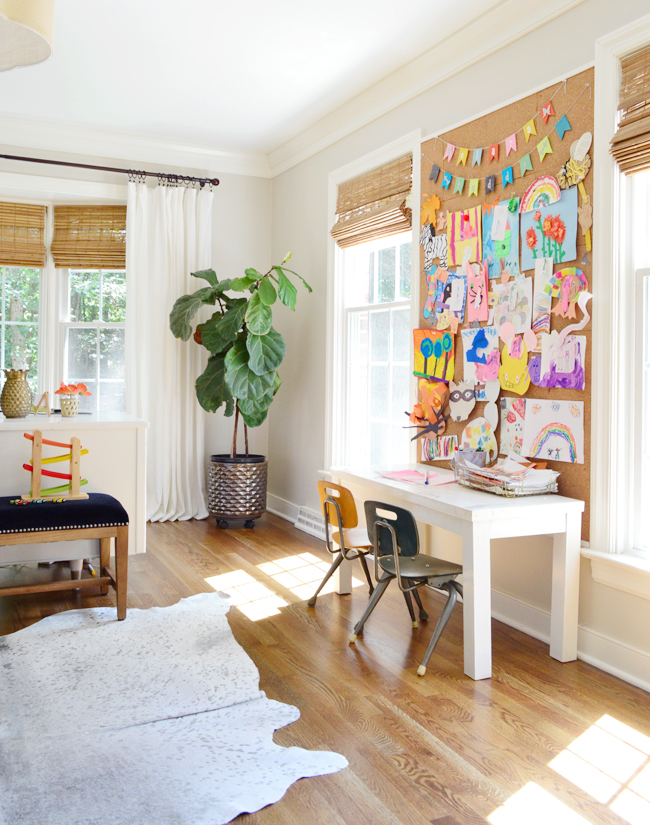 My closing lesson would be: general curtain rod guidelines and a trick to hang them more easily & quickly can be handy, but when it comes to the whole “what would look good in here†question, every single person might have a different challenge, layout, etc – so it’s really smart to have someone hold things up and step back and trust your eye. Try different heights. Stare at a picture of a certain window shade on your phone while standing in that room and looking at the window. Really try to picture things before you commit. Heck, you can even try photoshopping different solutions or printing out a photo of your room and drawing right over it (color blinds or curtains right onto the pic – this is the original photoshop – ha!). And don’t forget to consider woven blinds or even a pretty patterned roman shade (like this) for certain spots where curtains wouldn’t quite work – and remind yourself that it’s ok to just take your time and figure things out as you go. So many of our rooms have had curtains or blind changes while we figure it out – so don’t beat yourself up about it if it takes a second try. P.S. Wanna know where we got something in our house (or what color’s on the walls)? Click here. And we made the same masterlist of sources & paint colors for the beach house too for ya. And we’re pulling together a source lis for the duplex – it’s not very thorough yet, but a lot of the stuff we have there is on this page for ya – and there’s more to come. *This post contains affiliate links* The post A Quick & Easy Way To Hang Curtain Rods appeared first on Young House Love. Via https://www.younghouselove.com/how-to-hang-curtain-rods-quickly/ Today we’re sharing how to find the right balance when you’re choosing between artwork or family photos for certain walls – and we’re revealing where we’ve subconsciously gravitated towards putting personal photos in our own home (and why we think that is!). We also have tips for how to personalize your walls beyond the usual smiling-at-the-camera snapshot. And we’ve officially gone shed crazy (like really, really shed crazy), and the silver lining that we discovered after a yearlong delay at the beach house that’s saving us money and getting us excited for the summer. Plus I’m finally jumping on the crystal train. I know, it’s unexpected. You can download this episode from Apple Podcasts, Google Podcasts, Stitcher, TuneIn Radio, and Spotify – or listen to it below! Note: If you’re reading in a feed reader, you may have to click through to the post to see the player. What’s New

 Listener Question
We’re Digging
If you’re looking for something we’ve dug in a past episode, but don’t remember which show notes to click into, here’s a master list of everything we’ve been digging from all of our past episodes. You can also see all the books we’ve recommended on our Book Club page. And lastly, a big thank you to Grove Collaborative for sponsoring this episode. Sign up at Grove.co/YHL and spend your first $20 to receive a FREE gift: a trio of Mrs. Meyers cleaners, a 60-day VIP Membership AND a surprise bonus gift on top of all that. 
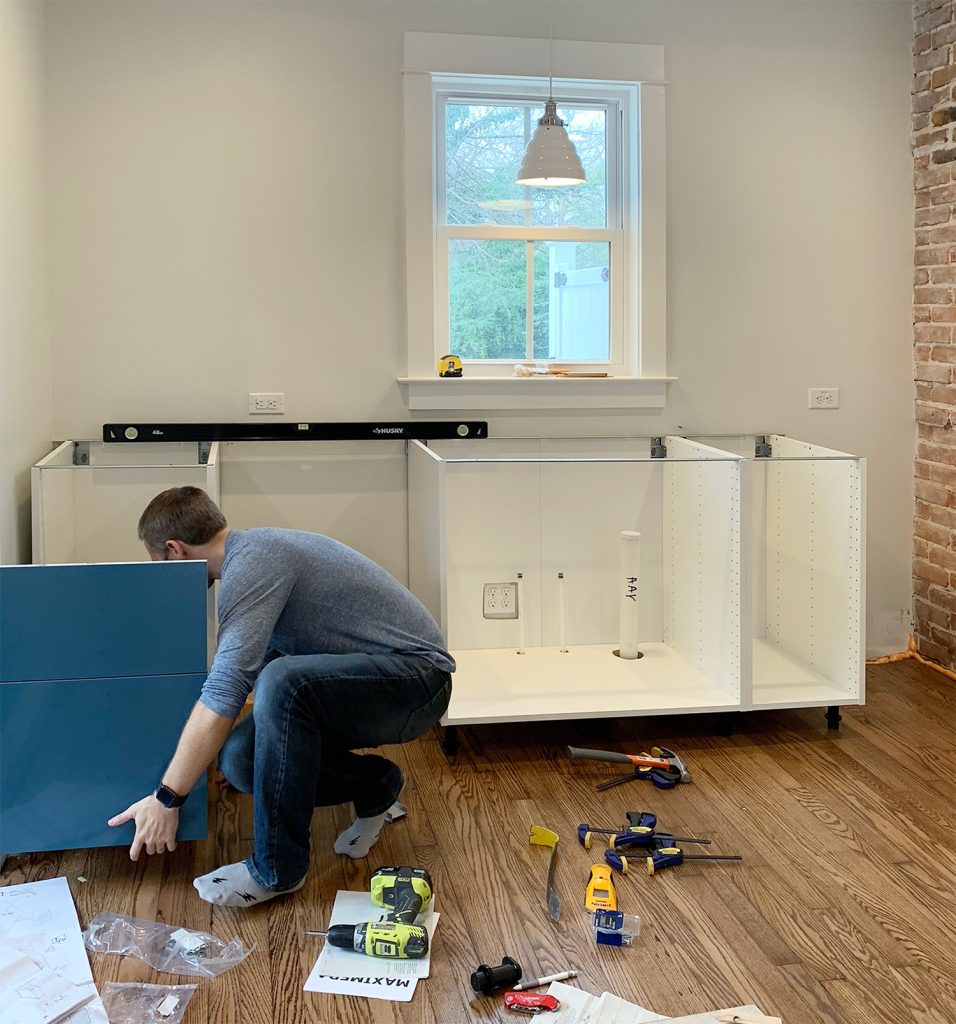
Thanks for listening, guys! *This post contains affiliate links* The post #134: Where Have All The Family Photos Gone? appeared first on Young House Love. Via https://www.younghouselove.com/podcast-134/ Many of you have asked for tips and tricks to make installing an Ikea kitchen go more smoothly and look (and function) the best it possibly can. And the good news is that after installing three of them in a little over a year and a half (!!!), we have learned A TON about how to make things a little easier and help you end up with a better result. So settle in, I’ve got twenty tools & tips that can make all the difference. 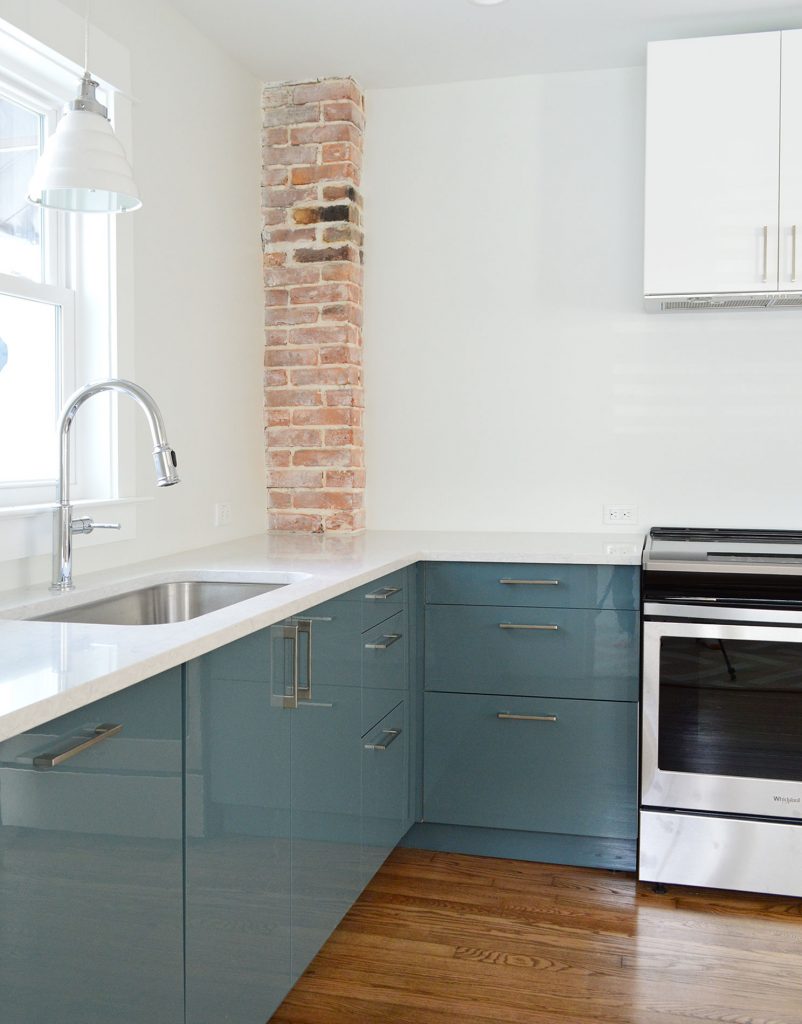 First off, we like Ikea cabinets and have personally installed them in five rooms: our laundry room & bonus room at home, our beach house kitchen, and now these two duplex kitchens. We have lived with the ones in our home for nearly five years and they’re great. Not a single issue. They are smartly made, very durable, and they have a great 25-year warranty and a great price tag (often thousands cheaper than other options). They also come with many thoughtful features like soft close drawers that come standard and tons of customization options. So yeah, some Ikea furniture is known for feeling a little cheap and wobbly, but that has not been our experience with their cabinets AT ALL. Ok, but back to the point of this post – tips and tools to make your Ikea cabinet install easier. Some of the tools I’m listing here are absolutely necessary and some are optional (they’ll just make the process easier, faster, and less frustrating). And as you read through this list, I think you’ll also get a pretty good sense of the steps (and curveballs) involved too, which I hope will help as well.  I’ll include a short bulleted list of everything at the end of the post too, that way you can use it as a tool checklist. But let’s just get right into it. 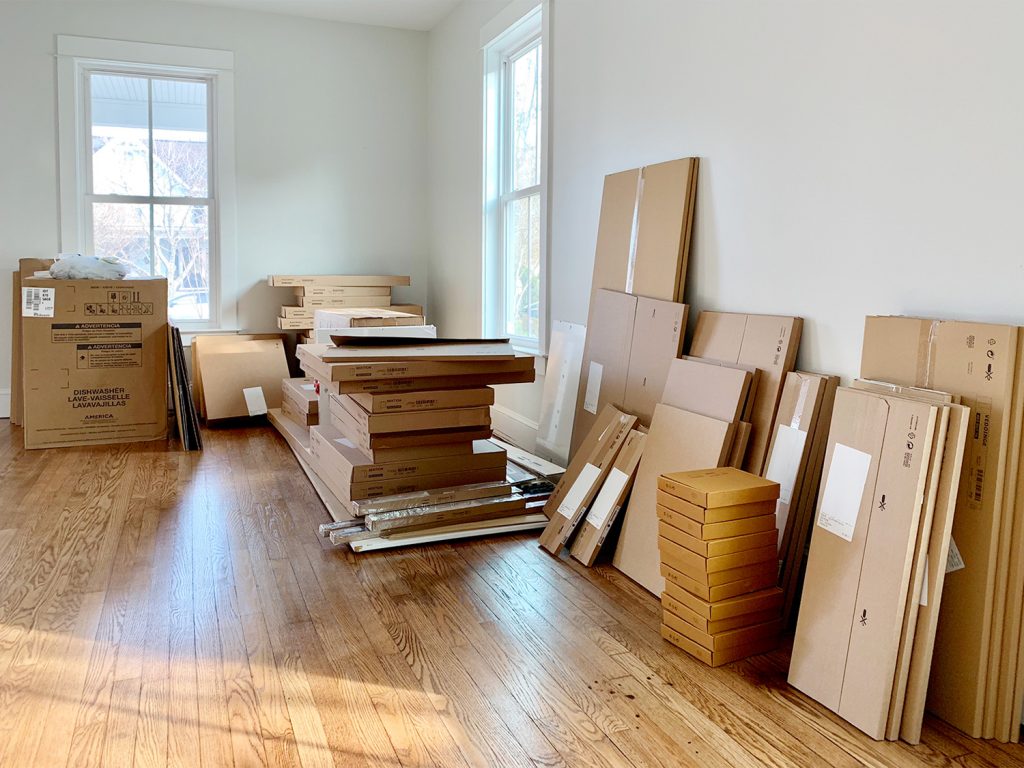 1. Your Itemized Receipt/OrderBefore you build anything, you’ll want to take time to inventory and organize all of your boxes. We had over 200 boxes (!!!) delivered for our two duplex kitchens, so it helped to sort everything into piles beforehand.  We personally like to sort boxes by item (Sektion boxes over here, Maximera drawers over there, all of our cabinet fronts somewhere else, etc.) but you may find it helpful to sort yours by cabinet instead (ex: the box, drawer, hinges, and front for one cabinet all together in one pile – this is how Ikea breaks them up your order form). Either way you do it, this sorting process will help you identify any missing pieces and also make it faster once you start building. 2. Power driver (with Philips head)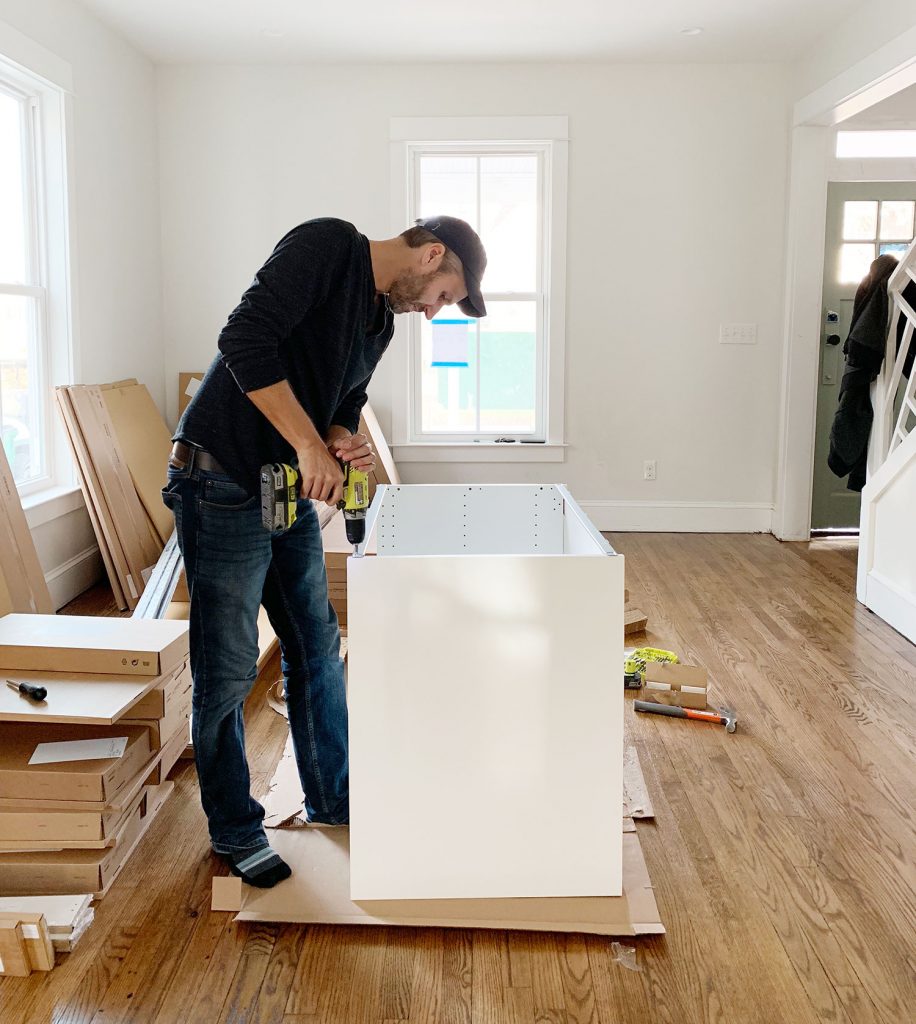 This combo gets a lot of use in this install (especiallythe power driver/drill) – but they’re needed first to construct your cabinet boxes (Sektion pieces). We love constructing the boxes first because you quickly get to see the shape of your kitchen come to life. 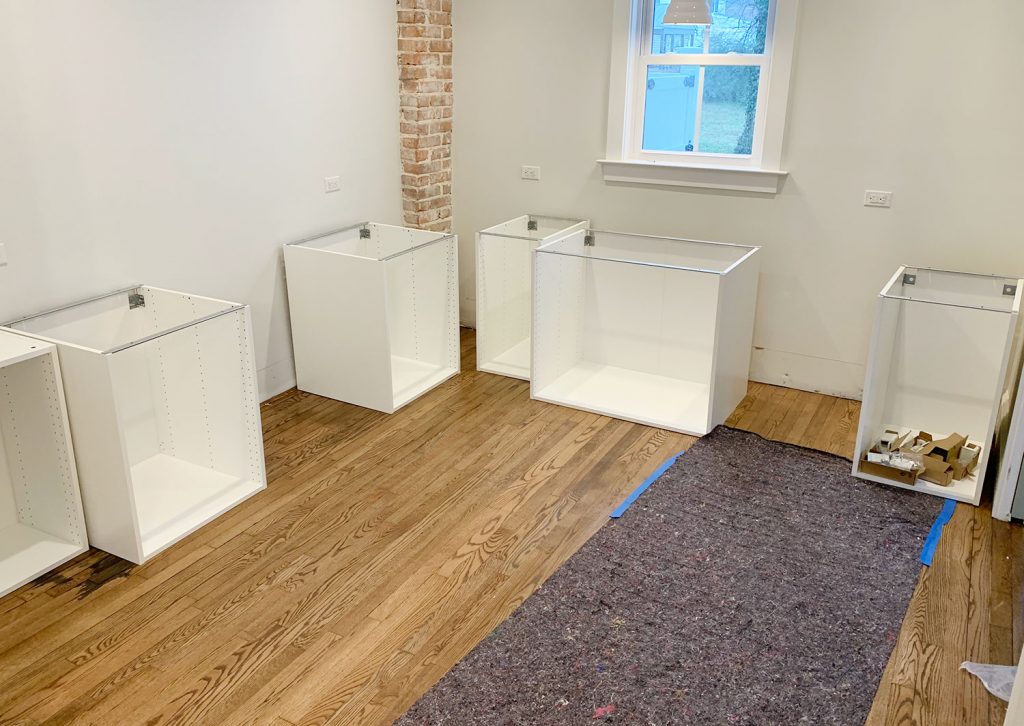 And even though Ikea is known for their allen wrenches, you don’t use them AT ALL during a typical kitchen installation! So don’t worry about having lots of specialty drill bits. You just need a normal Phillips head to screw these puppies together. 3. HammerYou’ll also need a hammer handy to nail the MDF backings onto the cabinet backs. It may also be useful if you need to tap any anchors into your drywall when it comes time to hang your cabinets. 4. Magnetic Drill Bit HolderHaving one of these on your drill can save you a lot of frustration while building your cabinets and drawers. You can buy one separately for about $2 or it often comes included in drill/driver sets like ours. It’ll magnetize your drill bits, meaning many of the screws that Ikea provides will stick to your drill handsfree (thanks to the magic of magnets). We found this VERY helpful when trying to screw into small spots that were too tight for our fingertips (we couldn’t reach in and hold the screw steady, so having a magnetized drill bit that held it for us was key). 5. Measuring TapeThe next several tools are needed for attaching your cabinets to the wall. Whether you’re doing upper or lower cabinets, Ikea’s system uses a metal track (called theSektion suspension rail) that you attach to your wall and then the cabinet boxes hang from these. The rail system is extremely handy because if you make sure the rail is level, your cabinets all hang from that and are guaranteed to be level! I know, it’s GREAT. The only time I don’t use their rail is when I don’t have a wall behind my cabinets, like if you’re doing an island. In that case I’ve built my own bases from 2×4″s, but more on that later. For now, just know the measuring tape will be useful in determining exactly where in your kitchen you’re placing your cabinets – both side-to-side on each wall, and how high the rails need to be hung (Ikea provides guides for this in their instructions). You will probably want to have your kitchen plan/schematic from Ikea handy too. 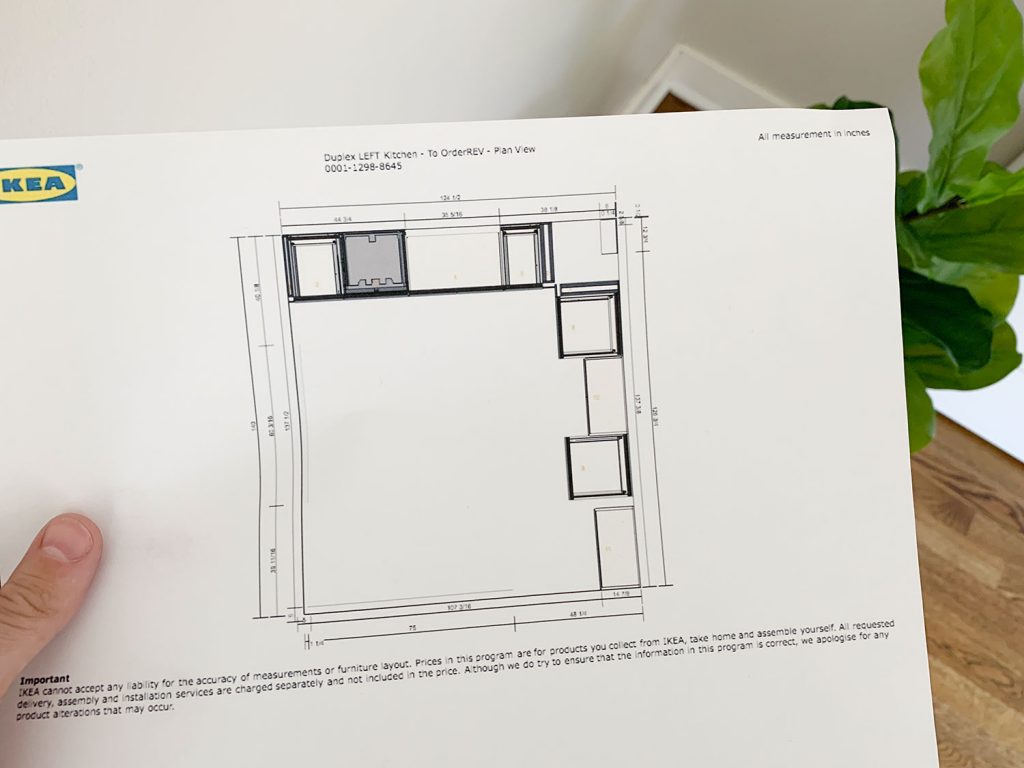 6. Dremel Or HacksawOnce you know where each run of cabinets is going, you’ll need to cut your metal suspension rails to size. The rails are sold in 7 foot lengths, but if you only have 4 feet of cabinetry in one area – you only want 4 feet of rail. You can cut these by hand with a hacksaw, but we find it much faster to use our Dremel Multi-Max with a metal cutting blade.  I typically mark my cut on a piece of painters tape and cut across the open top of one of our cabinet boxes (with a piece of cardboard to protect the cabinet underneath). 7. Stud FinderYou want to screw the rail into at least a few studs in your wall for maximum hold. So it’s smart to use a stud finder to locate and mark the studs that fall within the area you’re hanging the rail – that way you can be sure to go into them and get a nice firm hold. Since studs are typically 1.5″ thick, I like to mark the full width that my stud finder indicates, since you may not know exactly where the holes on the Sektion rail will line up. 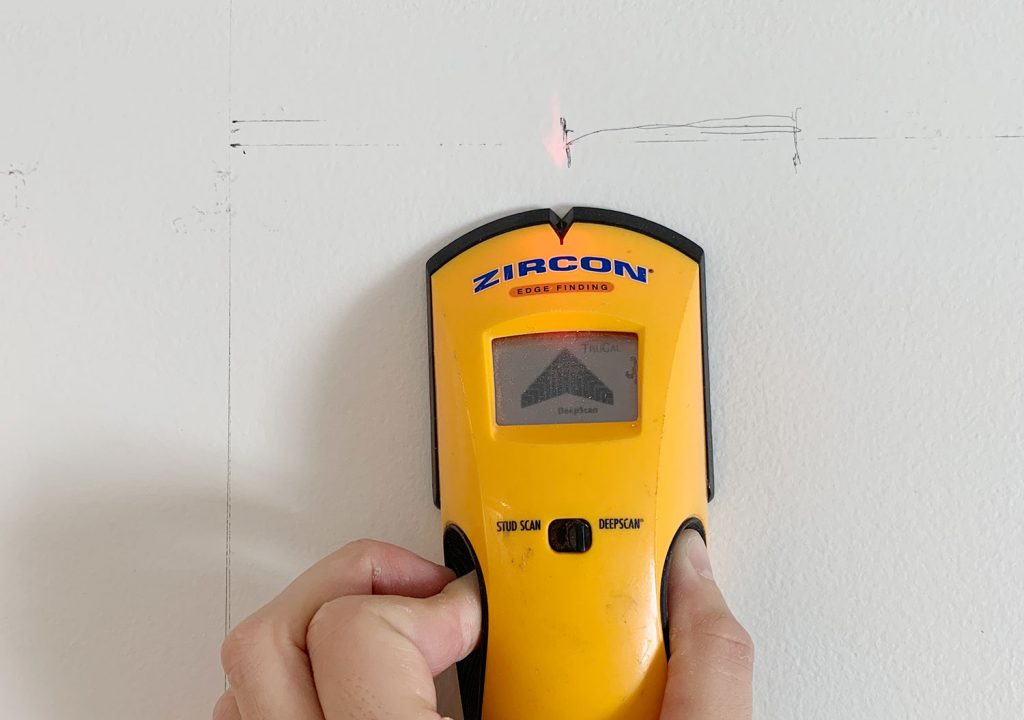 8. Medium-Size LevelOnce I know where my studs are, I hold my cut-to-size metal rail and, with a medium sized level (like this 24″ level) held against it, I mark the top line of my rail AND where the holes line up with my studs. I suggest amedium sized level for this just because they’re easier to wrangle during this step. 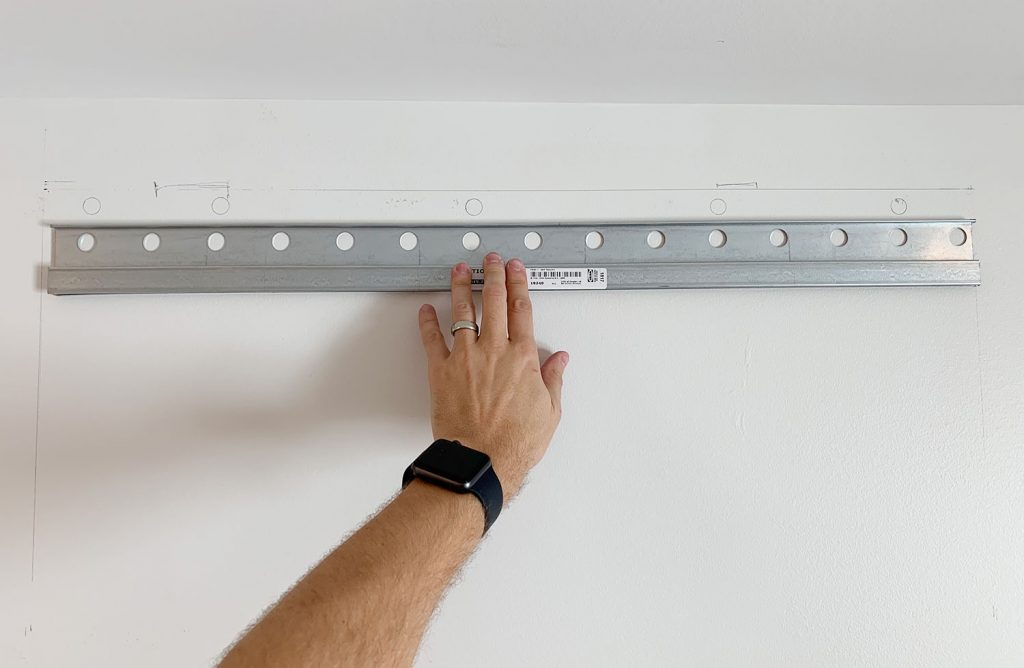 I also mark a few additional holes where I’ll use screws paired with anchors. I believe Ikea suggests at least having a screw every 12″ inches – but for short sections like this, I like to make sure I hit at least 2 studs and then have a screw at either end of the rail that goes into an anchor. 9. Heavy Duty Screws & AnchorsAfter some trial and error, we found that we like using these GRK Fastener Cabinet Screws to secure our rails into studs. They’re easy to drive, they hold really tight, and they include the star-head bit you need for them. We have tried other, cheaper “cabinet screws†and the heads kept breaking off. It was MADDENING. 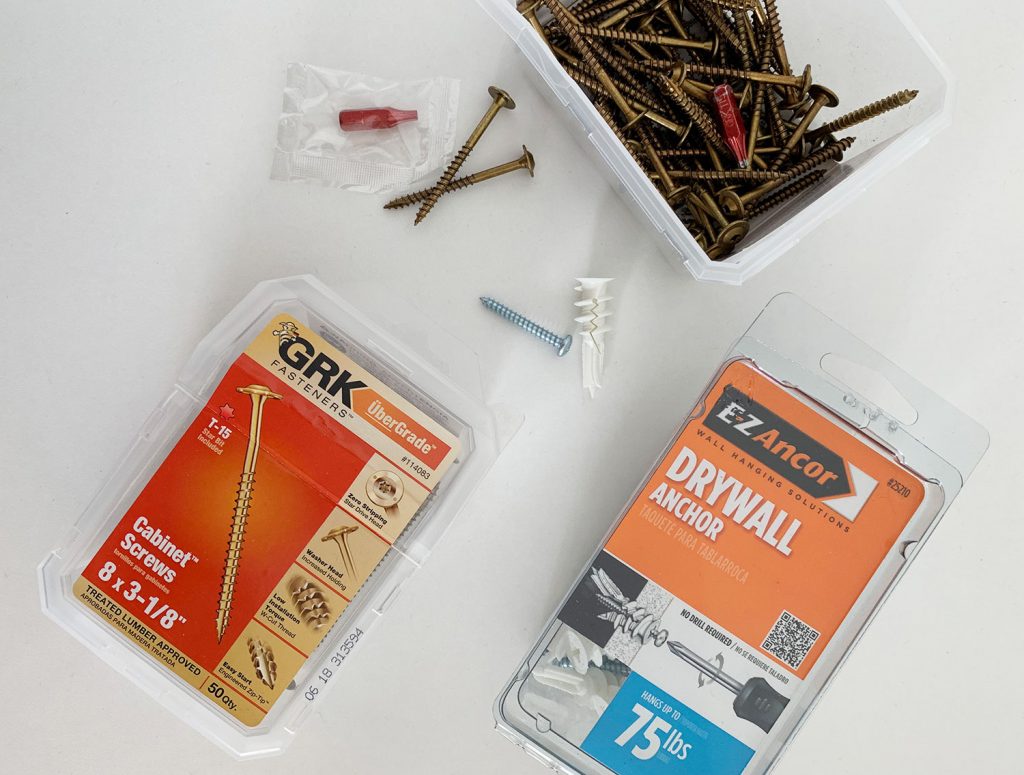 We also like to have some anchors on hand too, like these E-Z Ancor packs that come with screws, for those additional support screws that we add. 10. Long LevelOne of the biggest challenges we’ve found in this process is getting things level. Just because you’ve hung your rail level on the wall doesn’t prevent things like slopes in your floor or bows in your wall from chucking some additional curveballs in your direction. So your best defenses are a lot of patience and a nice long level, like this 4ft level we bought specifically for this task (after learning that it’s a lot harder to use a smaller level to solve these issues). 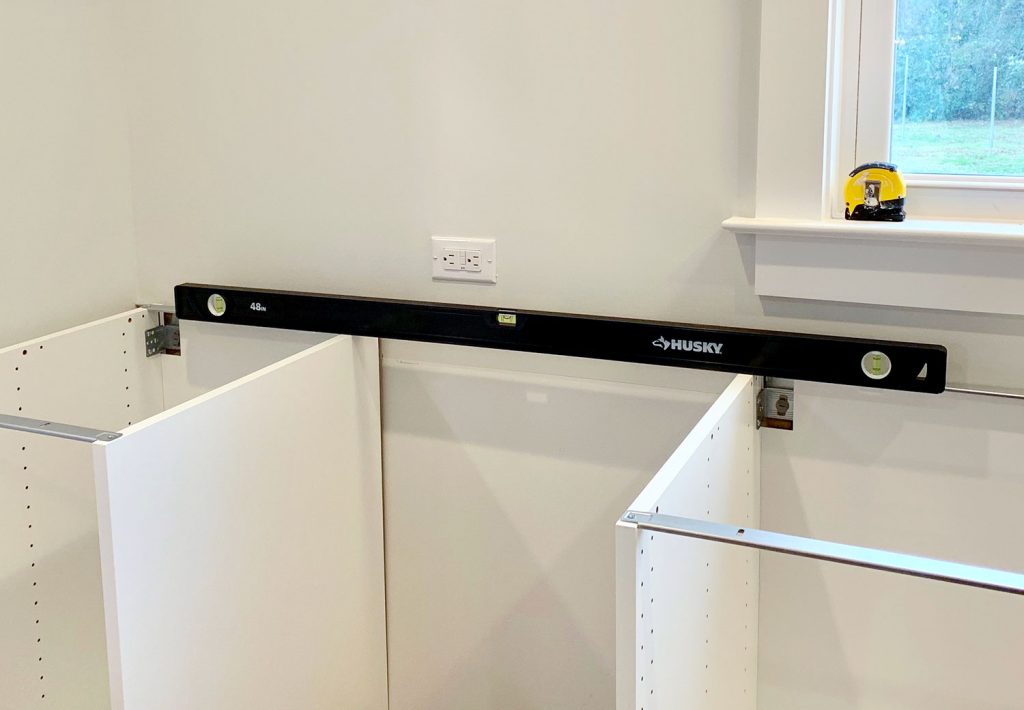 Your medium sized level will help with the process as well (especially in checking that each individual cabinet is level front-to-back) but you’ll want something bigger to check longer spans of cabinets. You could purchase an even longer level if you wanted, but they can start to get pricey, so we found a 4 foot long level to be sufficient, especially for checking across the gaps that you’ll leave for appliances like a 30″ stove or a standard 24″ dishwasher. 11. ShimsA lot of level issues can be corrected by twisting the adjustable plastic feet that come with your base cabinets, or by adjusting the placement of your metal rail. But if you’re dealing with bows in your wall (which you can find by placing your long level against it) you’ll want to have some wood shims on hand to place behind the metal rail. In these old houses, we had to use quite a few in a couple of places! 12. JigsawWhen it comes time to install your sink base cabinet, you’ll need to make some holes for your plumbing. For smaller pipes like your water supply lines, you can just drill holes using a large drill bit (we used the 3/4″ bit in this set). But for things like your large drain pipe, you’ll either need to buy a larger hole bit or break out a jigsaw. Even though we don’t get the cleanest cut with it, the jigsaw gives us a little more wiggle room when placing the cabinet (since the drain pipe isn’t flexible like the supply lines) and we can also use it for other cuts like for exposing the outlets along the wall (the one below powers the garbage disposal under the sink). 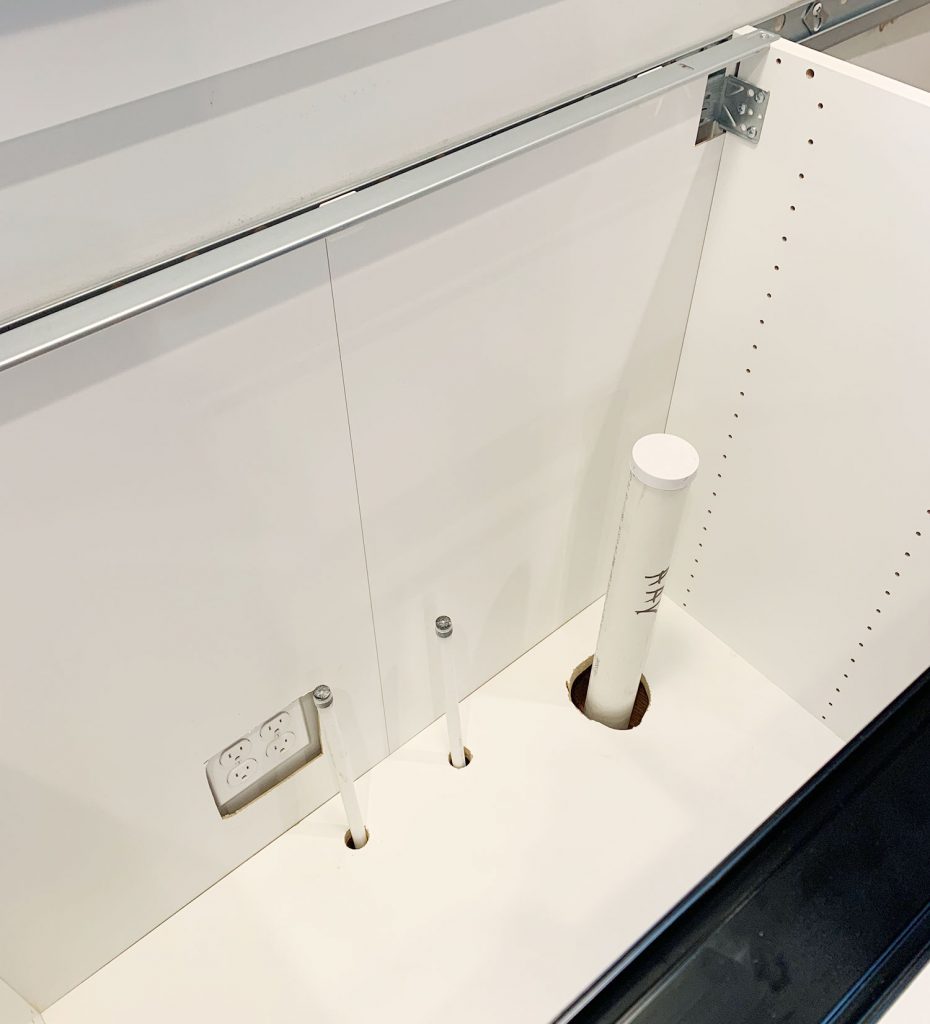 Just be sure to make careful measurements before you cut. We usually put a layer of painters tape around the area we’re cutting. It allows us to mark our cut without marking the cabinet, plus the tape helps keep the white finish from cracking off. Either way, this stuff will all be hidden under the sink so it doesn’t have to look perfect. 13. ClampsAs you start to get your cabinets in place and leveled, you’ll want to secure any adjacent cabinets together. Ikea provides screws for doing this, but you’ll want to use some clamps (we like these 6″ bar clamps) to hold the cabinets tightly together before you begin screwing. We didn’t get a picture of that process, but the clamps come in handy A LOT as an extra set of hands – like when we were installing this bracket for the exhaust hoods that we hung over the stoves. 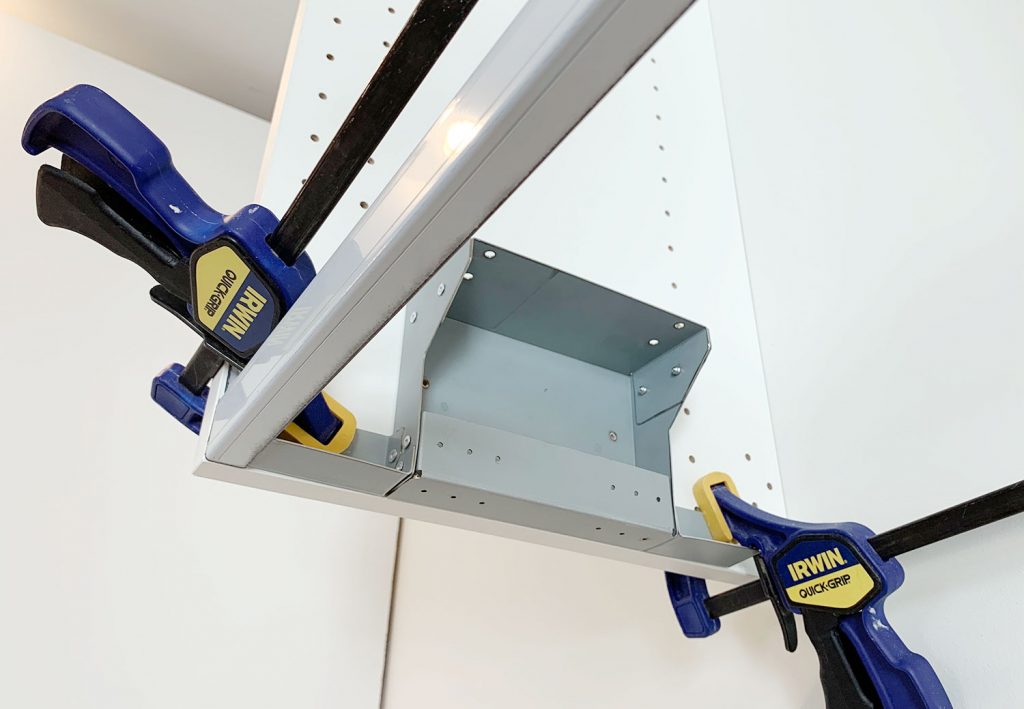 14. Circular Saw and/or Table SawIn addition to screwing cabinets together, you may find yourself attaching cover panels or filler pieces at some point. Cover panels go on exposed ends of cabinets (so you can’t see the metal rail they hang on) or, in our case, we used some large cover panels to create a box around the fridges at the duplex. So you’ll need some sort of larger saw to make long, straight cuts. Our cover panels were a bit too wide, so I used a circular saw to shave a few inches off one side. 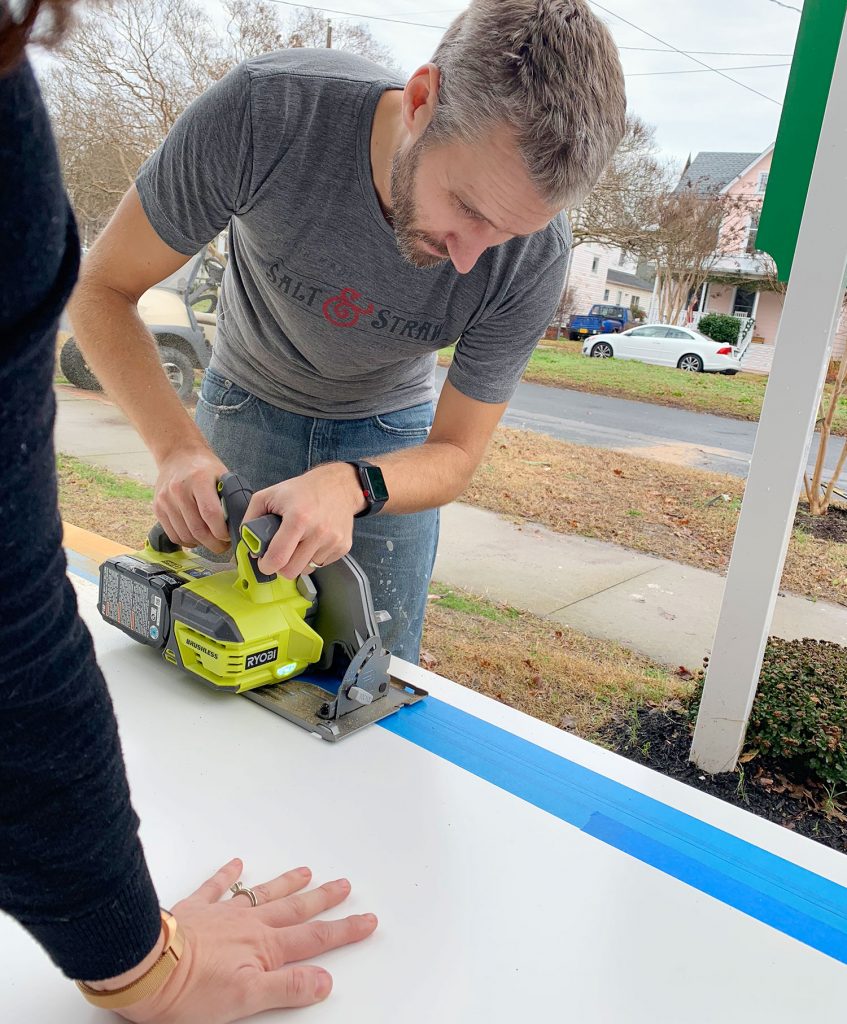 I didn’t use a table saw for that panel because running an 8 foot tall panel that’s this wide across my table saw would’ve been tough. But for smaller pieces (like filler pieces that are only about 3 feet long) a table saw is often easier, especially if you’re only shaving off a little bit. But if that’s too pricey and you’ve got a steady hand, you can get by with the circular saw. 15. 2 x 4″ BoardsEvery time we’ve installed an Ikea kitchen we’ve needed some 2×4″s at some point. At the beach house we used them to make some bases for the island cabinets. 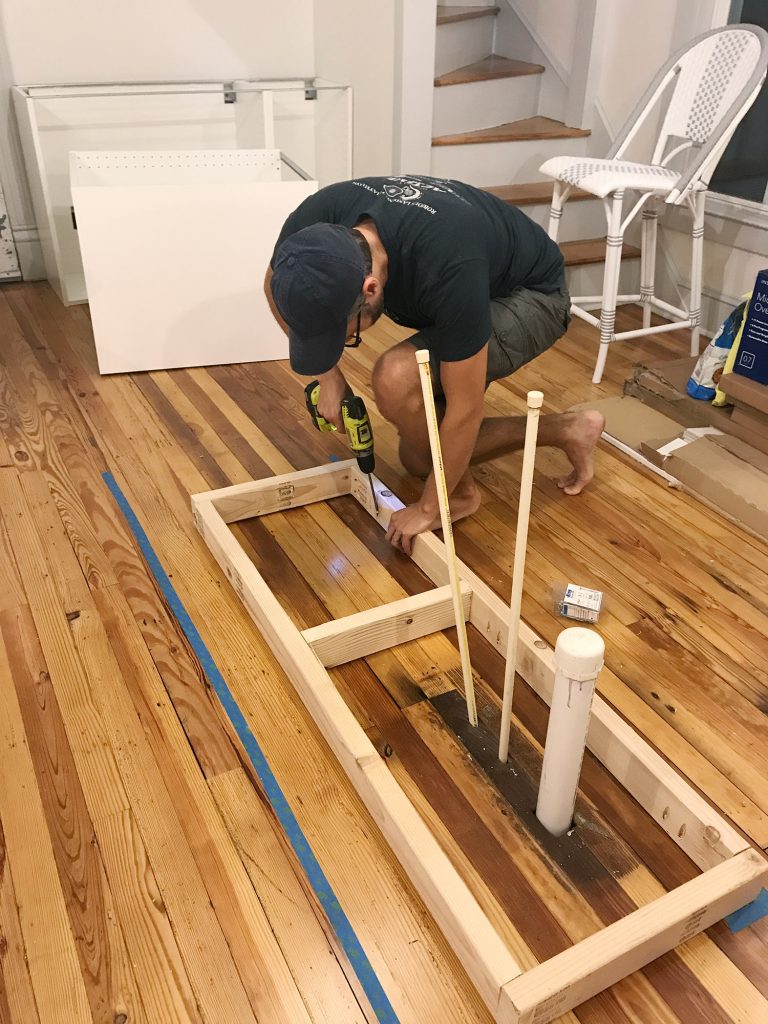 Basically, they were just some boxes we made almost the same size as each cabinet (slightly narrower to account for the toekicks) that we secured to the floor using pocket holes. To drill the pocket holes, you can use something like a… 16. Kreg JigNow, a Kreg Jig isn’t absolutely necessary here, but I’ve had one for around nine years now so I’m accustomed to breaking it out for tasks like this. So while I’m a big fan of having one in your arsenal, I understand that you’ve just bought a new kitchen so tacking on another $99 tool to your budget isn’t always practical. I did use it again for the duplexes to make more 2×4″s into boxes (this time for mounting the above-fridge cabinet away from the wall, so it sat closer to the front of the fridge). 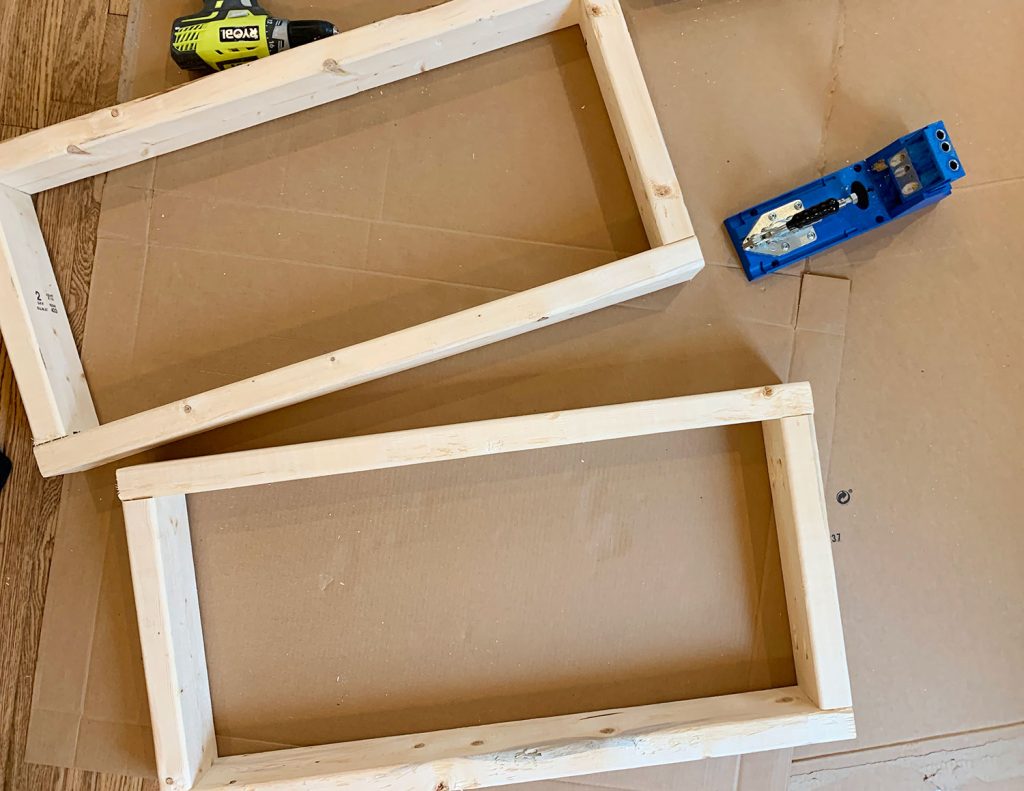 The boxes acted as an extension of the wall. The top one was for mounting the metal rail, and the bottom one gave the base of the cabinet a spot to rest so it didn’t tip back wildly. They also gave us a way to mount that large cover panel to box in the fridge. 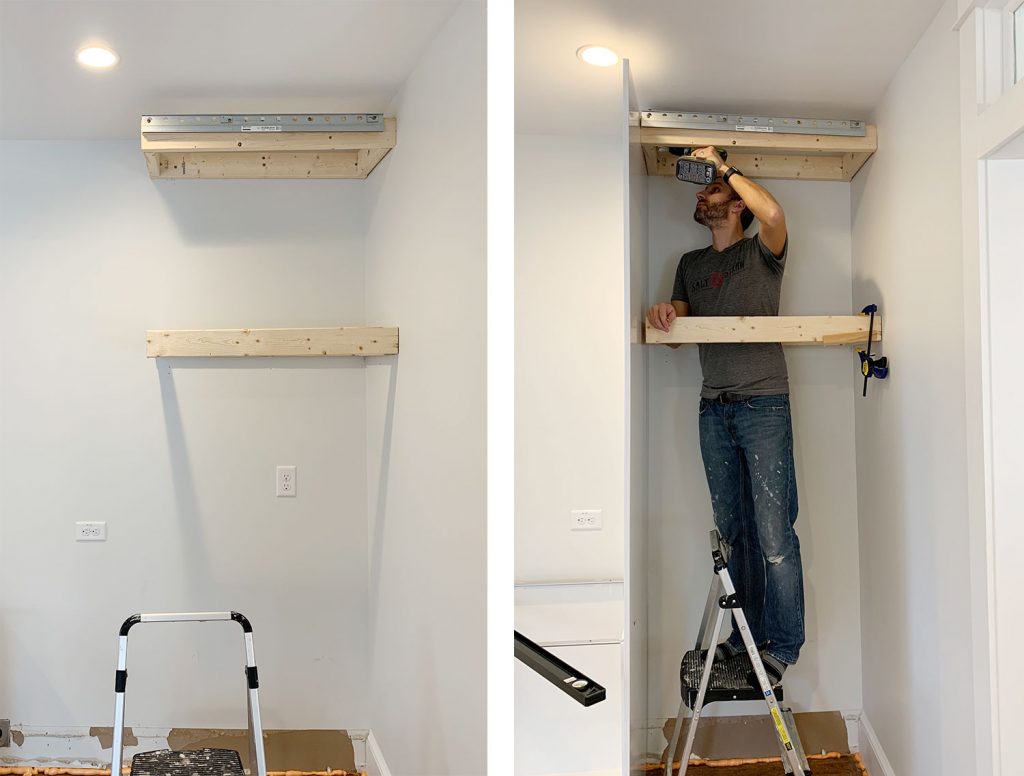 I guess I should add in here that a step ladder is also useful, so let’s officially put that on the list. 17. Manual ScrewdriverOnce your cabinets and panels are hung, leveled, and secured to each other, the next part of the process is to add your doors and drawers. The instructions here are pretty self-explanatory and the main tool you need is a power driver to screw everything together. Our main word of warning is to pay close attention to screw placements when you’re assembling drawers! Depending on where each drawer goes in the stack (top, middle, or bottom) there are sliiiiight differences in the instructions. So while we find it most efficient to do multiple drawers at once, we still pay close attention – especially for the first few. 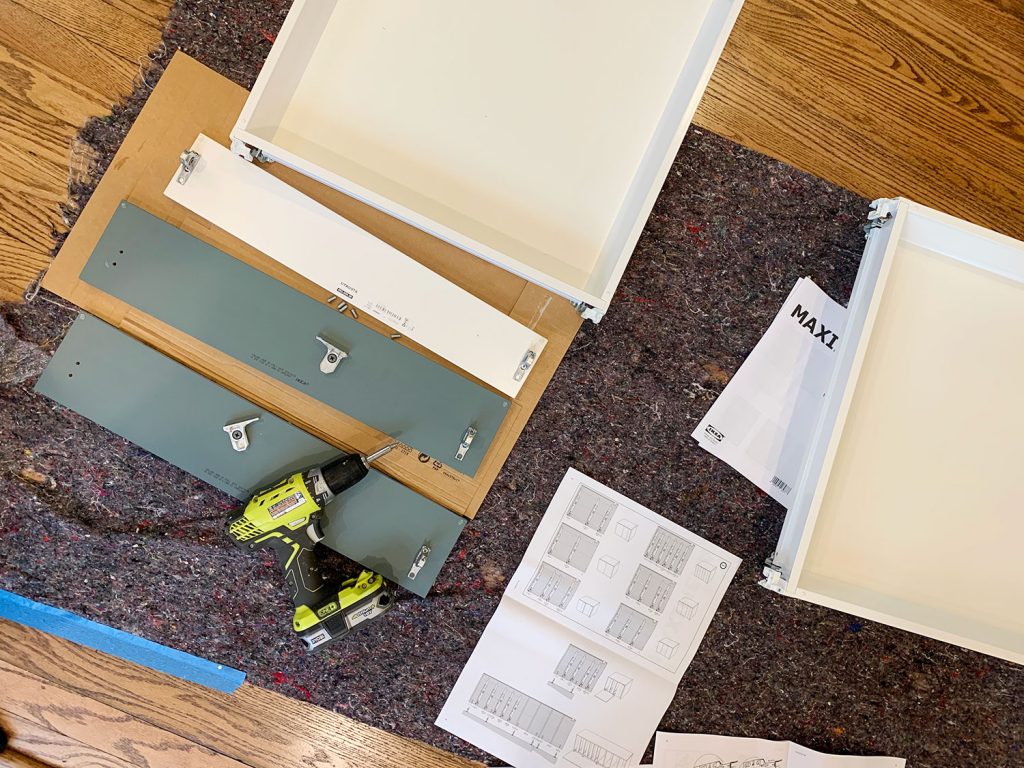 Ok, back to the manual screw drivers. One big part of installing doors and drawers is tweaking and adjusting them for even and level spacing. For this you’ll want to a regular ol‘ manual Philips head screwdriver. It can be kind of tedious and frustrating, but it’s worth taking your time with it. This video shows it in a bit more detail. 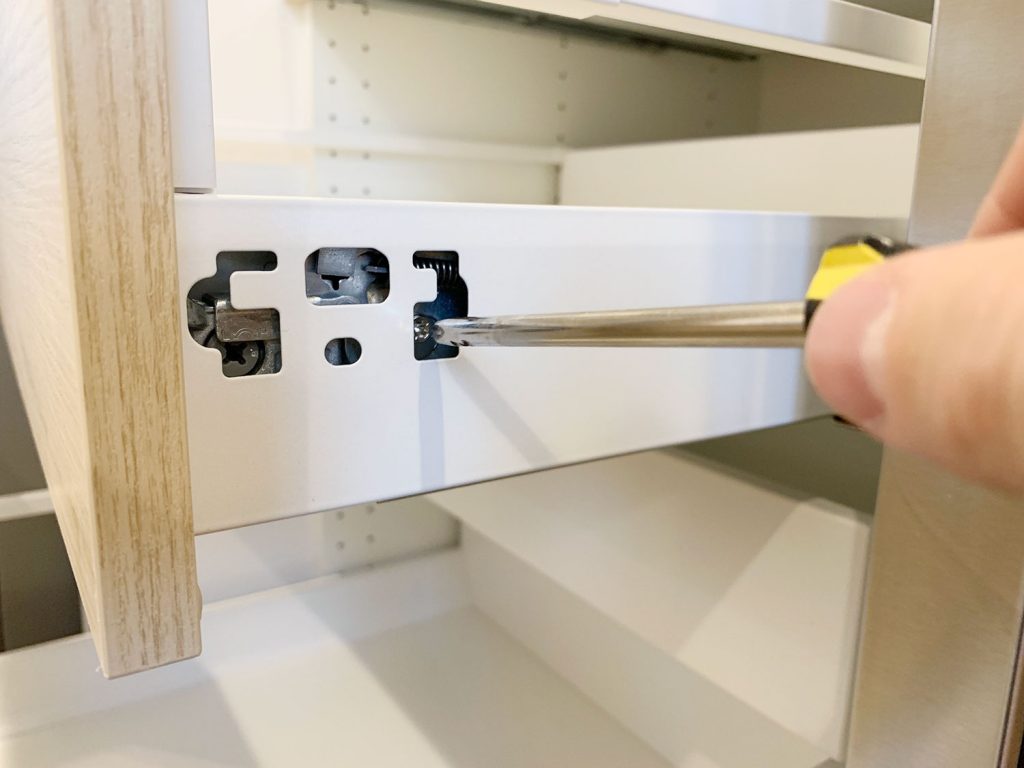 You also will want a flathead screwdriver for twisting the little piece of plastic that locks each cabinet onto the metal rail, which comes up earlier in the process. 18. Miter SawTasks like cutting your 2×4″s or even your filler pieces will be made easier and faster by having a miter saw on hand (we own this miter saw). You’ll also find that it’s helpful when it’s time to cut and install your toekicks. Ikea’s sells toekicks to match your cabinet fronts and they clip on to the plastic feet you will have attached to the bottom of your base cabinets. 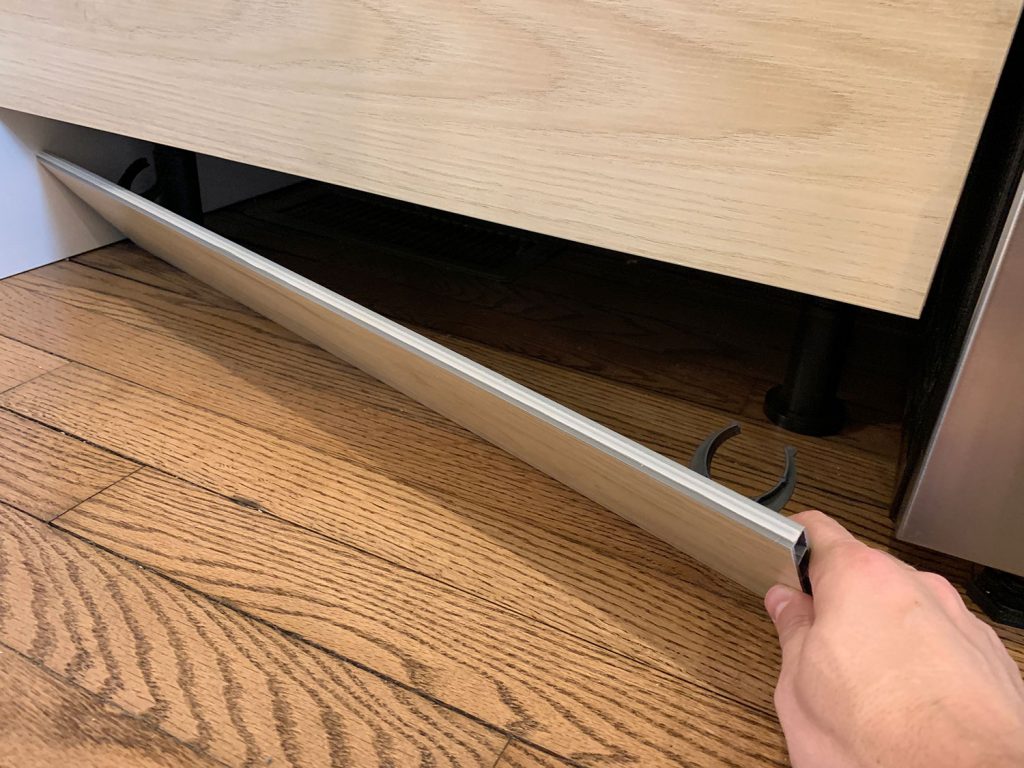 In our beach house kitchen we installed quarter round in front of the Ikea baseboards to help disguise some floor level issues, as well as using quarter round around the island where we built our own base (we used standard wood baseboard trim instead of the Ikea toekicks around the island). Meanwhile, we just used the Ikea toekicks in the duplex kitchens and the floors were more level (and we think the wood and blue cabinets were more forgiving than white ones) so we didn’t need to add quarter round and it looks great. 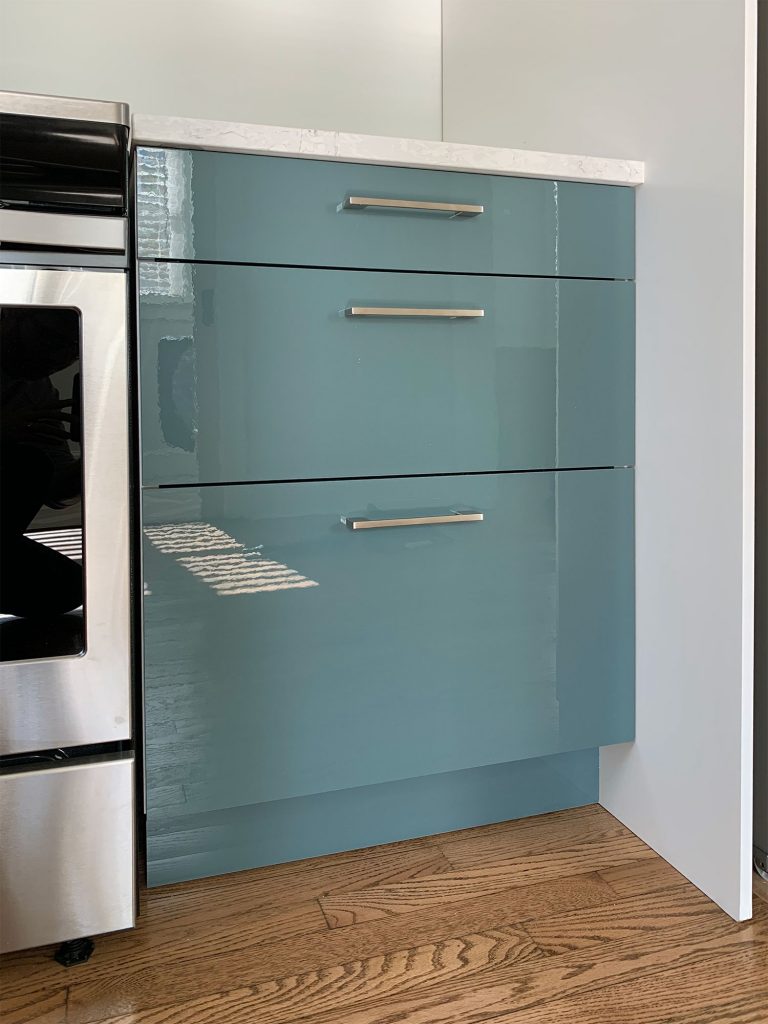 19. Nail GunIn addition to using a nail gun to attach additional molding like quarter round if you’re adding that (again, the Ikea baseboards just snap on so you won’t need it for that) I also find a nail gun comes in handy sometimes for attaching small filler pieces. Especially in cases where they’re too thin to take a screw. 20. Others ToolsReal quick, here are some other items you may want to have on hand. Some I’ve mentioned or shown already, but haven’t officially listed:
 Your Ikea Kitchen Installation Tool ChecklistAs promised, here’s all of the items in one place so you can make sure you have everything you need on hand. I’ve organized it a bit differently than above, just to put like items together. You may have special circumstances for your project that require more, less, or other tools – but I’ve found this to be a pretty comprehensive set:
Good luck and happy installing! P.S. For other posts we’ve written about installing Ikea cabinets, here’s one about installing our laundry room cabinets 5 years ago, and another one about using Ikea cabinets to make a wall of built-ins for our bonus room. *This post contains affiliate links* The post The Tools (And Tricks) You Need To Install An Ikea Kitchen Yourself appeared first on Young House Love. Via https://www.younghouselove.com/tools-and-tricks-for-installing-ikea-kitchens/ |
