|
Velvet evolution has taken a long curve to what it is today. In fact, it has been referred to as the timeless fabric. Velvet upholstery has taken many trends over time mostly in terms of shapes, color, affordability, and appeal. In terms of shape, velvet upholstery is fitted in a wide array of furniture such as sofas and chairs. This has made the fabric versatile and the top choice among interior designers. Velvet is now available in different shades of color unlike before where it was only found in limited hues. Walk into a store today and you will be amazed at the range of colors at your disposal. 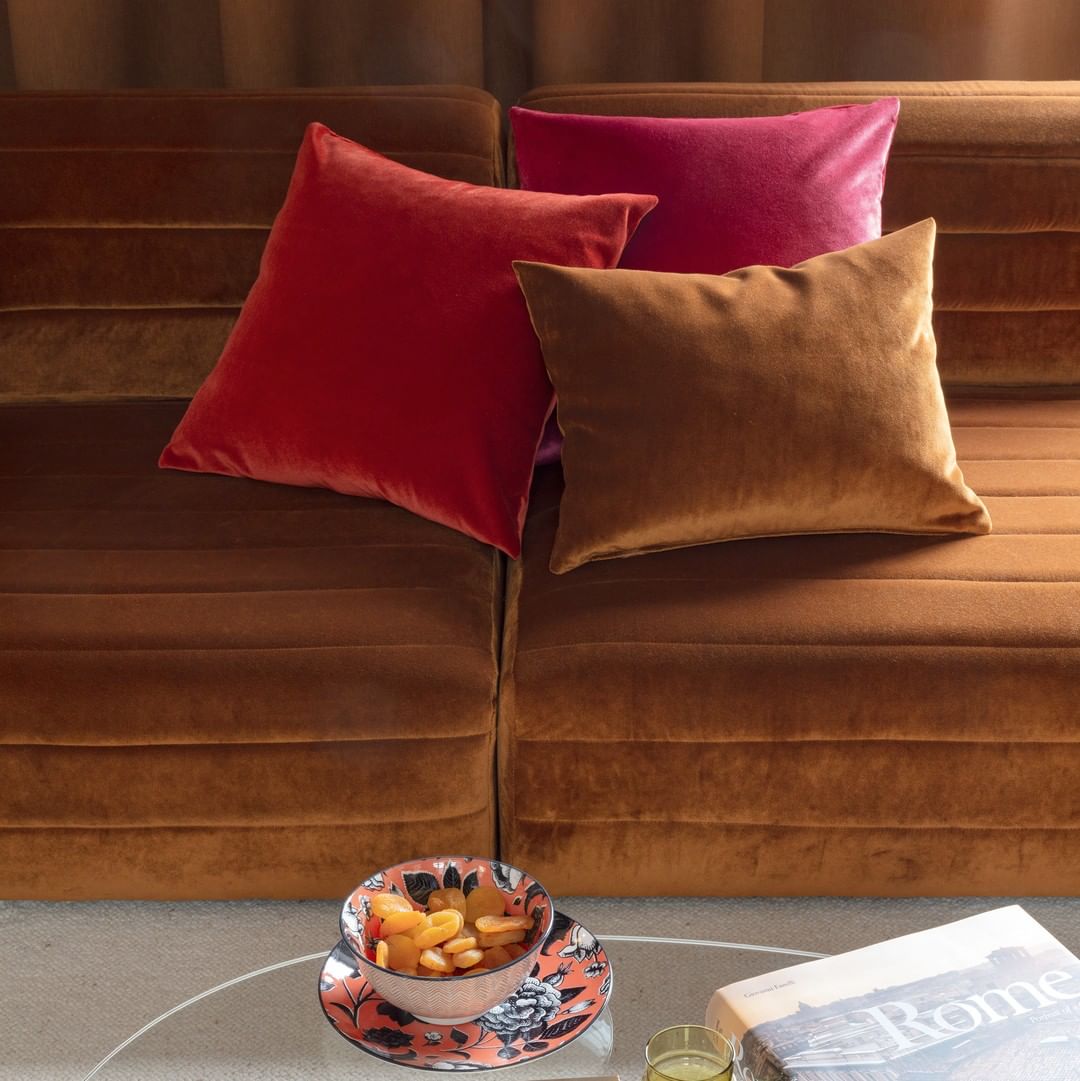 Image source: Fibreguard Instagram Velvet upholstery was the choice of the royalty and hence was expensive out of price range to the ordinary shopper. With advances in fabric technology, velvet is now affordable and available in both synthetic and non-synthetic forms. Despite the affordability and availability, this has not taken the luxury out of the fabric. Another trend in velvet upholstery is the appeal across generations. Velvet can no longer be considered the grandmas’ style. It has attracted enthusiastic embrace from the young alike. Cleaning velvet has also come a long way. Advances in cleaning technology such as vacuum cleaning have lessened the trouble of cleaning velvet upholstery making the experience attractive and delightful. 
0 Comments
Tiling was one of the most daunting tasks on our duplex to-do list this year (four bathrooms! two mudrooms! and there are still two backsplashes on the list) so it’s a HUGE relief to say that all of those floors and showers and tub surrounds are officially done (well, like 95% done – more on that later). So today we wanted to show you how they’ve all turned out and share some of the lessons we learned along the way, including which tiles we’d buy again in a heartbeat… and the ones we’d think twice about attempting ever again.
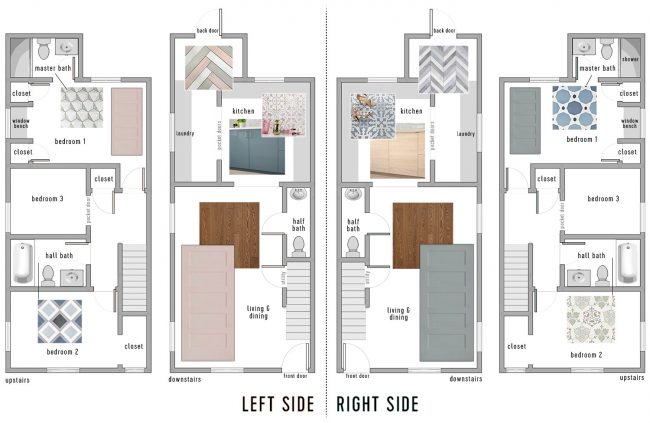
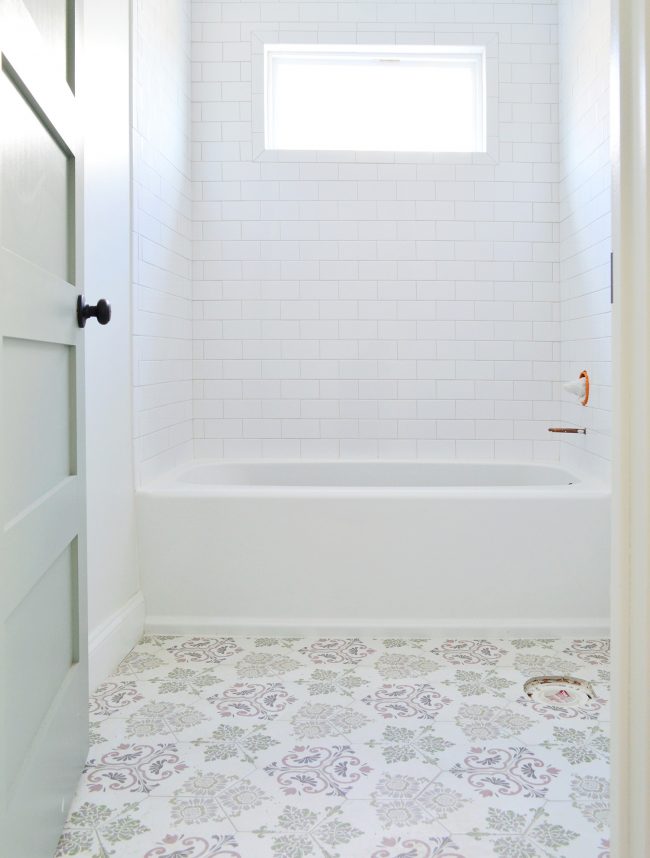
floor tile | wall tile | shower floor | grout: frost | door: SW Oyster Bay Listeners of last week’s podcast know that after two long weekends spent tiling the duplex, we completed all six of the floors ourselves (two mudrooms and four bathrooms!) but we decided to hire out the four remaining shower surrounds in order to keep things on schedule. What would’ve taken me and Sherry several more weekends to accomplish was knocked out by our contractor’s crew in less than a week. For each of the four shower/tub surrounds we chose white subway tile for the walls (simple, classic, affordable, and it’s a tile that falls back and won’t compete with the bolder patterned floor tile that we chose for each room). So this post is mostly going to focus on the floors in each space since we’ve covered our adventures in subway tile here and here already.
floor tile | wall tile | shower floor | grout: warm gray | door: SW White Truffle But as for the subway tile we used, we went with this affordable 3 x 6″ subway tile installed in a standard running bond pattern (the same stuff we used and loved on the beach house’s kitchen backsplash). And the two master showers got this white herringbone on the floor, which added a hint of interest to that surface without being too crazy busy. We showed you all of the floor tile selections in this post about how we chose our tile, cabinets, and paint colors. But we did make one last minute change to the plan from that post: we swapped the two master bathroom tile choices (seen in the two photos above) because the marble-looking tile ended up pairing better with the blue-green doors than the pink ones. As much planning as you do beforehand, there’s really nothing like seeing the tile in the space next to the items that are in there, hence that last minute swap.
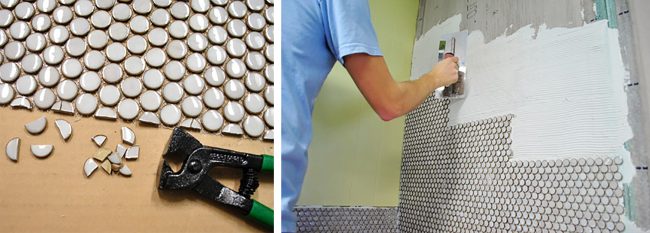
We mentioned in that same post that we limited ourselves to larger tiles with interesting patterns, rather than smaller mosaics because we knew it would help the process go faster (we LOVE our pink house master bathroom floor, but it took us forever and a day). But even within that larger-tile parameter, we learned that some tiles were faster, easier, and more foolproof to lay than others. We LOVE how all of them turned out in the end, but there are some that gave us more difficulty (and took much longer to install) than others. So if speed and ease are an important factor when it comes to picking tile, or if you’re a newbie tiler and want to choose something that’s simple & straightforward, this post should help. So let’s start with the easiest ones: The Square Patterned Tiles
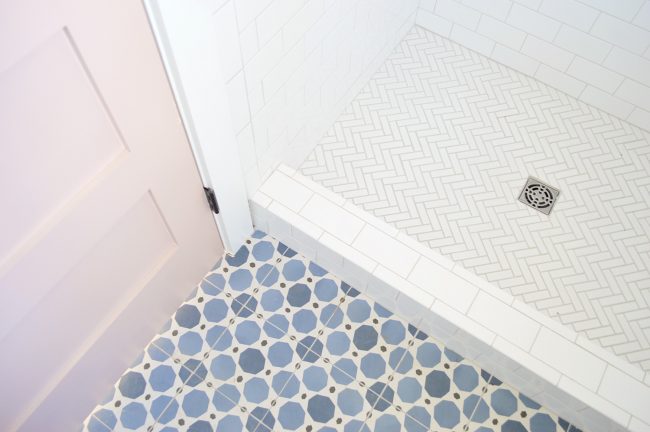
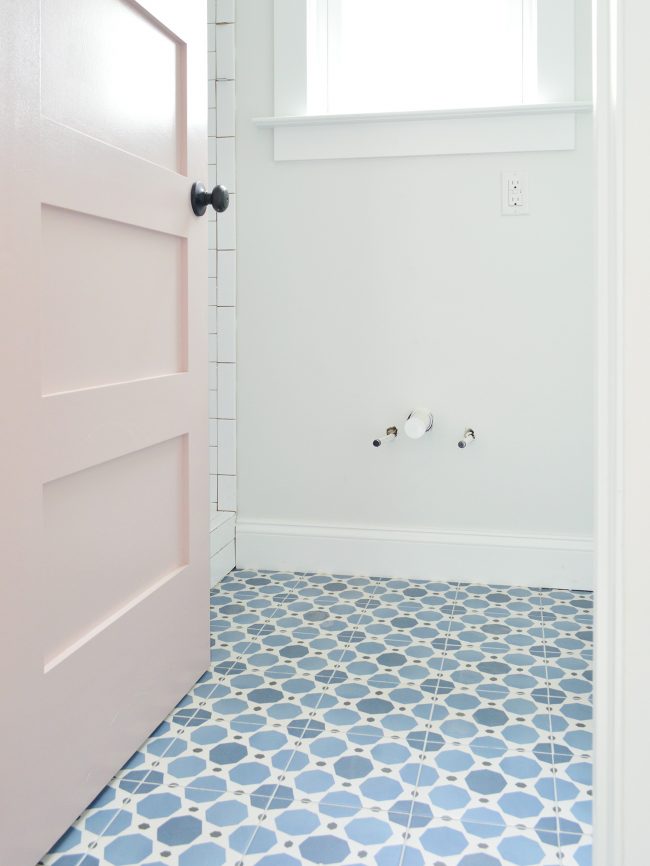
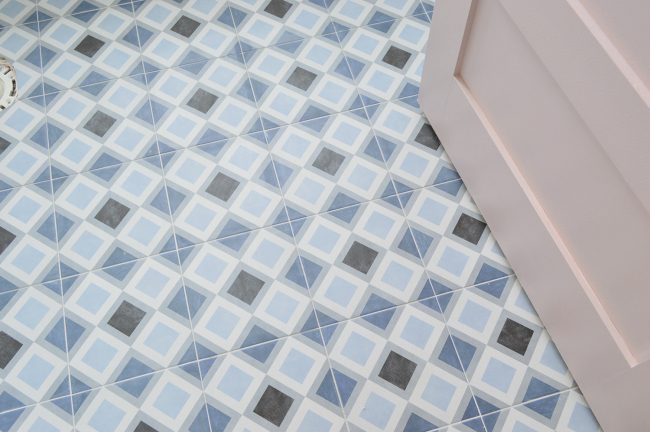
floor tile | grout: warm gray | door: SW White Truffle The blue patterned tiles that we laid in the bathrooms on the left side were the fastest and the most straightforward to install. Why? Because (1) they were square and (2) the pattern was symmetrical on all sides, meaning you could put the tile down in any orientation and it would line up. The combination of those two factors made it much easier to lay out, cut, and install because we were always working with right angles (we’ll talk about hex tile in a moment!). And because the pattern was the same on every edge, we had less waste because we could use both sides of a cut tile again in another smaller spot (like around any edge).
floor tile | grout: warm gray | door: SW White Truffle | wall: SW Spare White The size of these tiles was also really easy to work with. The master bath tile (above) was around an 8 x 8″ square while the hall bath tile (below) was 9 x 9″, so they weren’t heavy or unruly like larger tiles can be, but they filled the space more quickly than a smaller mosaic would have. I think each room took us about two hours to lay, which felt like nothing compared to some of the others.
floor tile |grout: frost | door: SW White Truffle And even though they were just simple square tiles that went down easily, the final floor still looks interesting and intricate – which was the goal. So we’re thrilled with these. Ten stars. Would recommend. Final verdict: If you’re looking to achieve something similar and keep your project as simple as possible, I would choose square tiles like these and these. They’re both porcelain too, so they don’t need to be sealed and cared for like more finicky materials do (we’re looking at you cement tile).
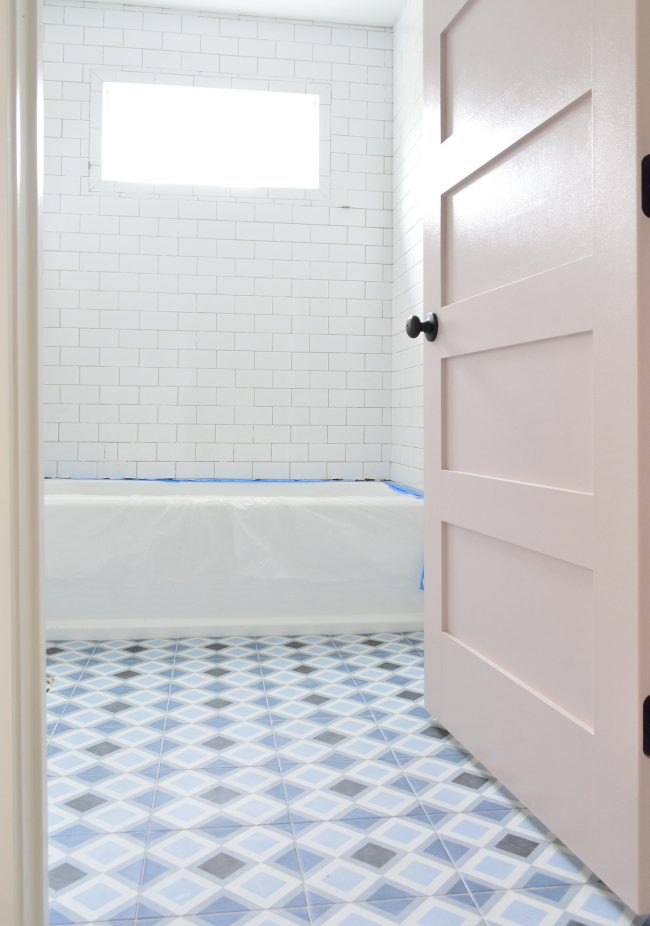
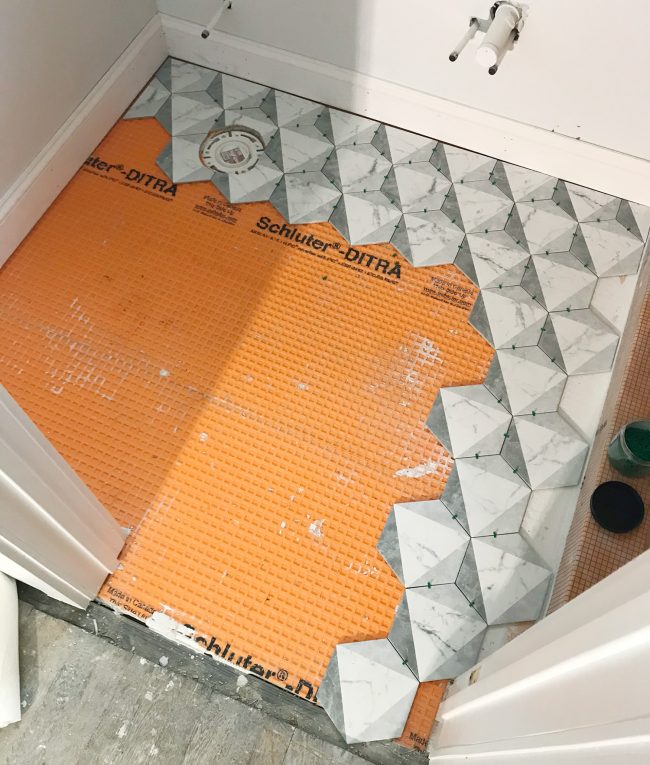
floor tile | wall tile | grout: frost | door: SW White Truffle | drop-in tub The only thing we’d do differently next time is we’d use a darker gray grout in the room above. We were trying to streamline everything and keep cost down by not buying different grout colors for each room (and whatever color went on the floors also went in the shower – some of which weren’t grouted at the time of these photos). But Sherry thinks a darker gray would’ve made the grout lines recede a bit more, helping the diamond pattern show through stronger. Anything for a diamond, right? Let’s move on to the next simplest tile to install… The Marble Hex Tile
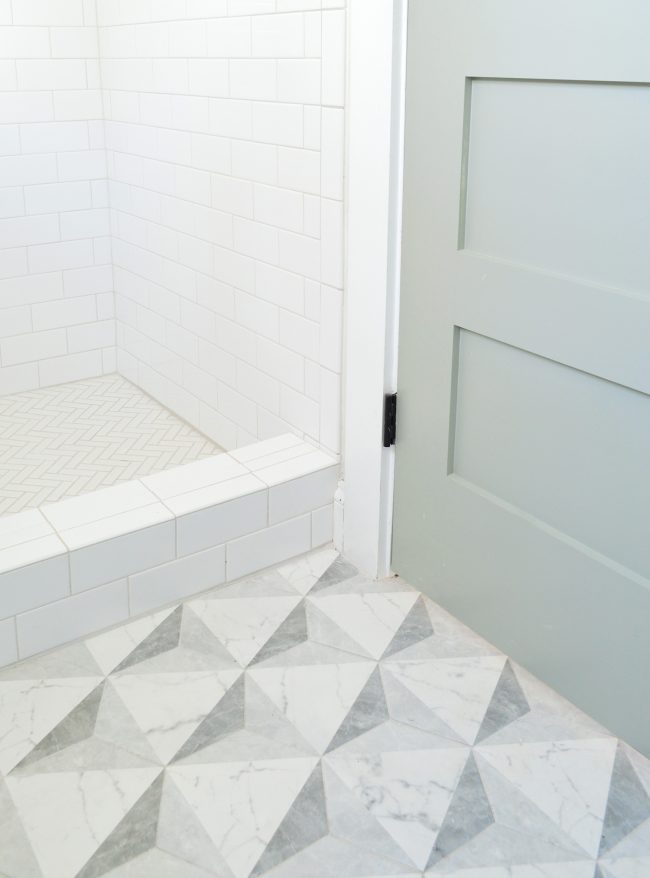
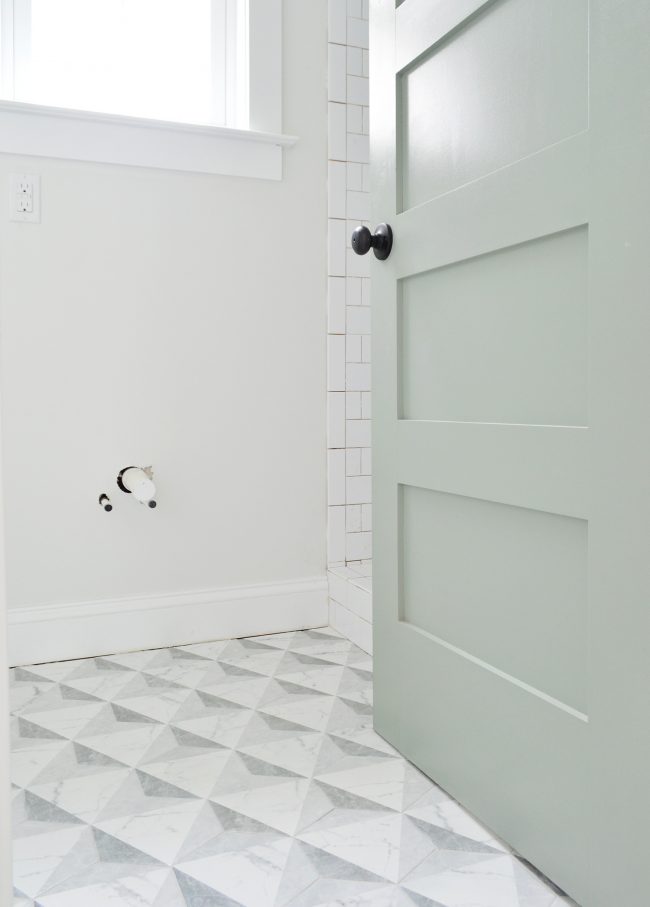
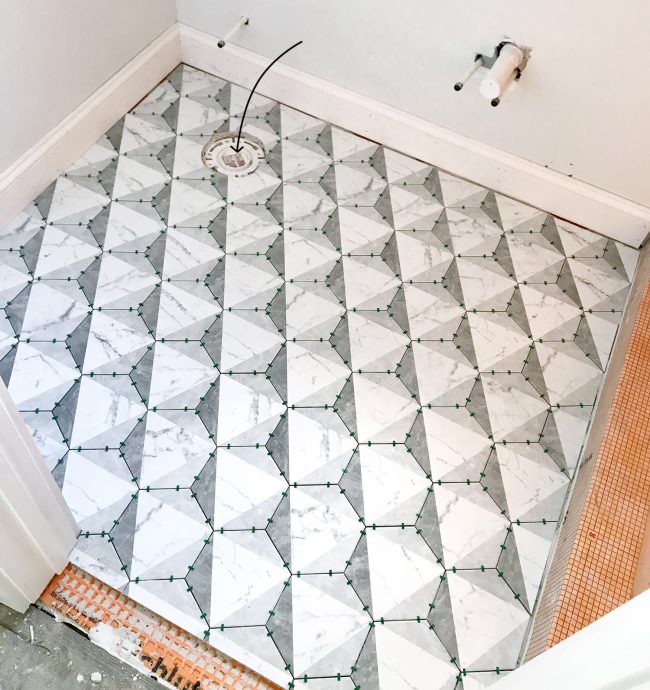
floor tile | grout: frost | door: SW Oyster Bay Now, this tile isn’t actually marble (it’s porcelain, just like everything else – because they’re extra durable and never need to be sealed) but it may be our favorite in the entire house. The marble-like finish is classic and bright, but the geometric pattern that’s layered on top makes it unique and unusual. We’ve actually talked about maybe using the same tile in our own bathroom here in Richmond – thats how much we like it. (Note: the space between the tile & the tub or the tile & the baseboard in various shots throughout this post will get white quarter round molding, so it all looks seamless in the end)
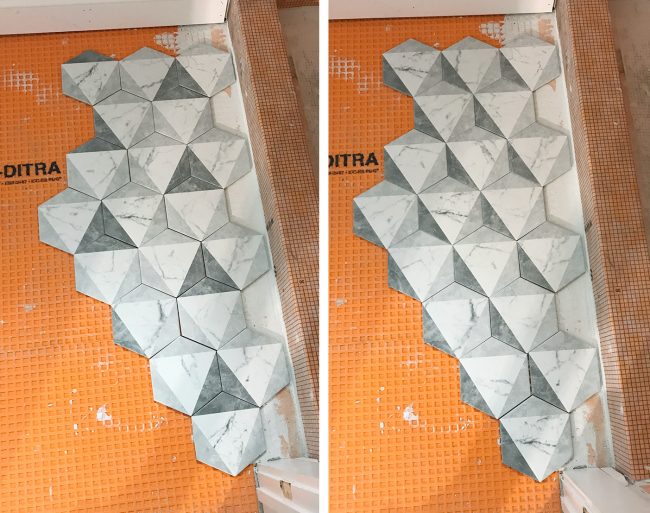
floor tile | wall tile | grout: frost | door: SW Oyster Bay | wall: SW Spare White Like the square tiles, this hex was about 8 x 8″ so the size was very manageable to work with and it provided fast coverage in the room. I think this one maybe took us 3-4 hours instead of 2. And that’s mainly because (1) the hex shape took more care to cut and lay and (2) the asymmetrical pattern took more concentration to not screw up. Speaking of which, there are two different looks you can get with this tile. See how the triangles are all the same color in the left picture below and they’re shaded differently in the right picture because we rotated the hexes? We laid out both options and picked the one on the right – but you could lay it the other way if your eyes like that better.
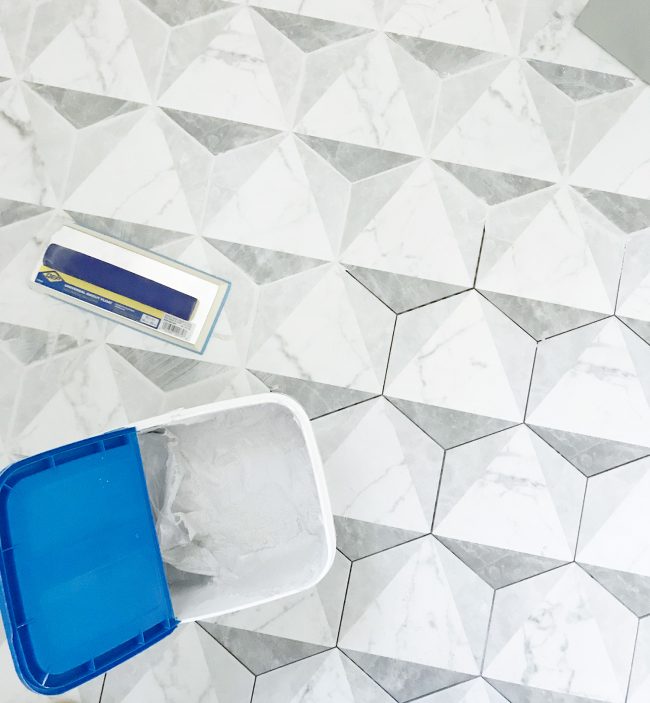
In addition to having to concentrate on not screwing up the pattern, hex tiles are a bit more finicky when it comes to spacing and not letting your layout drift. One tile laid too close to another in your first corner can cause big headaches down the line as that little inconsistency gets magnified in each subsequent row. So we actually laid out lots of tile BEFORE mixing Thinset to check how everything lined up and to ensure that we didn’t end up with slivers of tile anywhere. This may seem like overkill, but it made things go much faster once we actually started setting things for good.
Final Verdict: Ultimately this tile was noticeably (but not dramatically) harder than the square tiles, and with enough spacers (we used 1/16th spacers) we were able to keep everything lined up and spaced similarly. Even if our spacing had drifted a little, the grout color we used disguised the spacing pretty well anyways. Sidenote: we love this Mapei grout because it comes premixed AND doesn’t need to be sealed and is durable/flexible/stain resistant. So once it’s dried and any grout haze is buffed off, it’s totally good to go. Our contractor swears by it and won’t use anything else, so we tried it throughout the pink house and after over a year of heavy use, all the grout in the bathrooms & the mudroom still looks mint (no grout scrubbing in over a year, folks!)
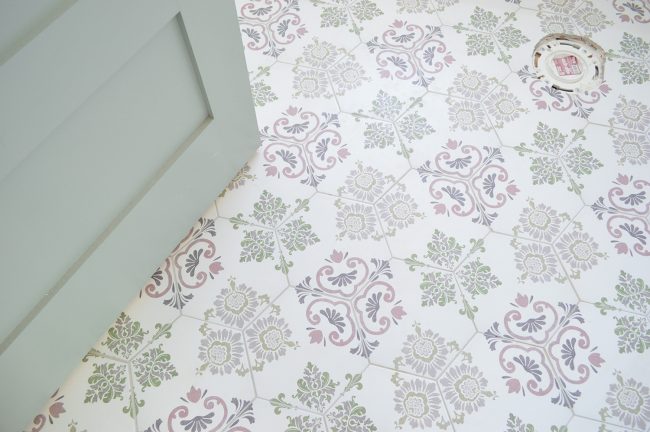
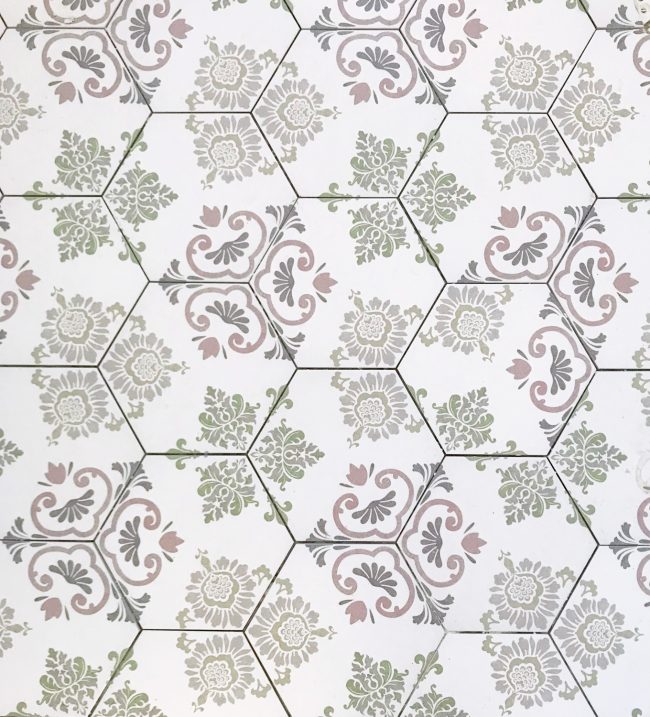
But just because this hex tile went down smoothly, doesn’t mean it all will… The Patterned Hex TileThis other hex tile went in hall bathroom on the same side as the one above and, well, it’s a good thing we love how this tile turned out because it felt straight up cursed when we were installing it.
floor tile | grout: warm gray | door: SW Oyster Bay First, it presented some of the same challenges as the last hex tile – a non-square shape and an asymmetrical pattern. But this pattern was even trickier to keep straight, which caused a few bad cuts along the way (plus, it was much harder to reuse cut pieces because the pattern was so particular). I actually laid one tile in the WRONG direction and we didn’t notice it until a week later when it was time to grout. Can you spot it below?
It wasn’t a big deal to fix. I just broke it up with a hammer, removed the shattered pieces of that single tile, and installed a new piece in its place – but it did set my grouting back a day because we had to wait for that new thinset to cure before grouting. And of course, this happened AFTER we had run out of tile during the actual installation. Yep, we were like 80% done and had to order another box. So this room had two pretty frustrating setbacks. But eventually we got it done.
floor tile | grout: warm gray | door: SW Oyster Bay | wall: SW Spare White | drop-in tub We actually think the square footage calculations on the website are wrong because a couple of our readers reported being short on these same tiles as well. And even without any bad cuts, we don’t think we would have had enough (again: it’s really really hard to reuse your scraps with a pattern like this). So if you use these tiles, I’d recommend getting around 25% extra (not just your typical 10-15% recommended overage). Final Verdict: If ease and speed are important factors for you when you’re choosing a tile, I would NOT recommend this one. The result was great, but keeping the pattern straight kinda made our brains hurt, this specific tile ran short for us based on the square footage listed on the site (and we heard it did for a few other people), and now we know that we can get interesting patterns with simpler square tiles. The Chevron Mudroom TileLet’s move downstairs to the two mudrooms / laundry rooms. I don’t have “after” photos of these because we haven’t grouted them quite yet (since the back doors act as the main entrances for the crew, the mudrooms are still seeing a lot of foot traffic and grime). So right now they’re both covered in protective paper and we’ll grout once things calm down over there. That means my best photos are mostly progress photos.
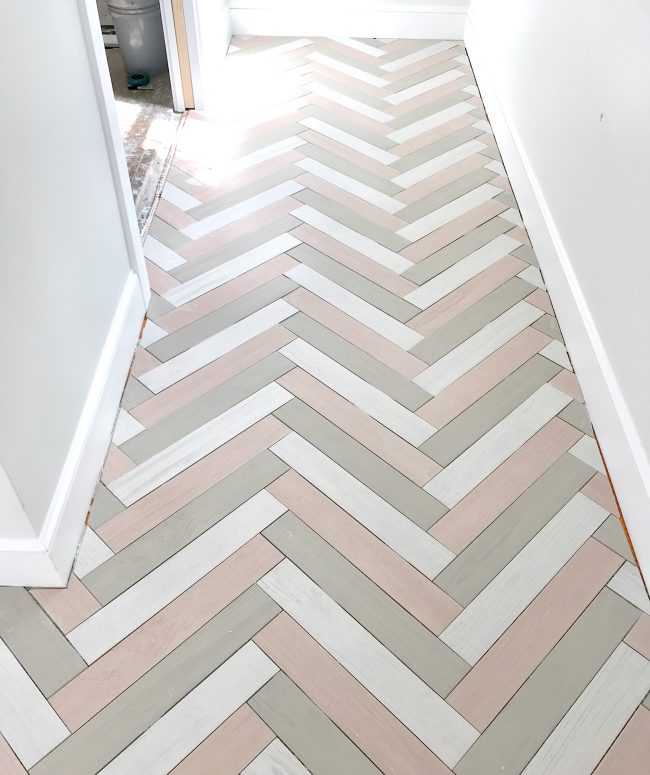
floor tile | spacers |wall: SW Spare White | trim: SW Extra White We really liked installing this chevron tile because the rectangular shape made it easy to lay out and cut, plus the size (17″ x 35″) meant the room – which is nearly the size of all four bathrooms combined – filled up very quickly. The only downside to the size was that they were a bit heavy and cumbersome to maneuver, and I had to get creative with how I rested them on the guide of my wet saw to get them to fit under the blade while I cut them. Plus, keeping big tiles level can be challenging so we always recommend using these LASH spacers, which you can read more about in this post.
My only beef with this tile is that ideally, your spacing between tiles would match the spacing of the zigzags within the tile itself. However, to do that, the manufacturer recommends a (wait for it) … 2/17th spacer. WHO THE HECK SELLS A TWO-SEVENTEENTHS SPACER?! Fortunately, a standard 1/8th or 1/16th (which is what we did) is pretty close to 2/17ths. But still, I feel like it’s an unnecessary complication that could make your chevron not line up perfectly. But even still, for a big room, I would definitely choose this tile again. Final Verdict: Larger tiles can be harder to handle, cut, and to get level, but these tiles were worth the trouble and we finished the room quickly since they were so large. It’s also one our favorite tiles looks-wise (this room gets the most in-person compliments) and it’s extremely durable (porcelain again) so we would recommend this for sure, especially with the LASH spacers we used.
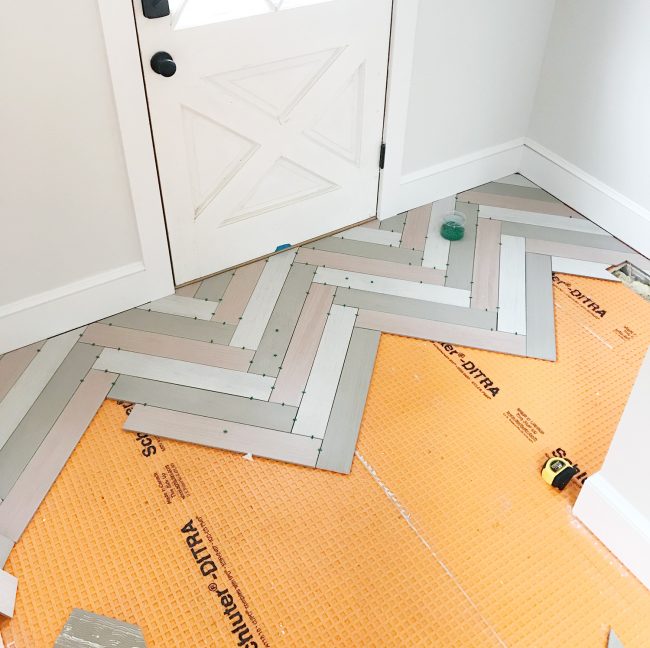
The Herringbone Mudroom TileI’ve saved the best for last. And by the best, I mean hands-down-the-hardest. Yes folks, this is the one we probably would NOT do again… which is hard to say because it’s so darn cool to look at (even here, when it’s still ungrouted). Reminder: the space between the tile & the baseboard in various shots throughout this post will get white quarter round molding, so it’ll all look seamless in the end.
floor tiles: pink, white, and taupe | wall: SW Spare White | trim: SW Extra White To create this floor we laid three different colors of long porcelain tiles (pink, white, and taupe) in a herringbone pattern, making it a perfect storm of all the challenges of the previous rooms combined:
Because of all of those factors – and because it was such a large room – this is the only space that took us an entire day to complete. Heck, it took us more than two hours just to get our pattern planned and the initial pieces cut. Maybe we were just tired (this was room five of six that we did across two consecutive weekends) but it took nearly all of our mental energy to precisely measure all of these angled cuts, to keep things square to the walls, and to not screw up the color sequence in the process.
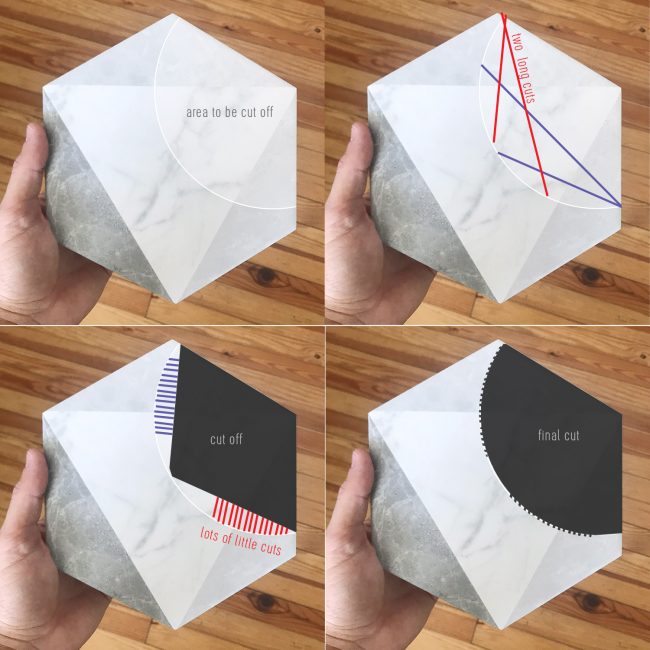
Final Verdict: This was by far the hardest tile choice and it took the longest and required the most mental calculations (angled cuts, creating the pattern ourselves with three different colored tiles, etc). I think it could’ve been simpler had it been a smaller room (or frankly, just a wider room with more full pieces) or if we hadn’t done the herringbone pattern, so I don’t want to totally dissuade anyone from recreating this. Because again, we’re REALLY happy with the result. But I do want you guys to know what you’re getting yourselves into. And One More Thing… About Toilet HolesThis post didn’t cover a lot of “how to” because tiling is something we’ve talked a lot about over the years (I’ll link to some of our previous tutorials at the bottom of this post). But I did want to cover one thing that lots of people asked about on Instagram: cutting around the toilet flange in the floor. See that nice round cut below? Who knew so many people would notice and ask us how it’s done. So here ya go.
I didn’t document this process and we were already done by the time the requests for tips arose, so I’ve tried to illustrate below what I do to make the round cuts around the flange. Most people use an angle grinder to get a really pretty circle cut, but I don’t own one, so my process involves my wet saw and it’s decidedly less pretty, but here it goes…
Basically once I’ve marked the area that needs to be cut, I make a two long cuts from each side at the shallowest angles I can manage (marked in red and purple in the top right picture). This removes a few big chunks and makes the next cuts easier. Then I make a bunch of short cuts very close together – almost like making teeth – along the edge of the circle (marked in purple and red in the bottom left picture above). The “teeth” usually break off in the process, or if they’re too thick I just run my blade against them again. The final result is rarely a perfect circle and often has little indentations where I made the teeth cuts. But it’ll all be covered by a toilet anyways, so it doesn’t need to be perfect. In fact, I probably don’t need to be as meticulous as I am since it’ll be hidden under the toilet. But you don’t want to get too lazy because your toilet needs a flat solid surface to rest on and if your chosen porcelain throne has an especially small base, a larger cut could end up peeking out. Speaking of which, the upstairs toilets and vanities got installed last week so we’re hoping to make a trip out there this weekend to check it all out! Things are really coming together!! More Tiling Projects & How To’s:If you’re interested in more tutorials on tiling or want to check out some of our previous tile projects, here you go:
*This post contains affiliate links* The post The Duplex Is Tiled! Here’s What We Loved & What We Wouldn’t Do Again appeared first on Young House Love. Via https://www.younghouselove.com/duplex-is-tiled/ It’s a question we’ve gotten a lot over the years: are you doing this for you or for the blog? It’s even one we’ve asked ourselves – and it hasn’t always always been easy to answer – but it’s a lot clearer in hindsight. So we’re diving into what past projects we would’ve done differently without an audience watching and we’re sharing how we keep ourselves in check these days. Plus, Sherry is finally getting the chance to realize a makeover she has fantasized about for five years and we talk through how we decide what home maintenance tasks to tackle ourselves and which to hire out. You can download this episode from Apple Podcasts, Google Podcasts, Stitcher, TuneIn Radio, and Spotify – or listen to it below! Note: If you’re reading in a feed reader, you may have to click through to the post to see the player. What’s New
Listener Question
We’re Digging
If you’re looking for something we’ve dug in a past episode, but don’t remember which show notes to click into, here’s a master list of everything we’ve been digging from all of our past episodes. You can also see all the books we’ve recommended on our Book Club page. And lastly, a big thank you to Agility Bed for sponsoring this episode. For Cyber Monday you can get $200 off your hybrid mattress order and a free sheet set with the code BLACKOUT at AgilityBed.com. They’ll ship it to you for free and if you don’t like it, you can return it within the first 100 nights, no questions asked!
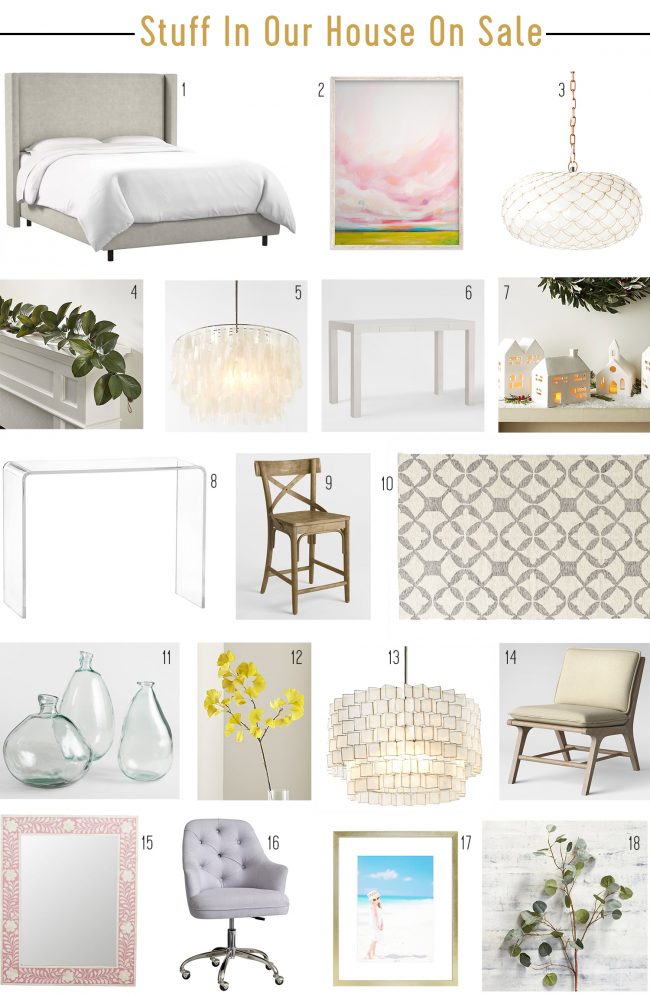
Thanks for listening, guys! *This post contains affiliate links* The post #121: Do We Make Design Decisions Just For The Blog? appeared first on Young House Love. Via https://www.younghouselove.com/podcast-121/ As is the tradition, I’ve scoured the Black Friday sales (is it me, or do they start earlier every year?) and rounded up my favorite home decor & furniture deals. And John already grabbed some tech items (he’s been waiting for this sale for a while). Our kitchen stools are under $96, our daughter’s bedroom rug is $350 off, and these velvet pillow covers are just $10! Our TV is also 42% off ($250 off!!), the smart plugs John loves are 58% off and his FBAT (favorite backpack of all time) is 65% 0ff. And so much more. Stuff We Already Own (& Love!):These are all things that we have bought with our own money, lived with, and love. And thanks to these crazy sale prices, you’re gonna get a better deal than we did. Let’s start with items you’ve probably seen around our Richmond house:
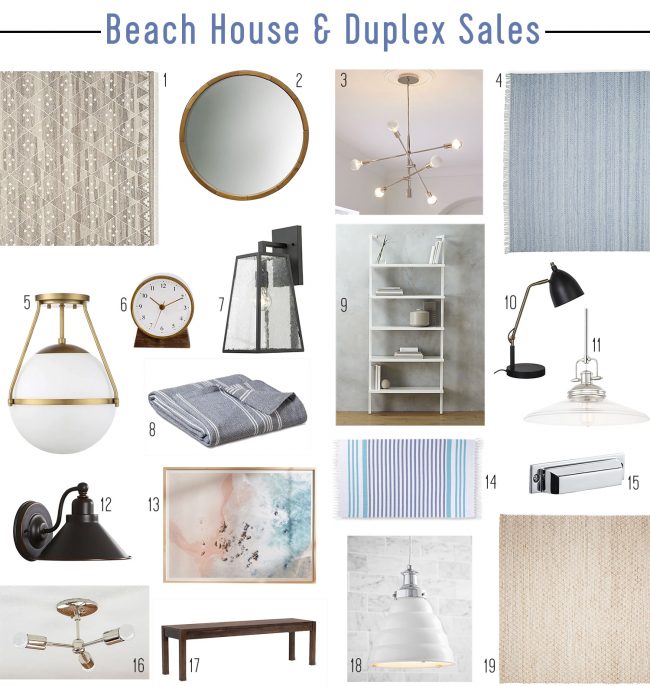
There are also lots of deals on stuff that we’ve got in our beach house and have started filling the duplex with (like some lights I’m crazy for). And there are some BOSS deals in here too.
Tools & Technology We Own/Love:Thanks to John’s deep obsession with watching all things tech for deals throughout the year, he already jumped on a bunch of them for himself this morning since they’ve never been lower. So here are the items we’ve already purchased and used (many for years & years) and still LOVE.
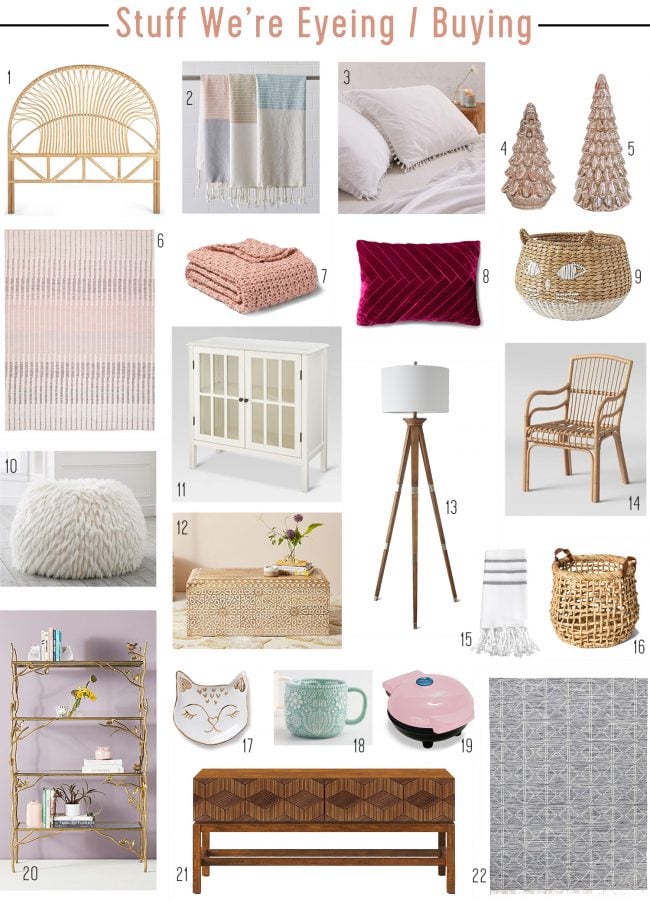
House Stuff We’re Buying / Eyeing:I’m mainly checking out rugs, accessories, and a few pieces of furniture – and these are the things I’m loving most with the best prices right now. A glass doored cabinet for $67?! Big rugs like this and this that are 40% off?! A gorgeous armchair for $185?! Yes please.
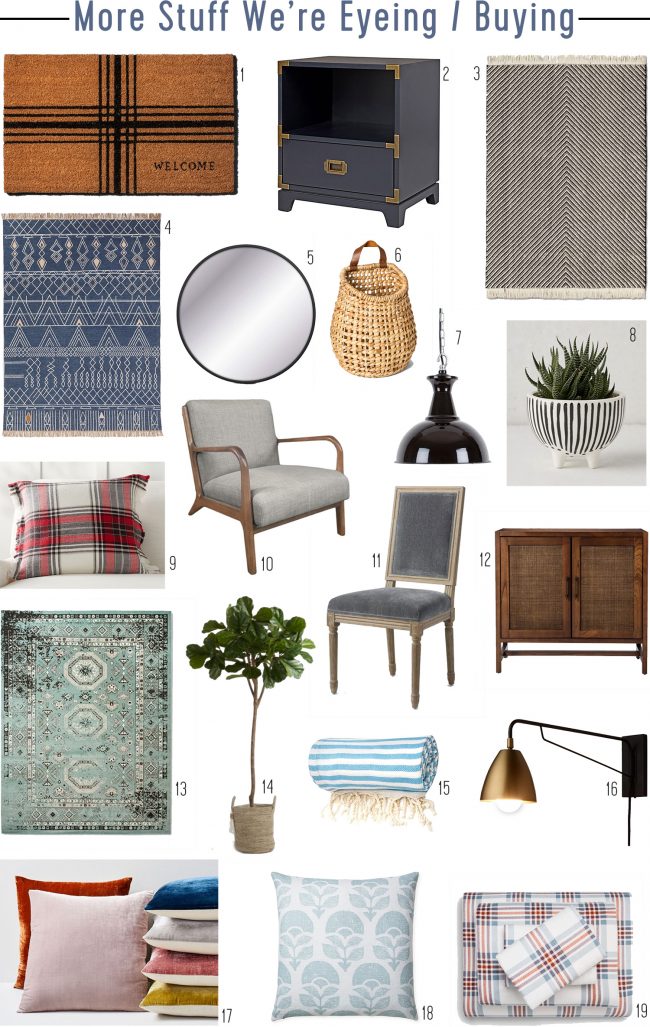
Not everything we’re keeping an eye on falls into a soft blush color scheme (it was fun to organize things that way, though – ha!) so here are the other home deals I’m loving:
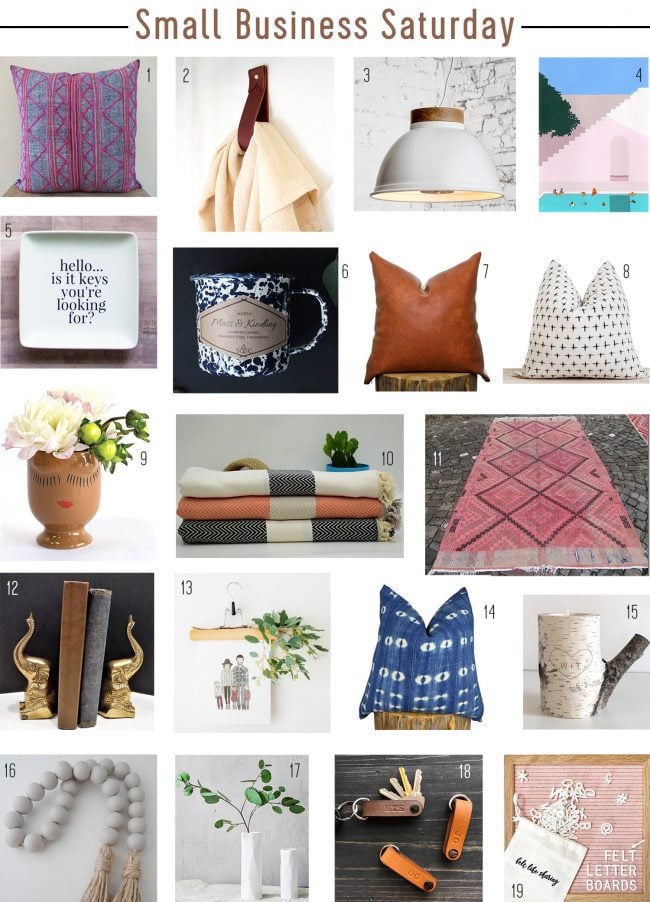
Can’t Forget Small Business Saturday!Here are some of our favorite Etsy shops with lovely (and personalized!) hand-made wares. Not everything’s marked down, but it FEELS SO GOOD to have original art and handmade stuff in your house. Really puts a personalized spin on any space. And can you resist that sweet personalized birch candle holder?! Also: support small businesses year-round!
Coupon Codes & Sales That Are On Now:Ok, I’m off to eat my weight in turkey and grab at least a handful of things on this list (John already bought our Nest thermostats for the duplex and his belated birthday Apple Watch – such a deal! he saved $80!). But before I go, here’s a rundown of the sales & codes I’ve found so far:
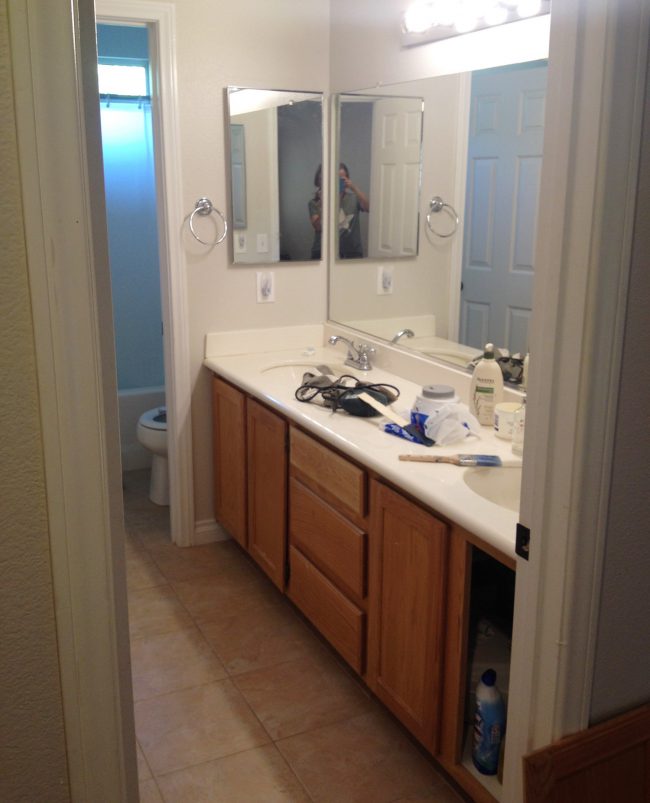
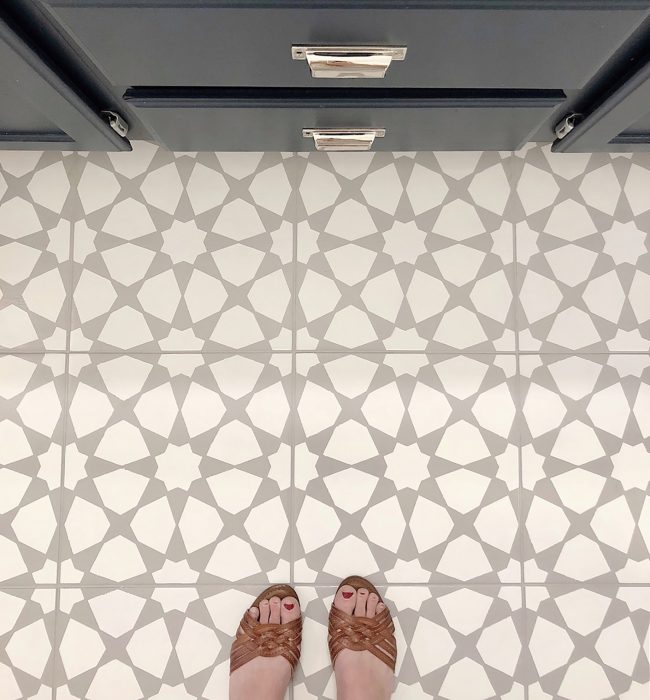
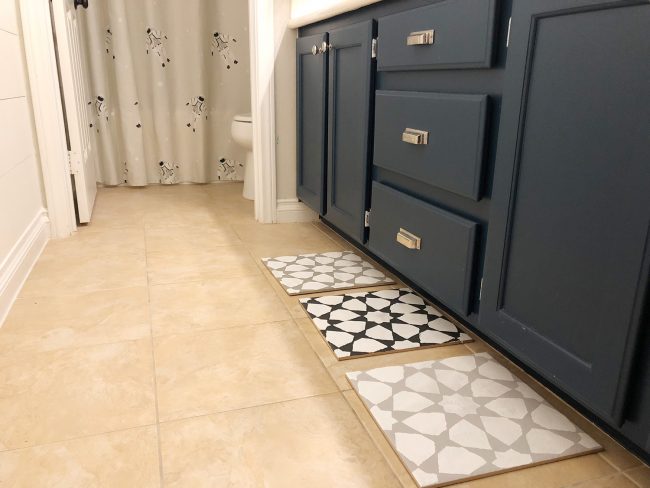
Hope you guys are all soaking up lots of family time (and all the delicious fooooood) this holiday weekend. And feel free to tell me on Instagram or Facebook if there are any major deals I’m missing. You know I love to submerge myself in them hot-tub style and pretend to splash around in them a la Scrooge McDuck. Psst – For all the exact paint colors & links to all of the furniture & accessories that we have in our house, this page has you covered – and if you’re looking for items we have already bought and lived with and love, this page has all of those things corralled for ya. *This post contains affiliate links* The post Black Friday Home Decor Deals (& What We’re Buying) appeared first on Young House Love. Via https://www.younghouselove.com/black-friday-home-decor-deals-2018/ I hear everyone who’s asking for our annual Black Friday deals post and I’m putting it together as we speak! But in the meantime, you guys have to see this awesome tile transformation that a reader named Angela sent over. She not only COMPLETELY transformed her old blotchy beige bathroom floor, but it was super wallet-friendly (UNDER $75! HOLLA!), and it has already held up for well over half a year without any issues. In a wet bathroom that gets everyday use, no less!
I know this is probably going to be hard to believe, but that beautiful bathroom above used to look like this. Again, she did not put down new tile – she just painted it!
Even I was a little skeptical of the idea (painting a tile floor?! in a bathroom?!!) but Angela reports that it still looks mint after seven months of shower-dripping, toothpaste-splattering, and all that good stuff. So if you’ve got some tile you’re not crazy about, but a full-blown gut job isn’t in the cards right now, this could be a great solution to tide you over for a while.
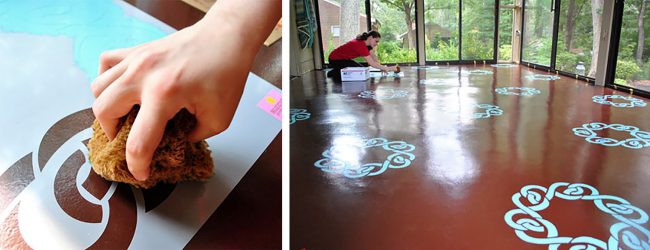
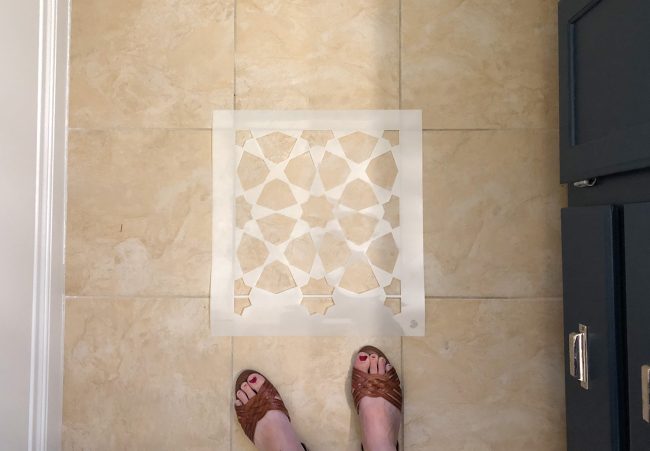
So here’s how Angela got it done: Ordering The StencilFirst, she measured her tile size exactly, within 1/16th of an inch (erring slightly on the smaller side so the stencil wouldn’t bleed into the grout lines), and found this stencil on Etsy and special-requested that the seller make her stencil exactly that size.
In order to visualize what color combo she’d like best for her stencil, she tested out a few different ones on spare tiles and laid them on the bathroom floor (you could also do this with cardboard if you don’t have spare tiles around).
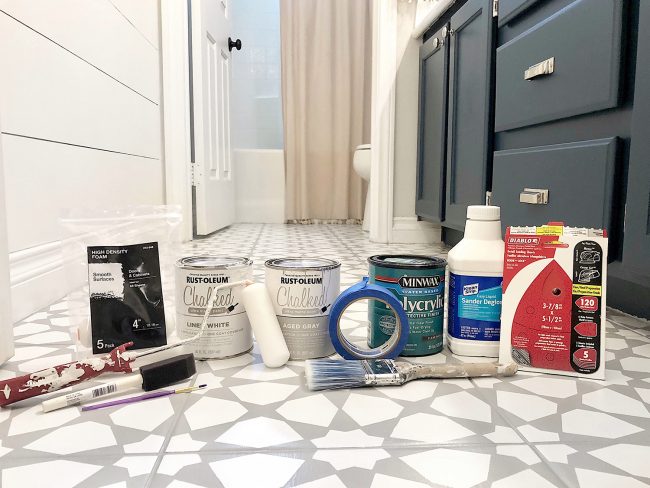
Prepping The FloorOk, so Angela warned me that this part isn’t fun, but don’t skip it! Floor preparation is super important in order for the paint to stick. First she thoroughly cleaned the bathroom floor, then she sanded the floor with 120 grit sandpaper to take off the sheen and rough it up a bit (here’s our favorite palm sander for jobs like this), and then she wiped it all down with a liquid deglosser (like this one). She was sure to remove all dust and debris so it was perfectly clean.
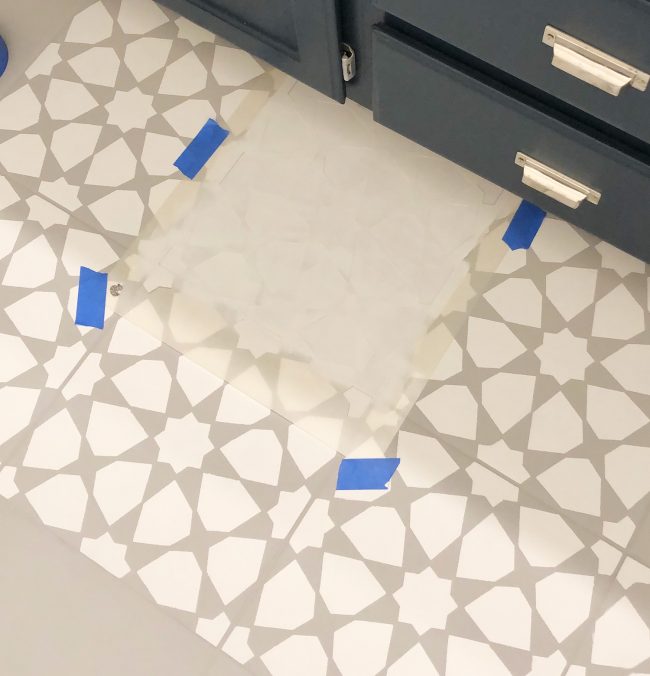
To help keep the floor clean throughout the process, she even had a pair of clean socks that she would ONLY put on when she went into the bathroom so she wouldn’t track in dirt and crumbs. She even used a blow dryer like a mini leaf blower and blew out the remaining dusty stuff after sweeping AND she put caution tape across the doorway to block it off from any adorable little children who might accidentally wander in. YOU KNOW I LOVE HOW THOROUGH ANGELA IS ;) Lastly, she took blue painters tape and taped off the base of the cabinet, walls, toilet, and tub – so she didn’t have to worry about getting paint on those items when she was stenciling Painting The FloorShe started by painting her floor the base color, using some leftover Rustoleum Chalk Paint in Aged Gray. Angela made sure to start at the furthest point from the doorway (you don’t want to trap yourself in!) and used a high-quality paint brush (so it wouldn’t shed bristles as she went). She painted all the grout lines around each tile first and then filled in the tile with the brush. Her entire floor only needed one coat, but you can do up to three coats if needed. After the base color dried, she again started at the furthest point from the door, taping down her stencil with painter’s tape over each tile and using a high-quality foam roller to roll on super thin coats. Thin is the operative word, here! A thick application will bleed under the stencil, whereas thin coats make for much crisper lines – so you may want to even grab a paper towel and roll any excess paint off the roller. She applied two coats of Rustoleum Chalked Paint in White Linen for the stenciled parts.
Move the stencil to different tiles making sure to not overlap with any wet parts. In between coats she also used a blow dryer on the cool setting to speed up the drying process (she said in hindsight that purchasing two stencils so she could switch back and forth as one was drying would have sped up the process). Once she completed all the full square tiles, Angela moved on to the edges. She had to get a little creative and find various awkward body positions that worked to reach those spots (I remember this fondly from this project of yore). You’ll want to bend the stencil up against walls to fill in any edges. Angela also used painters tape in places where she couldn’t fit the stencil (taping off a little triangle or sliver that needed to be painted to make the pattern look complete).
Finally, she took a small paint brush and touched up all the edges and places where it didn’t look perfect. This part isn’t difficult, but it takes patience. Angela also mentioned that she was glad she thoroughly cleaned her toilet before embarking on this project because she was so up close and personal with it. Ha! SEALING THE FLOORHere’s the easy part: sealing the floor. Angela used some Minwax Polycrylic in satin that she already had on hand (note: water-based sealers like this won’t yellow like something oil-based, which is important if you’re doing a lighter colored stencil). Using a high-quality brush she brushed on four coats of Polycrylic (with two hours of drying time for each one, and a light sanding between each coat).
And that was it! An awesome $75 solution for her bathroom and an affordable way to get that cement tile look without a full bathroom gut job. Angela has been so happy with how it has held up so far. She’s not sure it’s a permanent fix, but it’s been such a great way to live with tile that you don’t love until you can replace it. And she thinks that adding a coat of Polycrylic every year could help maintain the floor and keep it nicely protected.
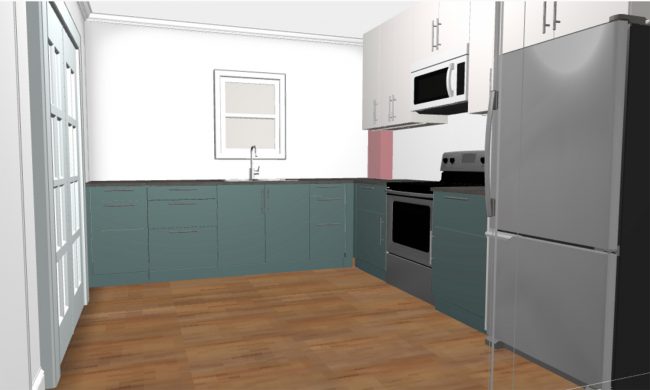
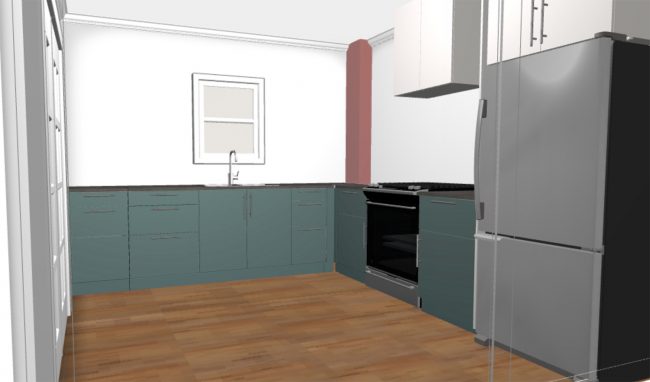
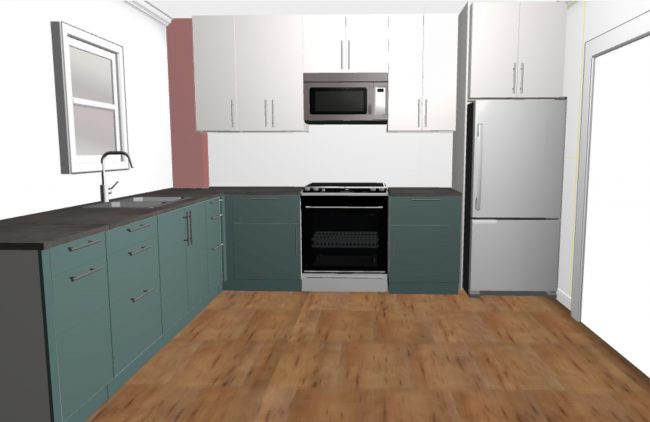
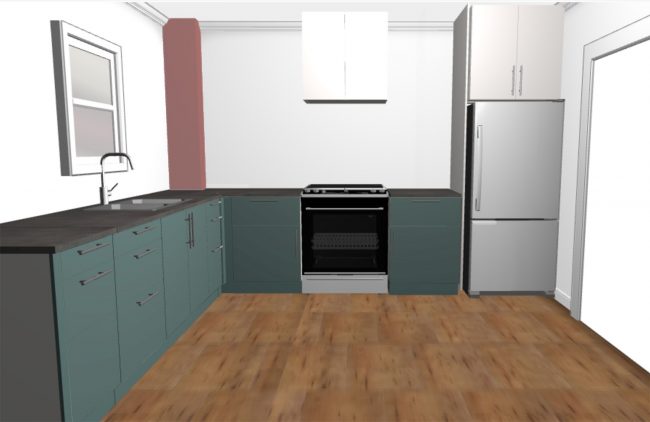
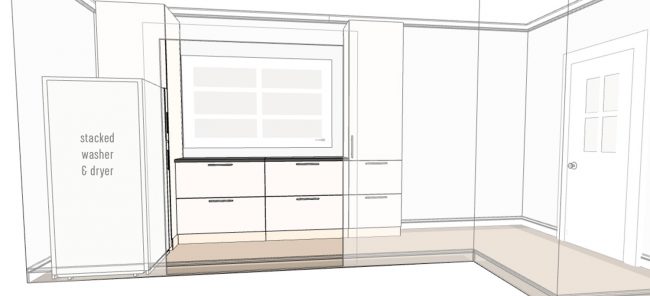
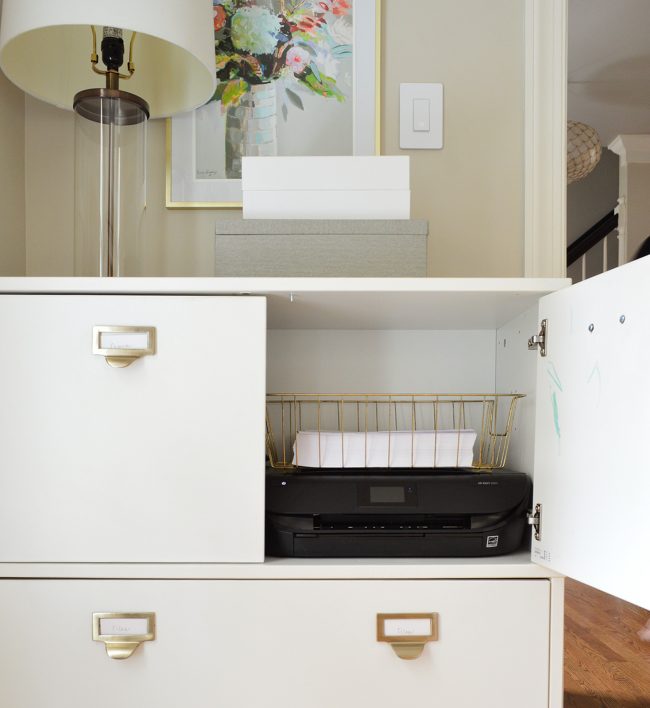
One thing to note is that Angela knew this was for a bathroom, and not a main area in her house that got a ton of foot traffic. So another step she could have added was to prime her floors with this Zinsser Primer. She also could have used Porch & Patio Floor Paint, but she had chalk paint on hand and wanted a low fume option since she didn’t have much ventilation and was working around her kids’ bedrooms. So thanks so much to Angela for sharing her project! I love following her on Instagram, so you can see what she’s up to right here. And feel free to drop back in on the blog this Friday when I share the best Black Friday deals I can find on furniture, accessories, and all that other fun house stuff. The sales are already starting and I don’t want to jinx anything, but they’re looking GOOOOOD. PS: If you want to see another floor stenciling project, we stenciled our closet & bathroom’s basic old subfloor after ripping up the carpet. That lasted for FIVE WHOLE YEARS and still looked pristine except for one small seam in the subfloor that rubbed when we walked on it. *This post contains affiliates* The post How To Paint A Bathroom Floor To Look Like Cement Tile (For Under $75)! appeared first on Young House Love. Via https://www.younghouselove.com/how-to-paint-bathroom-floor-tile/ Remember when we got into it over a refrigerator back in Episode #74? Well, the location of an appliance recently had us battling over two different kitchen layouts – this time for the duplex. So this week we’re sharing our competing perspectives on form versus function, and how we finally came to a compromise that checks both boxes (but not until I spent a few days cooling off). We’re also sharing why this stage of the duplex renovation is especially brain-bending, and what we’ve come to realize about hitting a wall… and then getting yourself over it. Plus, a solution to an age-old problem in our home office, an update on Sherry’s weighted blanket, and an easy upgrade to a money-saving tool that we use at home. Oh yeah, and we solved our weird locked-out-of-Instagram problem! You can download this episode from Apple Podcasts, Google Podcasts, Stitcher, TuneIn Radio, and Spotify – or listen to it below! Note: If you’re reading in a feed reader, you may have to click through to the post to see the player. What’s New
Updates
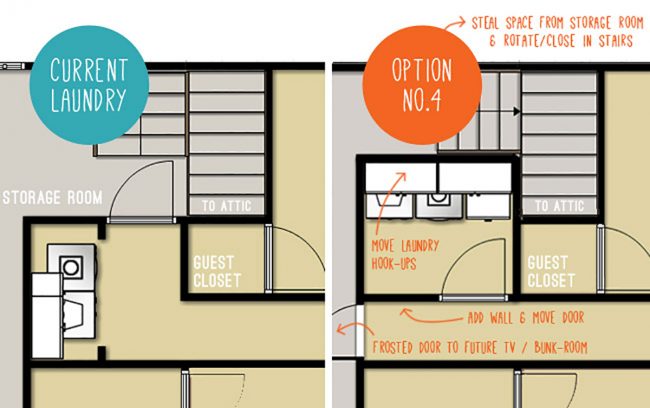
Duplex Kitchen
We’re Digging
And if you’re looking for something we’ve dug in a past episode, but don’t remember which show notes to click into, here’s a master list of everything we’ve been digging from all of our past episodes. You can also see all the books we’ve recommended on our Book Club page. And lastly, a big thank you to Universal Furniture for sponsoring this episode. They’ve teamed up with Coastal Living Magazine for a whole new home collection called “Escape,” which captures that relaxed beachy feel. You can check it out at UniversalFurniture.com/YHL.
Thanks for listening! *This post contains affiliate links* The post #120: The Big Fight We Had Over A Microwave appeared first on Young House Love. Via https://www.younghouselove.com/podcast-120/ |