|
Just when you thought we were done with backyards (we shared the duplex backyards last week) we’re back with yet another… backyard! And this beach house backyard has been a long time coming, and it started out in an incredibly lackluster state – so we’re excited to show you what we did back there. It might be one of our favorite updates to date – especially since this backyard is really small but it all feels super functional and useful for our family – we’re out there all the time! And it’s about 1000% better than where we started. 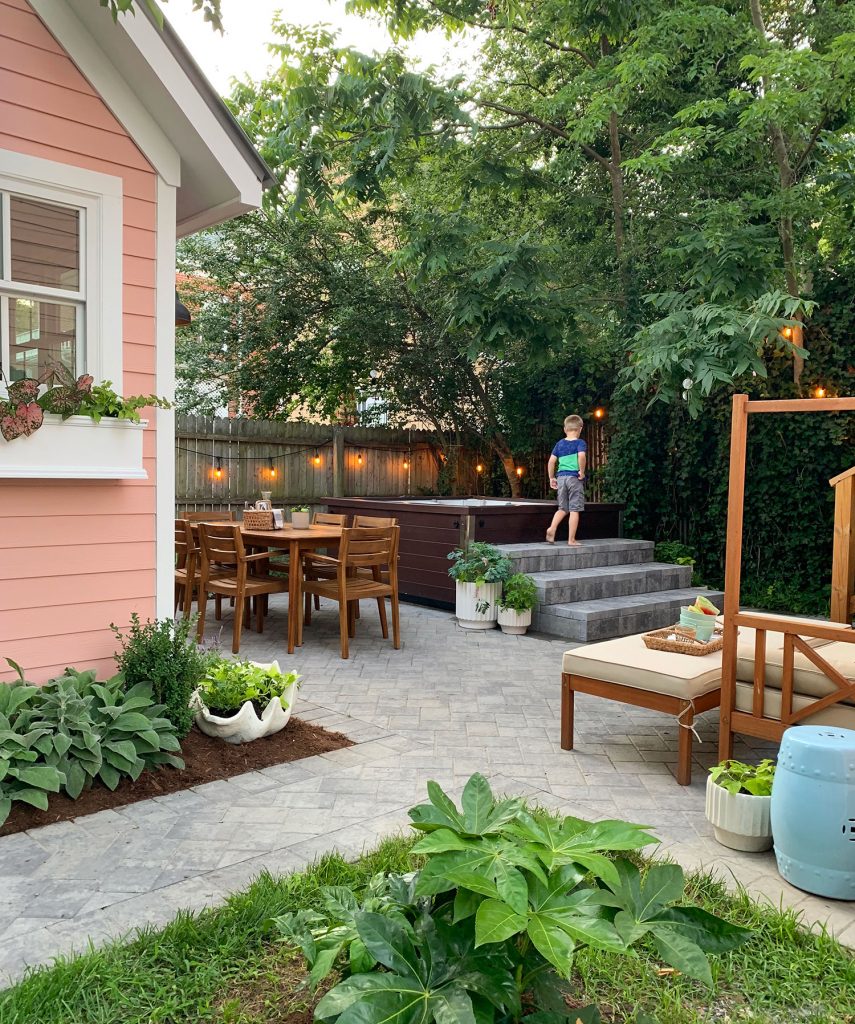
There’s a lot to see because we squeezed in SO MUCH into a relatively small space. And surprise! That actually turned out to be the key to creating this cozy and private-feeling area for our family (despite being closely surrounded by neighbors on all sides). But first, let’s flashback to October 2016 and the overgrown jungle we had just purchased. Gulp. 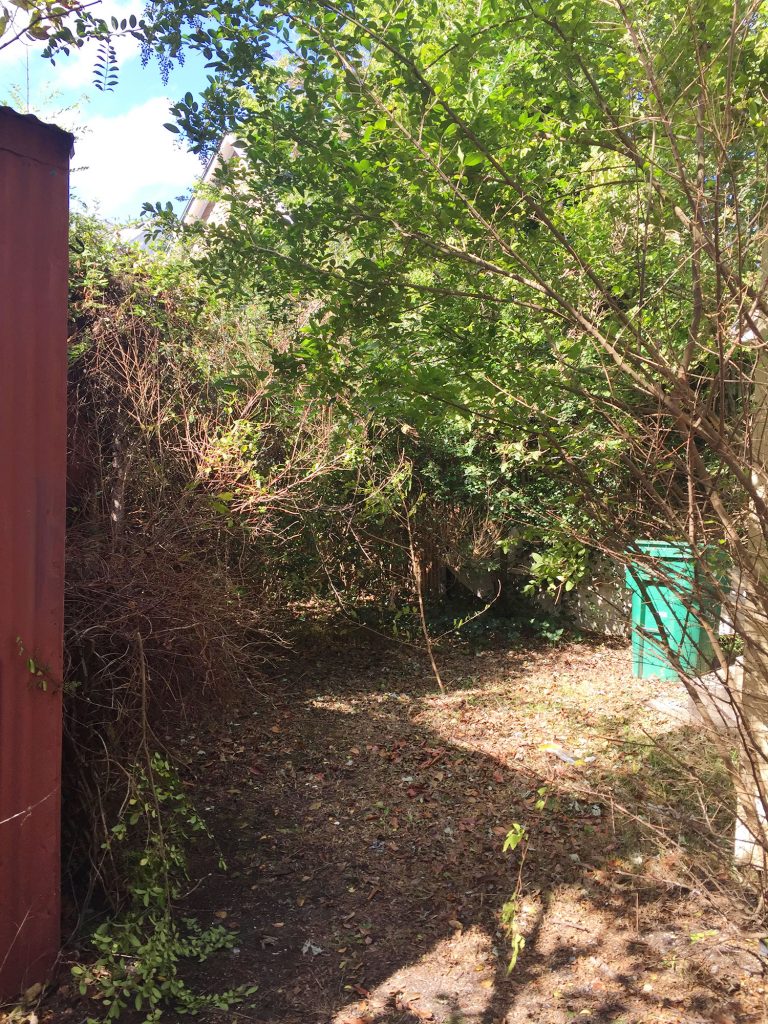
The next photo is taken just a few weeks later, right after we cleared some of the brush and weeds. It’s also the project that gave methe worst case of poison ivy of my life. #memories So yes, this backyard and I got off to a rocky start. But all is forgiven now because it has become one of our absolute favorite places in the world. No joke. We are out here basically every night that we are in Cape Charles. 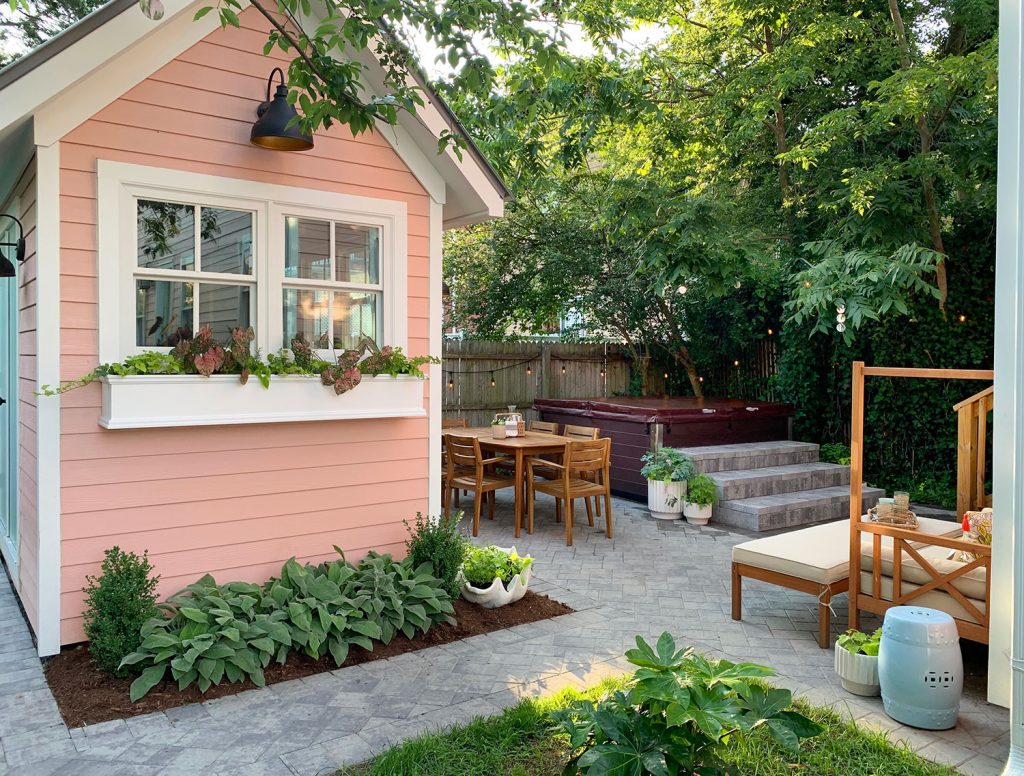
The end result is also made sweeter by the fact that we had to wait for it longer than originally planned. Our original schedule was to tackle this in the fall of 2017, once our contractor Sean finished the inside of the house. But a new little project distracted all of us (ahem, the duplex!) and we back-burnered the beach house backyard. So for our first few months of staying in the otherwise finished beach house, this was our view out the back door: 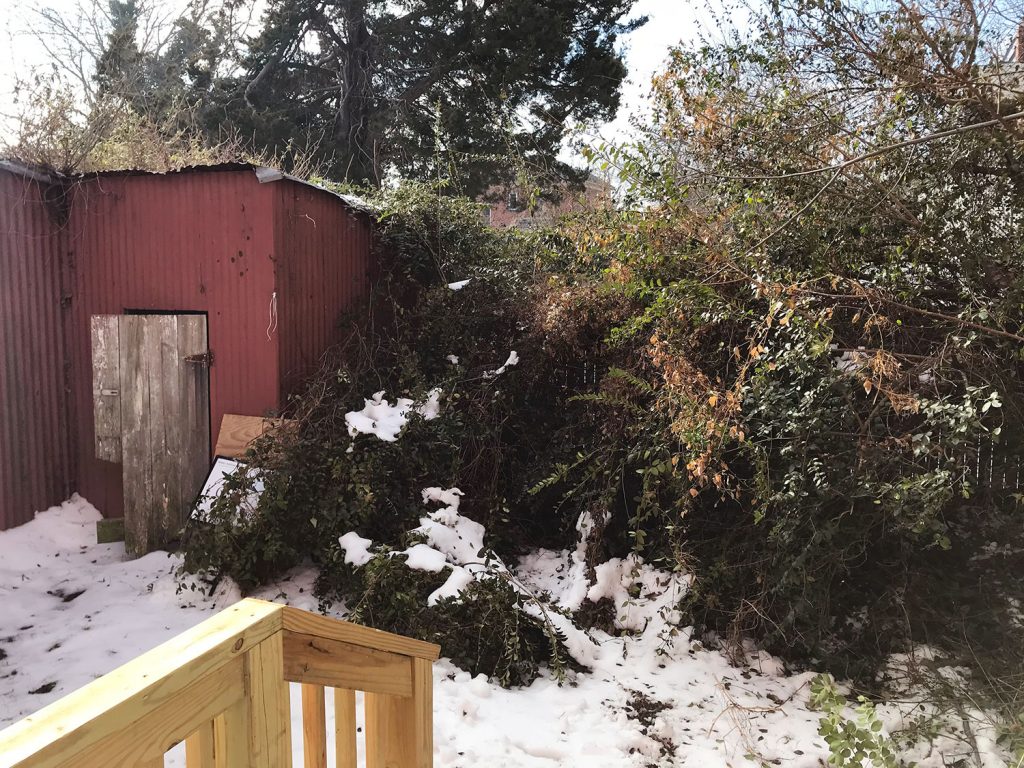
When the town delayed our duplex plans in early 2018, we briefly returned attention to this area. Sean and his guys cleared out the overgrown vegetation along with the old, rusted, metal shed and we began planning a new one. You may remember hearing Sherry and I debate/argue about the new shed on our podcast around that time. You can hear the details of the disagreement in this episode, but here’s short version: the old shed had been built about two feet onto our neighbors’ property line AND any new structure was required to be set back two feet from that now-closer-than-we-originally-thought property line. So our new shed would have to encroach four more feet into our yard than the last one had. Sherry didn’t like that and argued for no shed, but I thought one was necessary (are you surprised?) to house all of the sandy stuff like beach chairs and umbrellas and floats that we were dragging into the house for the first summer without it. I’m like the Oprah of backyard sheds. To every yard I’m basically like “you get a shed! you get a shed! you get a shed!” Spoiler: I was right – Sherry even admits it on camera in the video later in this post. BUT ANYWAYS… by the time we agreed on something, the duplex delays had been resolved and the crew was full steam ahead over there. Meaning this backyard got left in the dust – or, more literally, the mud – for nearly a year. Having an incomplete muddy backyard for our first summer in Cape Charles wasn’t the worst thing ever, but it was a noticeable rain on our proverbial parade. Because when there was an actual rain (or just a bunch of wet sandy kids coming back from the beach and using the outdoor shower) there was an actual parade of mud into the house even after they showered – cause there was mud between the outdoor shower and the back door. So it made us even more excited to complete this space. We temporarily satisfied that appetite later that summer in the form of the hot tub we bought in August. Sherry (Lover of Hot Water, First Of Her Name) always wanted one, and I think it was also another way for us to make lemonade out of the limbo that the yard was stuck in. You’ve probably seen pics of it like this on Instagram, and there’s a reason why they’ve always been cropped like this. 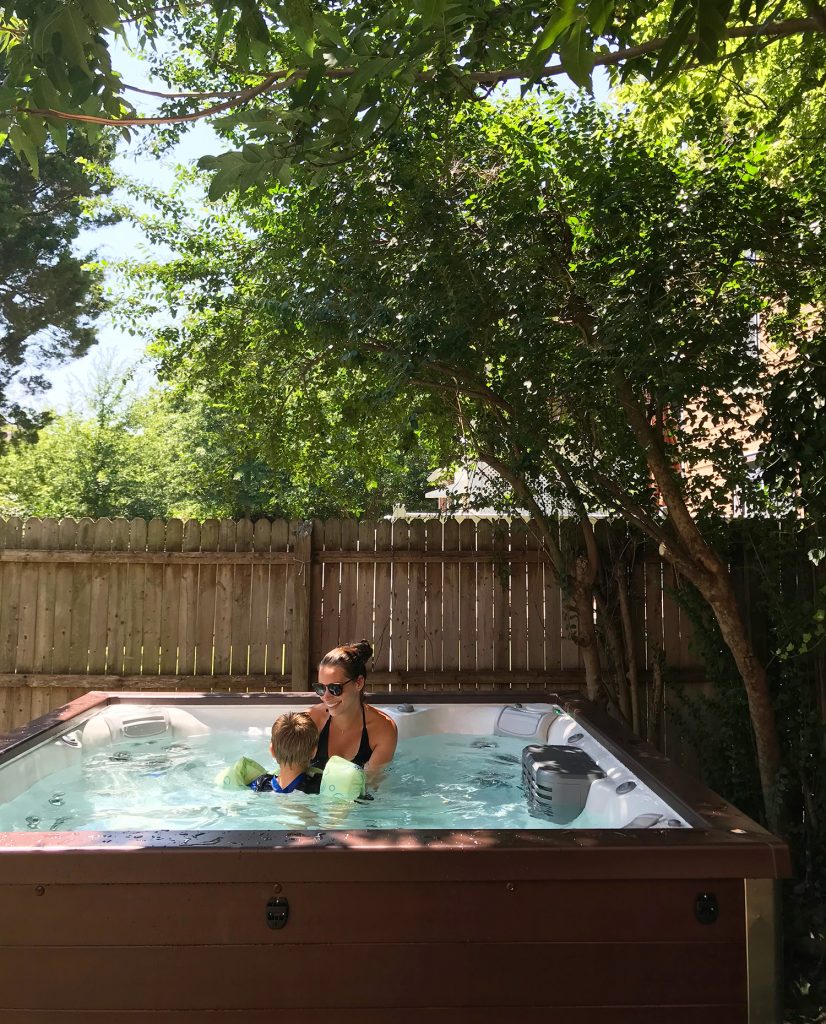
The yard around the hot tub was just a grassy, muddy mess. We threw down a few large pavers to create a relatively mud-free walk to and from the hot tub, but it was – shall we say – subpar. I don’t even have any pictures of it. But here’s one from right before the hot tub was delivered to give you an idea. That’s the concrete pad we had poured for it to sit on. 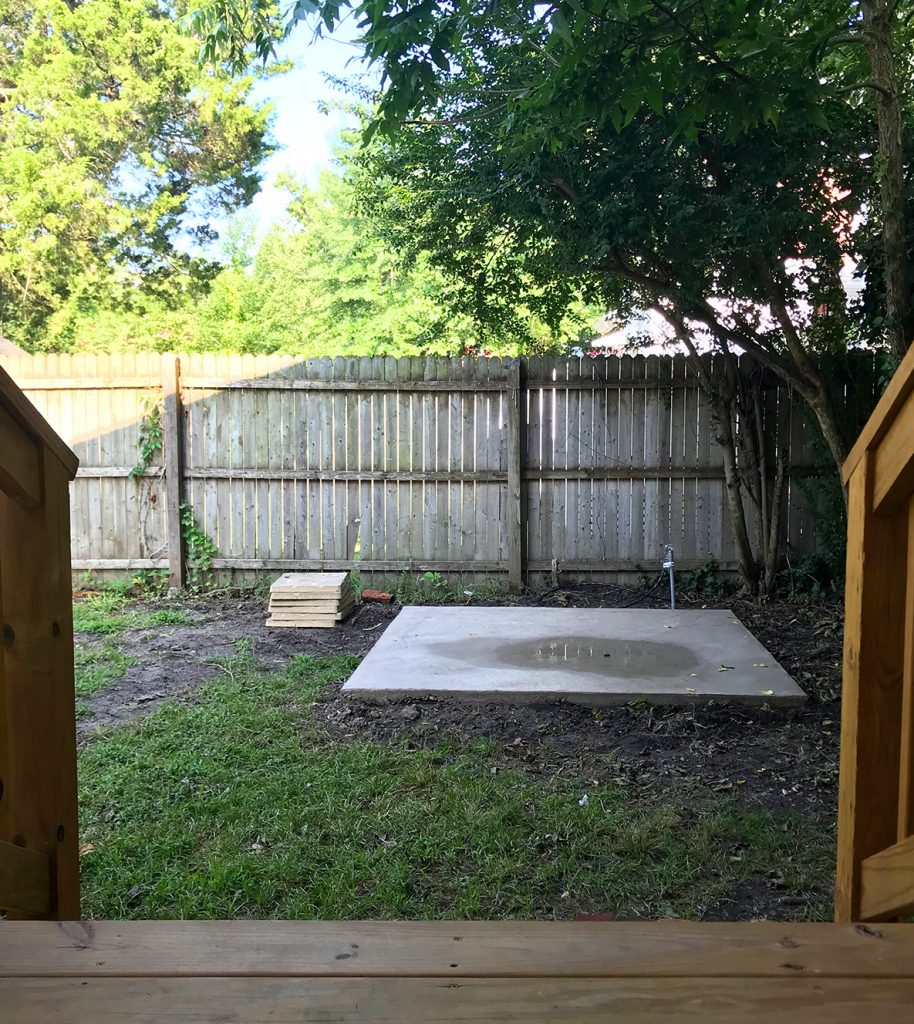
So while the hot tub allowed us to enjoy the backyard, it also made us even more impatient to finish the rest of it. So earlier this year – once the crew was done on the inside of the duplex – we finally got to work on the backyards of the beach house AND the duplex somewhat simultaneously. It was kind of a whirlwind, but we were able to get some cost efficiencies by bundling the projects together (basically 3 sheds and 3 patios all at once – which saved us some money because we got to bulk order materials like stone and hardiplank and negotiate thanks to sheer shed volume). 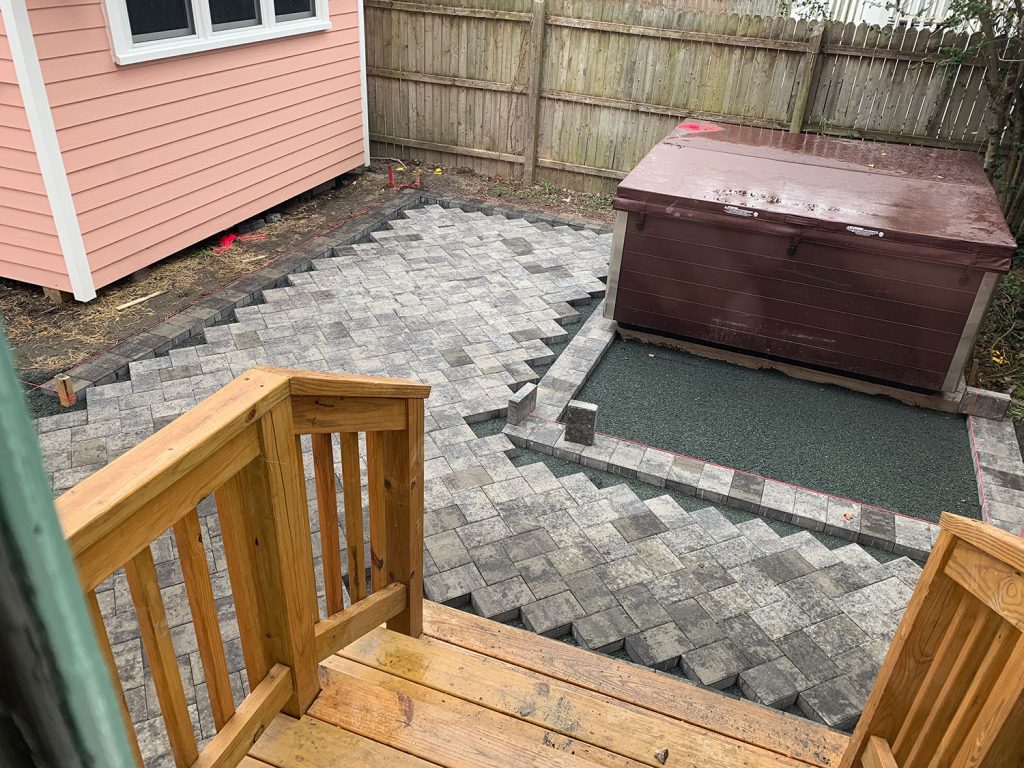
I wish I had more progress photos, but we didn’t catch a whole lot of “in between” stages on our visits out to Cape Charles. But just like the duplex sheds, this one was custom built in place by Sean’s crew – using the same Hardiplank siding, the same pink paint color as the house (Mellow Coral by Sherwin Williams), and even the same tin roof that we’ve got on the main house. And I know it sounds counter-intuitive, but that was actually cheaper to have this custom built than to have a pre-built one of the same size trucked in. Here’s what the area looked like back in March, after the patio crew was done and it was now up to Sherry and I to turn it into something inviting and cozy. 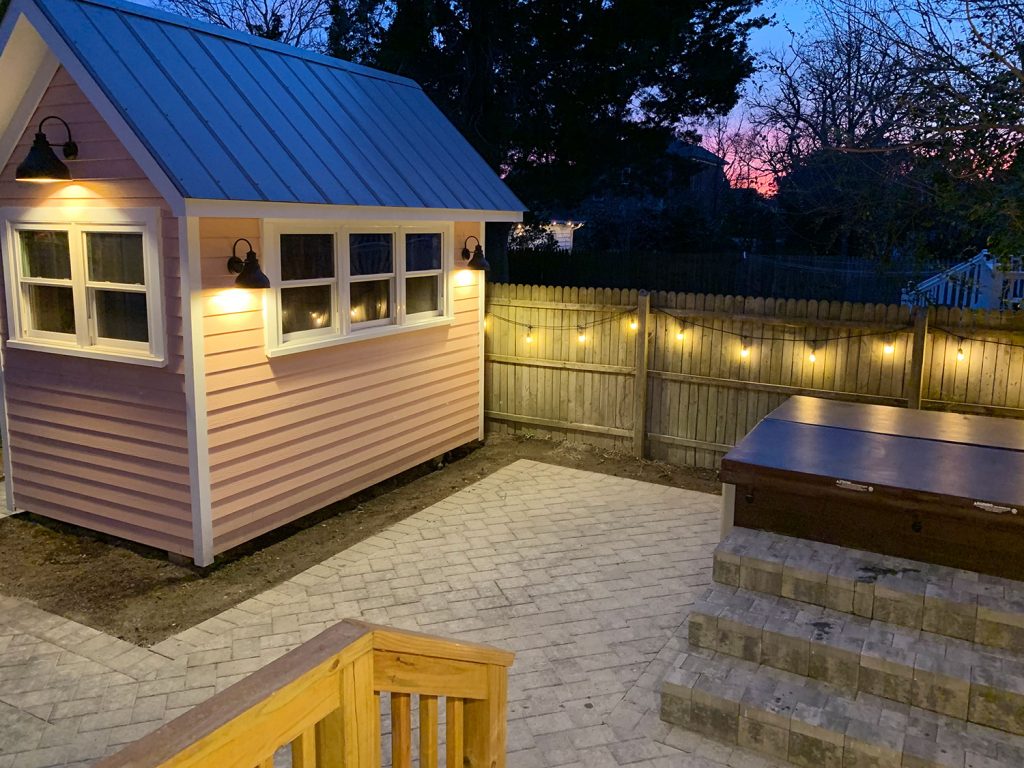
And thanks to a few strategic furnishings and a lot of greenery, here we are today! Our little backyard beach house oasis… 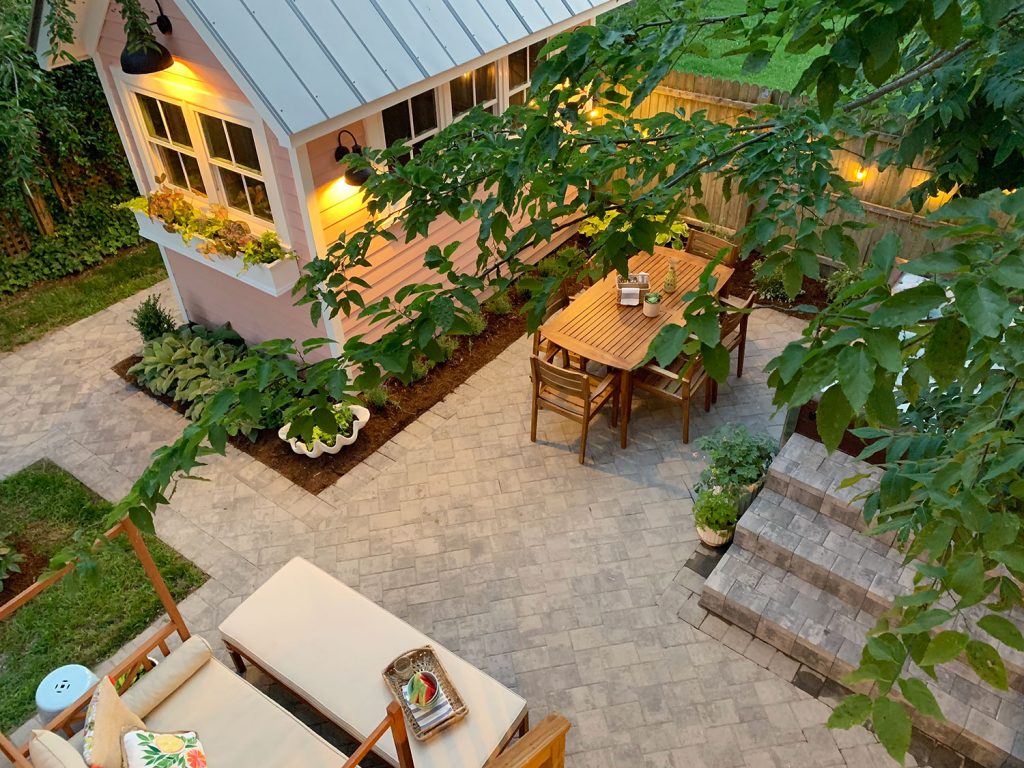
So now that you’ve seen how we got here, let me point out some of the details and decisions behind what we did – and why it works so well for us. Let’s start with my pride and joy: the shed. Well, not the red rusted out shed below – the new one. Remember how I said the old shed was built 2-feet over our property line? That tree is effectively the end of our property. 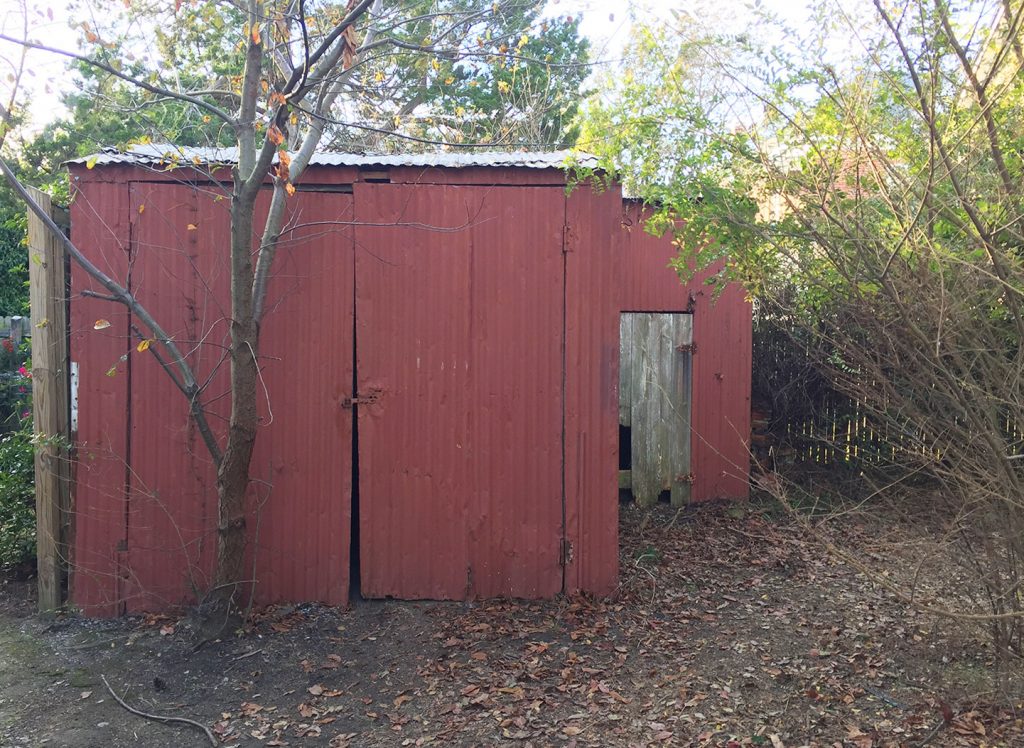
We were initially annoyed by the setback rules for the new shed, since it creates a 4-foot wide “dead zone” where no one can build anything. But we talked things over with our neighbor and (since they weren’t about to move their pretty, jasmine-covered fence) they said that 4-foot space was ours to use. Although town code prevented us from putting our shed there, it didn’t say we couldn’t put a path to the shed there… 
So we made the unconventional choice to put the doors on THAT side of the shed. It not only made use of that “dead zone,” but it also meant that we didn’t have to account for door swing clearance on the patio side of the shed (which would’ve prevented us from having a dining table out there). Plus, it meant we could focus on making the more visible sides of the shed pretty to look at (like adding a big window box on the front, for example). They call me The Shed Whisperer. Just kidding nobody calls me that. 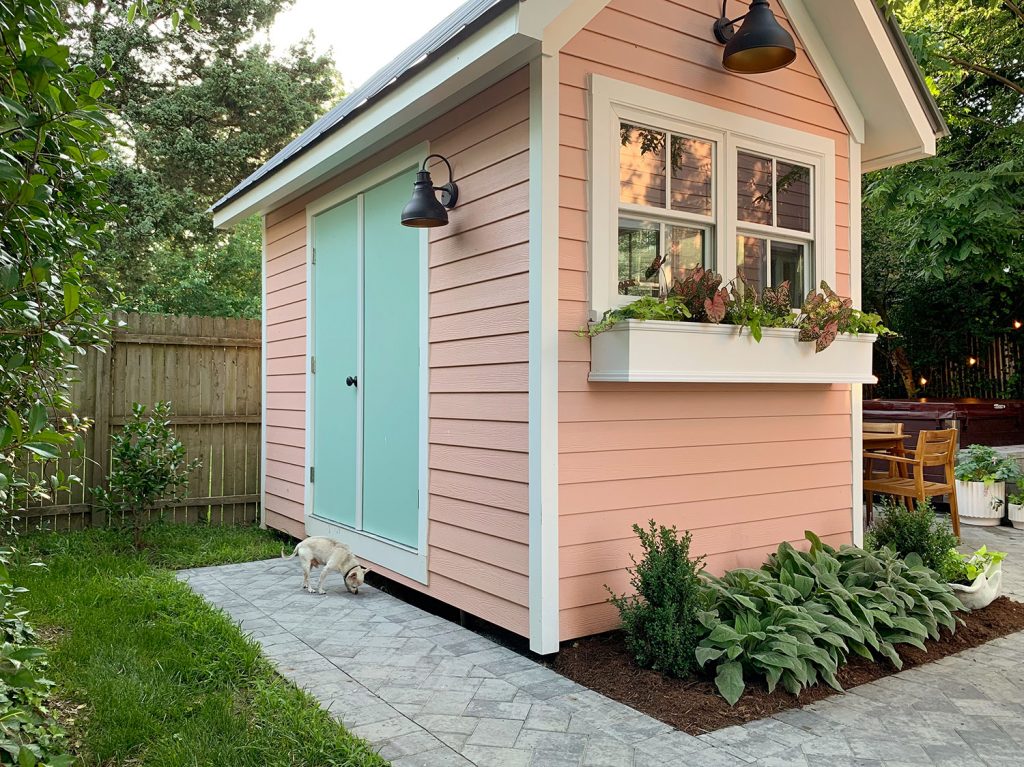
I’ll show you the inside of the shed once it’s not a disaster pile, but trust me that it has been a game changer storage-wise. We have no garage or basement or anything at the beach house, so until now all of our tools, yard equipment, beach gear, etc has been stuffed inside in various places. So it has been HUGE to be able to keep all of that messy stuff out of the house now. 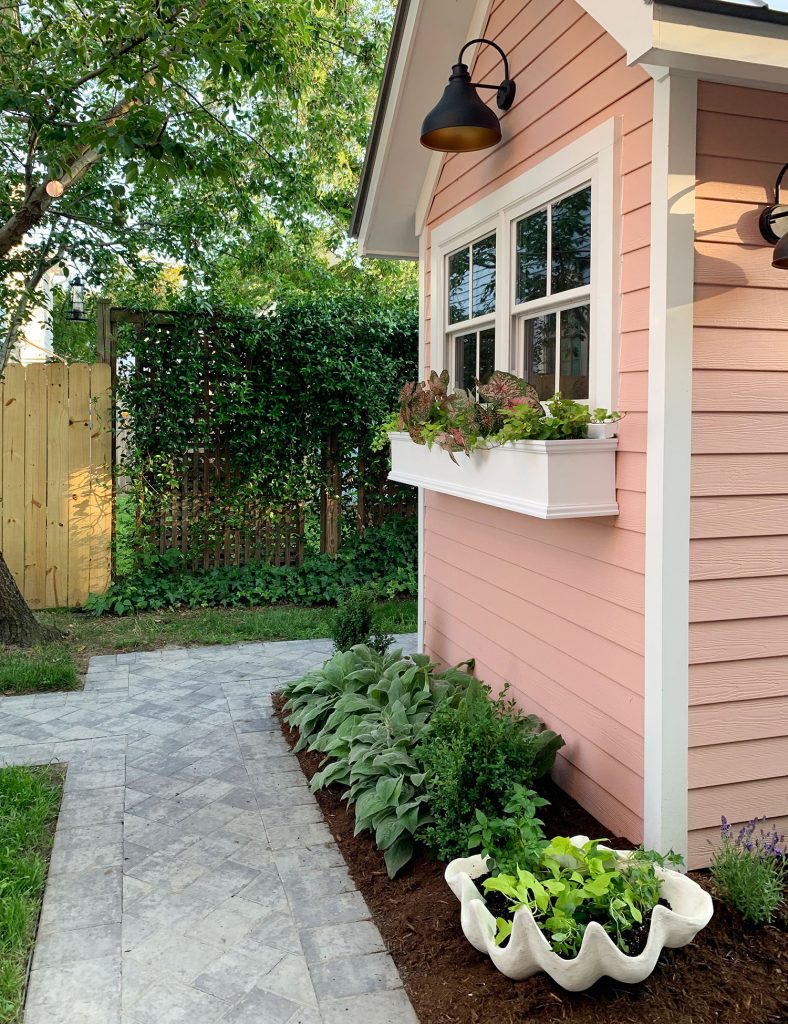
The shed is 7′ x 11′, which is kind of a weird size – but we chose it precisely to fill the space (it leaves us enough room for everything else we planned back there, but is still large enough to create some privacy and contribute to the cozy, nestled feeling we wanted). Speaking of privacy, Sean also added that little section of fence for our neighbors since their existing one wasn’t completely enclosed. It couldn’t be as tall as the lattice fencing due to a large tree limb that we all agreed we wanted to keep, but now both of our dogs can roam free in our respective yards and eventually the new section of fencing will weather to be the same color as the existing stuff so it’ll blend right in. 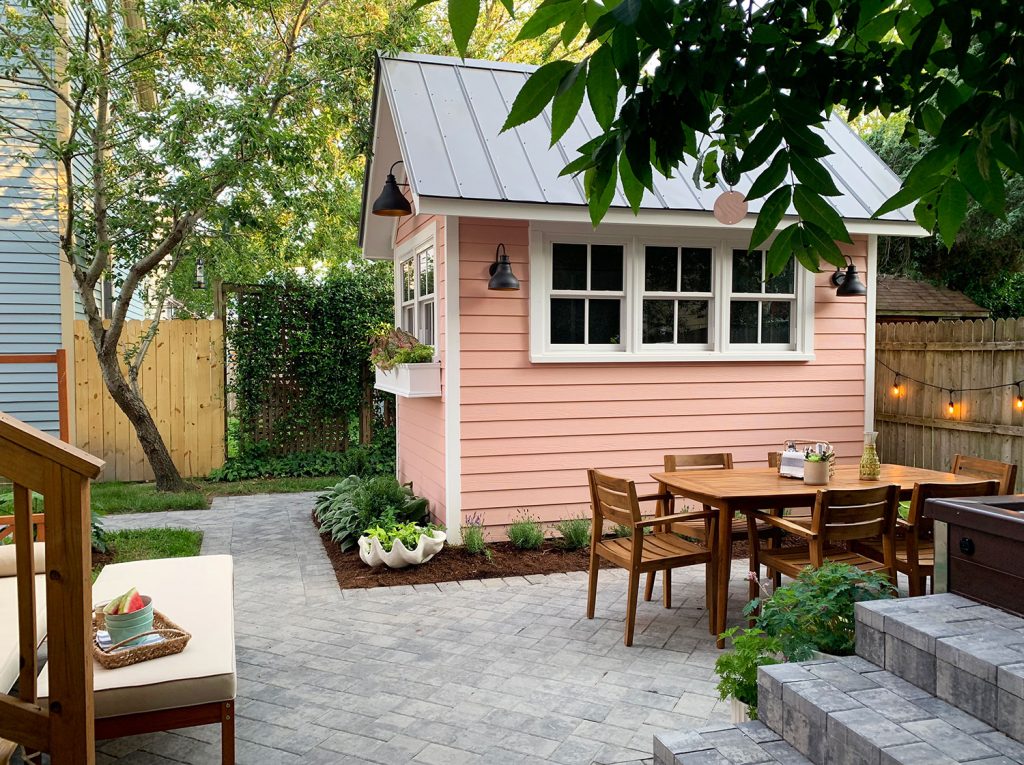
It’s also the same height as the fencing on the right of the shed in the shot above, so it should feel nicely balanced once it darkens in color over time. The other big feature we added (and perhaps the other “elephant in the room”) is not the hot tub itself, but the hot tub STEPS. The Jacuzzi came with some basic plastic steps that we used all last year, but they were small, low, and a little unstable. So we knew we wanted something more permanent and substantial, and boy did we get it. Ha! 
The crew who did the patio made these wide stone steps using a cinder block base covered with the same affordable pavers (they’re adhered in place over the cinderblock). The steps not only provide a much easier entry into the hot tub itself, but they also act as a convenient place to set your drink while you’re in the water and, better yet, even create additional seating. Sherry describes them like having a console table/bench right outside the hot tub and it’s true – we set a ton of stuff down on them, sit on them, etc. 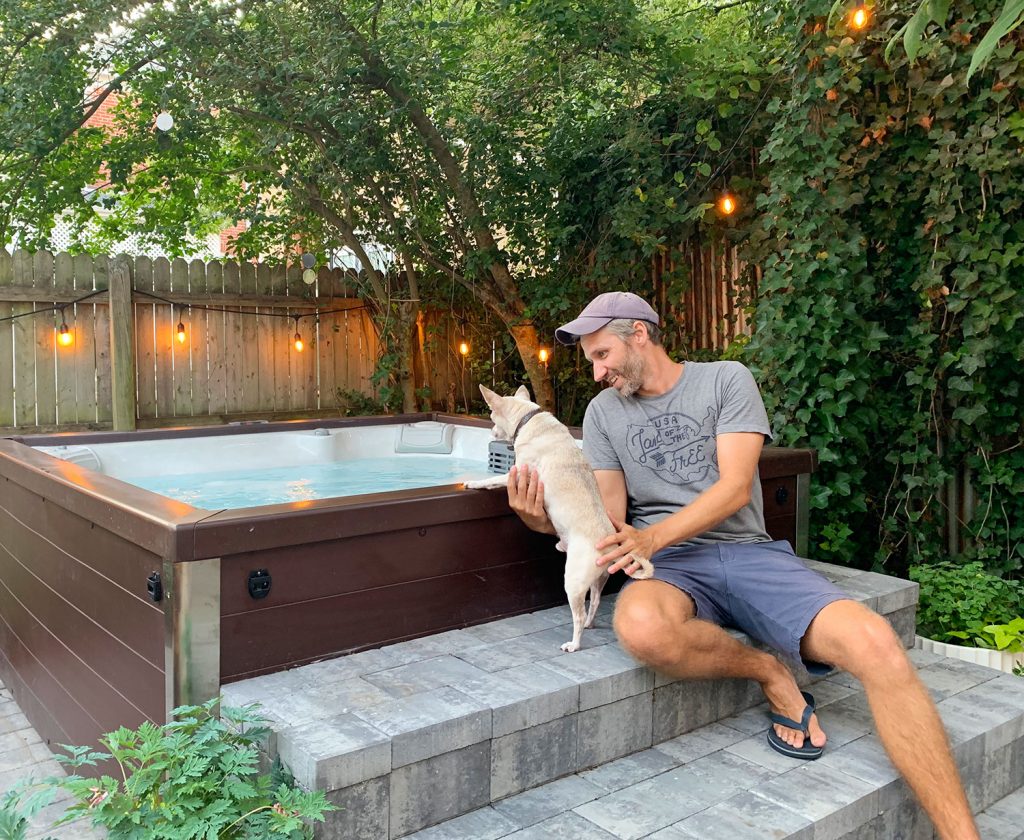
These stairs are actually one of the shadiest spots throughout the day so they’ve become one of the more popular spots for our kids to hang out. They’ve probably eaten more snacks and meals there than at the table! And I know we’ll be so grateful for them when we have people over for a 4th of July cookout next week! Flexible extra seating and space to set things down = jackpot. 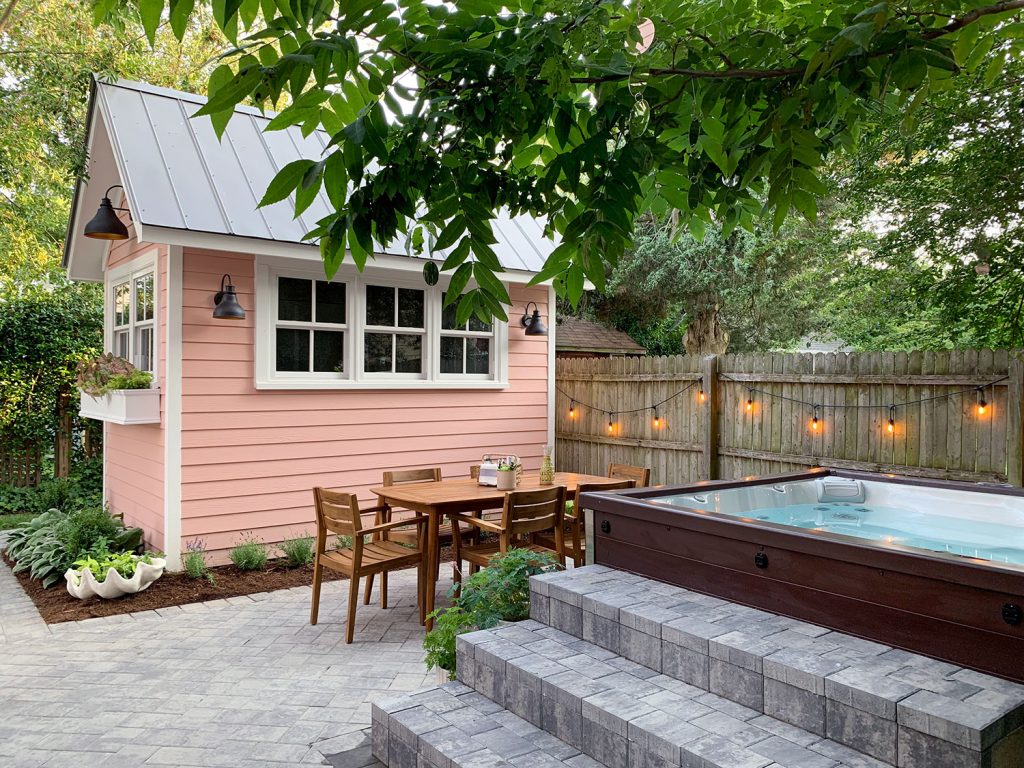
As for the dining area, we just wanted something that could seat 6 people but still fit in that pretty small space between and shed and the hot tub, and this 7-piece set was such a great buy (it’s even lower now because it’s a “Special Buy” – just $561 for seven pieces!). We paid $100 more and still thought it was an awesome deal because we saw it over here for $800 something! 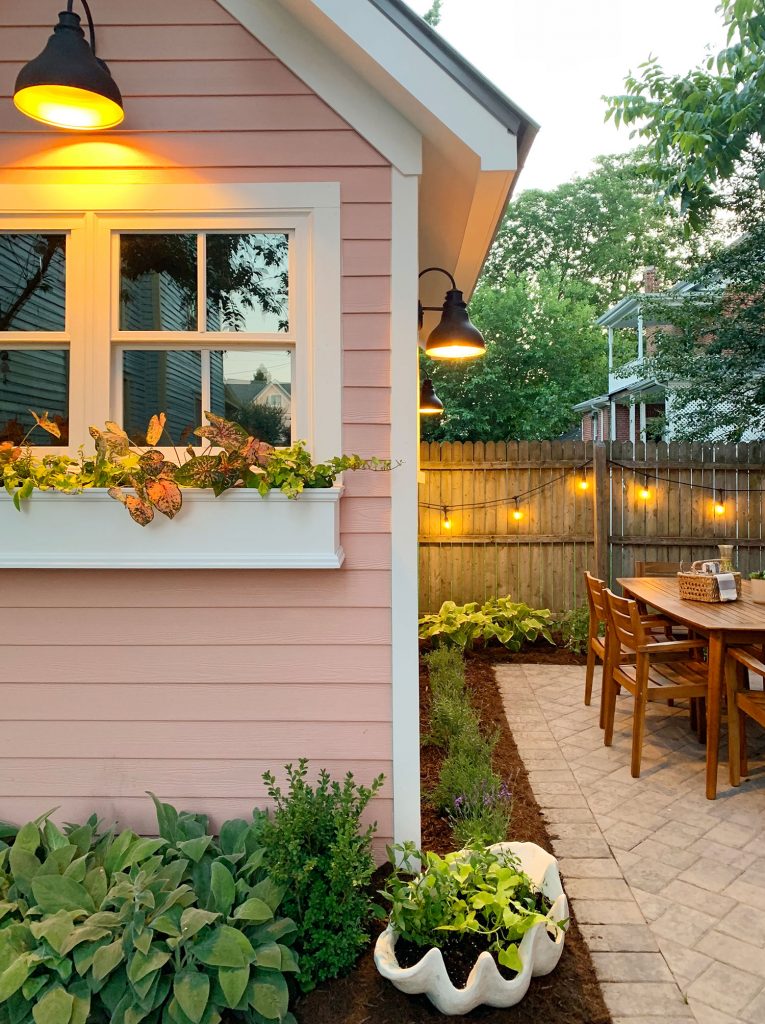
I also have to point out a surprisingly beloved feature that is a complete fluke. See all that ivy? That’s our other neighbors’ old, rusty, metal shed (also built 2 feet onto our property – just like our shed had been shoved over on the other side). We originally hated it, but now it adds SO MUCH to the nestled-in-greenery vibe back here that we’re hoping our neighbors don’t replace it anytime soon. 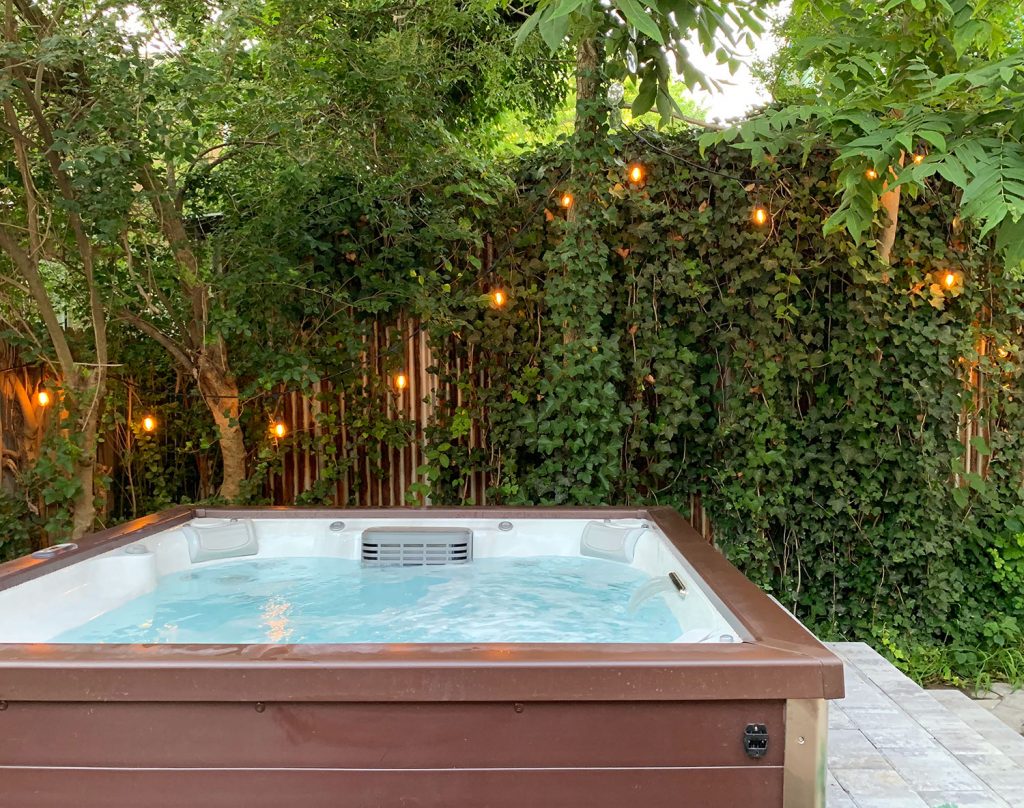
Right across from the hot tub is our outdoor shower. Our contractor installed the same vinyl outdoor shower kit that he put in over at the duplex and it’s quickly becoming the most used shower in the entire house. We recently had to cut down some ivy that was encroaching on the house too much, but we’re eager for it to grow over the shower a little bit more because there’s something weirdly satisfying about having greenery in your shower. 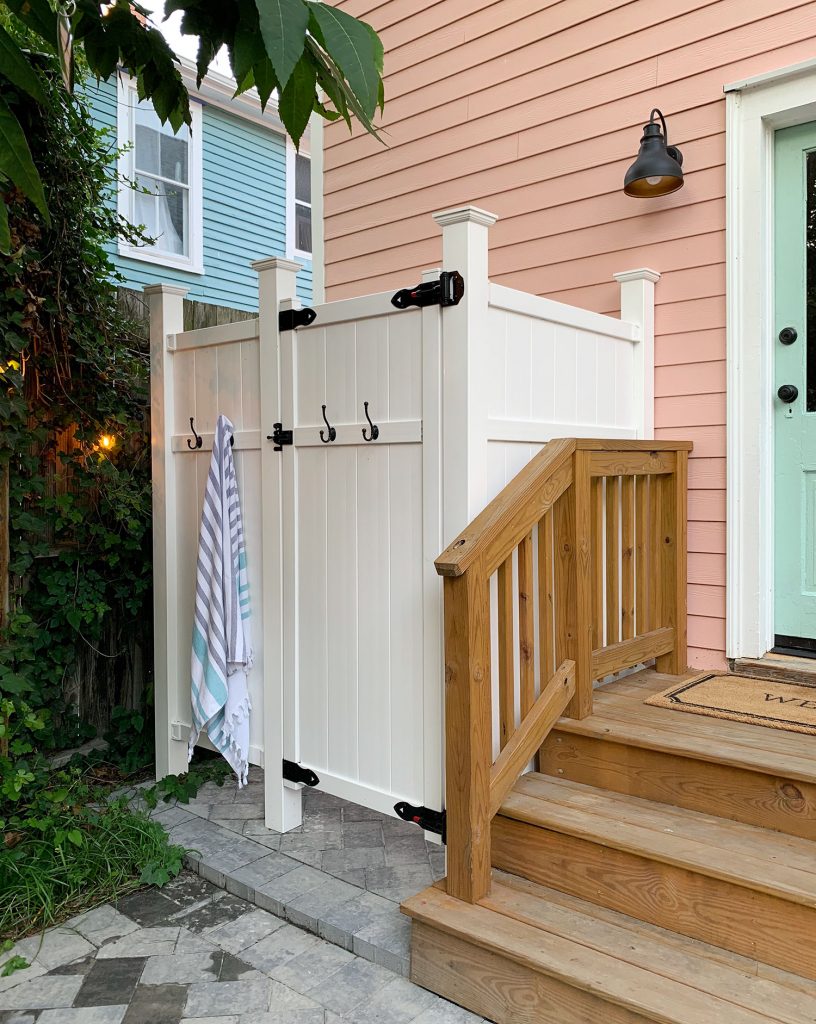
Oh, and this is what that same area looked like when we bought the house – complete with a not-so-safe-looking awning that we tore off ourselves. But the back door is still the same one, Sherry just repainted it a cheerful new color (SW Pale Patina – the same color as the duplex shutters and the doors to our pink shed). 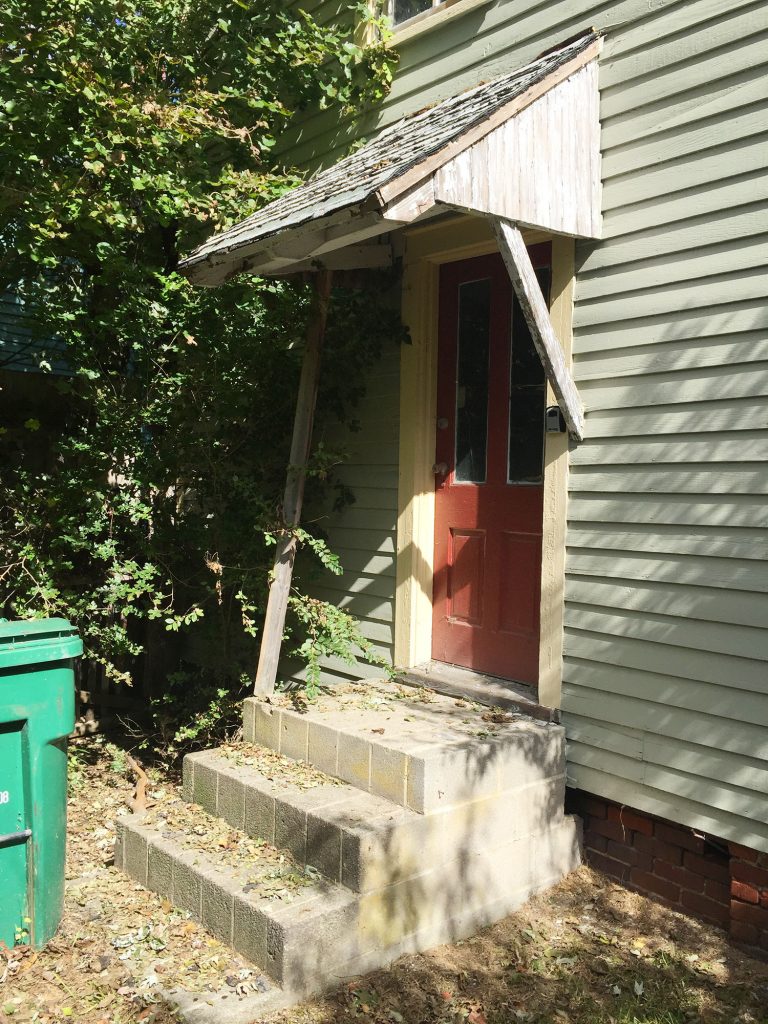
While I take full credit for the shed (I also take full credit for my modesty) – I will give Sherry her due for the little lounge area she carved out in that spot next to the back stairs. We originally considered a planting bed there, but Sherry realized if we extended the patio all the way to the house, there’d be room for one of the functions the back yard lacked: a place to recline, kick your feet up, dry off in the sun after hot-tubbing, read a book, snuggle the dog, whatever. 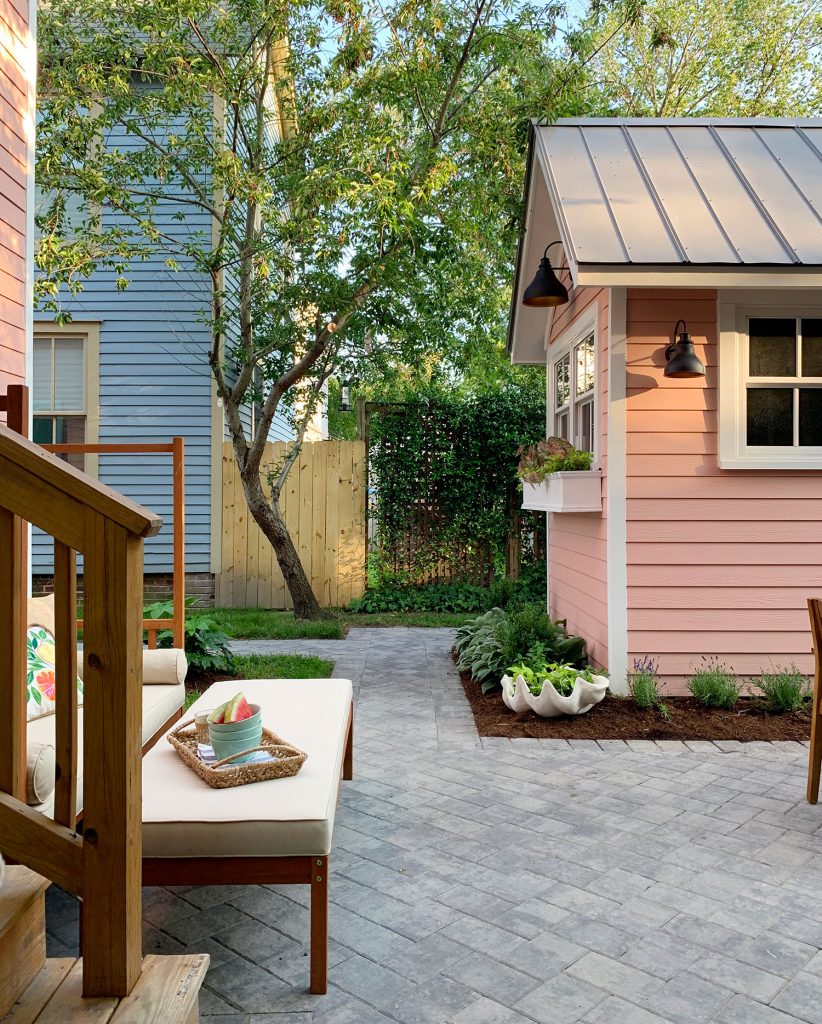
She kept telling me she wanted something like two lounge chairs side-by-side, almost like you’d find on a pool deck. But we actually had a lot of trouble hunting down something that wouldn’t stick out too far into the walkway. But eventually Sherry stumbled on this lounge set and it’s been PERFECT (we got it on Amazon, but now only the bench is there for some reason – but we did find that one on Ebay). It has been perfect, not only in size, but it’s also super flexible. The bench can be pushed in to create essentially a big outdoor bed, or pushed out to become a foot rest, extra seating, or even a little coffee table. 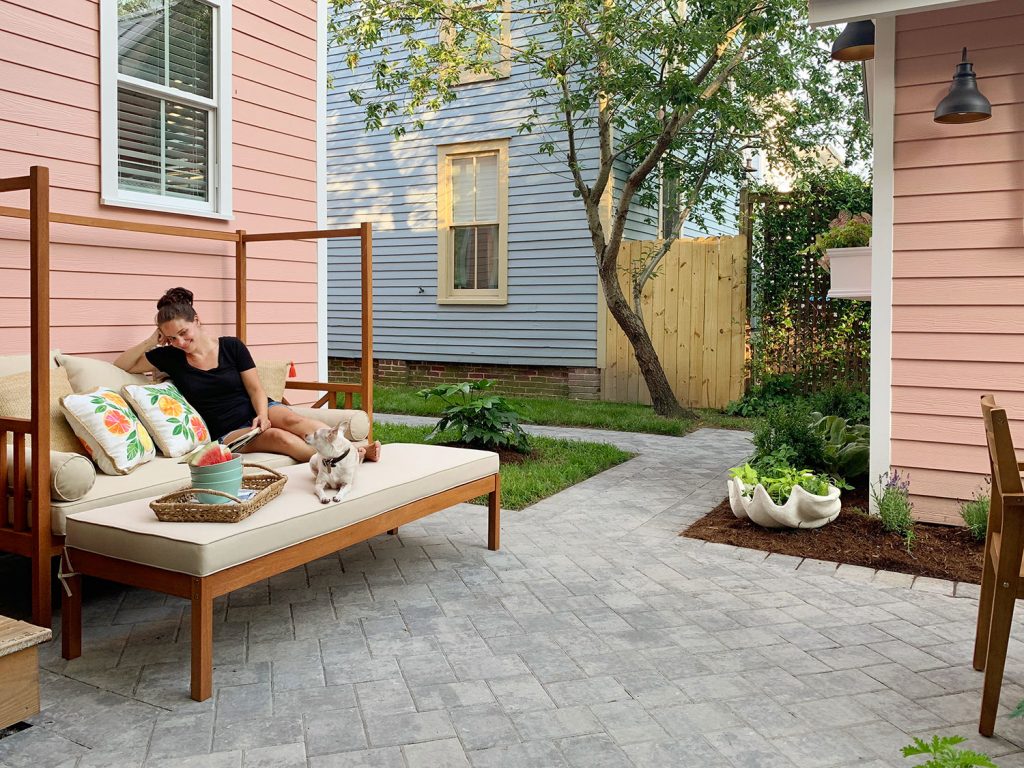
The listing photo shows it with a fabric canopy draped over the top rails (and inexplicably, a rain chain???) but none of that is actually included. So we originally planned to cut off the posts, but they’ve kinda grown on us. The house provides plenty of shade so we’re thinking maybe some string lights around it? Or some outdoor curtains for effect – like this $4000 version but less intense maybe? 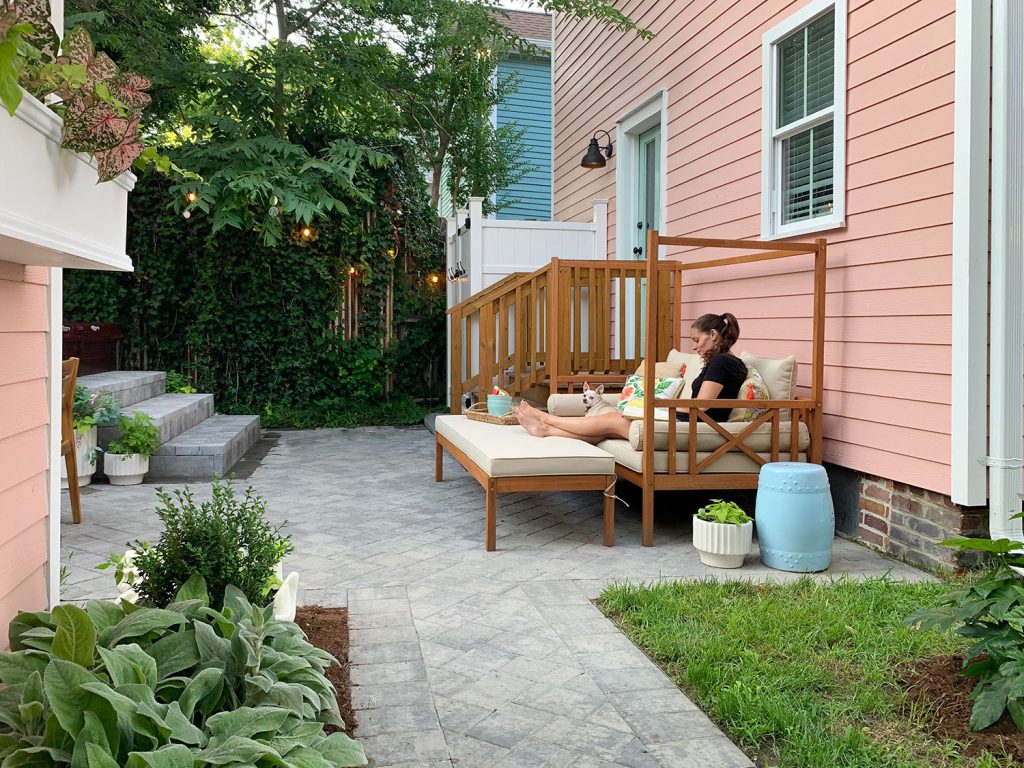
And I suppose we should talk a little bit about the plantings and greenery, even though they’re something we’re still kinda winging. Some of this was stuff we planted earlier this spring (like the boxwoods and lamb’s ear in front of the shed that has already doubled in size!) and some literally went in this past Sunday, so time will tell how things grow/survive. 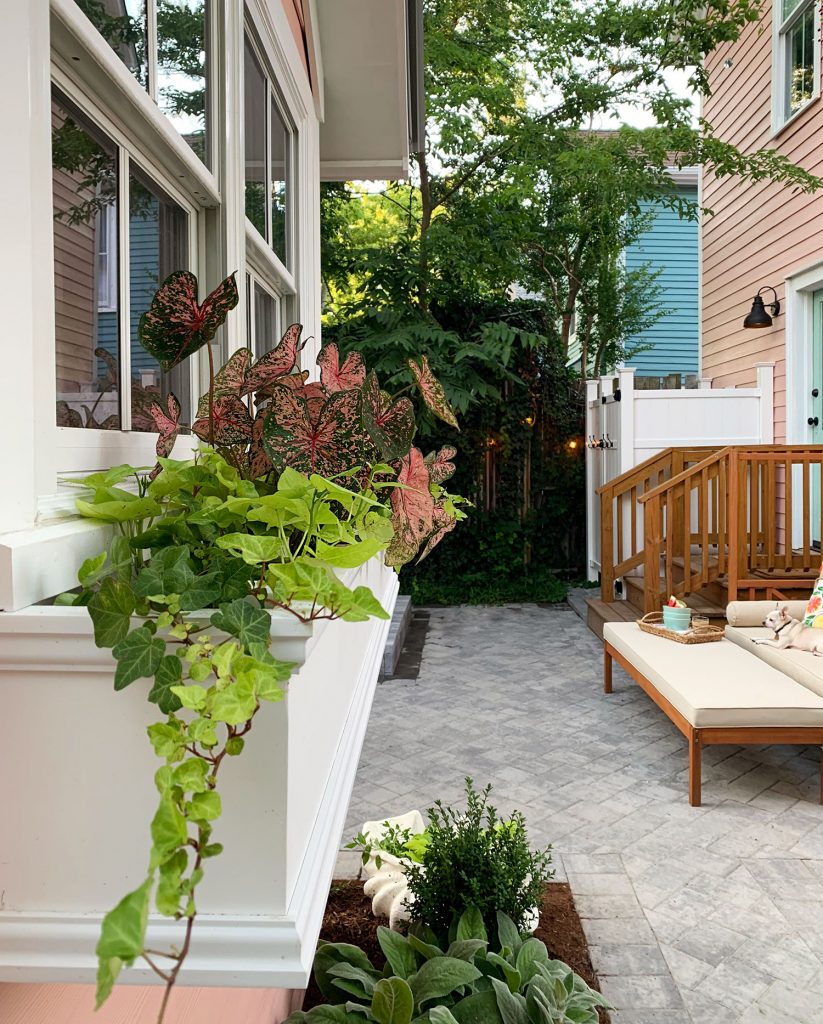
We’re most excited to see how the window box fills in. Sherry found this perfect-sized box and my nephew and I hung in last month. It comes with a cool self-watering system that would be an easy DIY, but I’ll get into that in next week’s email newsletter. We basically filled it with elephant’s ear (for height), sweet potato vine (for trailing) and some rosemary (for mosquito prevention). Speaking of which, we tried to work in some other mosquito-repellant varieties throughout the yard – like the lavender along the shed, mint in that giant clam shell planter (here’s a similar giant clam shell). Ours is an old accessory Sherry has owned for like 7 years (remember it in our last house’s fireplace?). We also added citronella and peppermint plants in the white pots by the hot tub. We’re not sure how much it’ll actually do to ward off mosquitos, but we figured it was worth a shot.
Sherry also shot this quick video (only 2 minutes!) if you want to get a better sense of how it feels to walk around the space at dusk – or if you just feel like your day would be incomplete without a Limp Bizkit reference. NOTE: If you’re viewing this post in a feed reader, you may need to click through to see the video. You can also watch it here on YouTube. And I’ll leave you with one last before & after as I wrap this puppy up. This was the view down our side yard when we bought the house (ours was the tree-covered one on the right side). 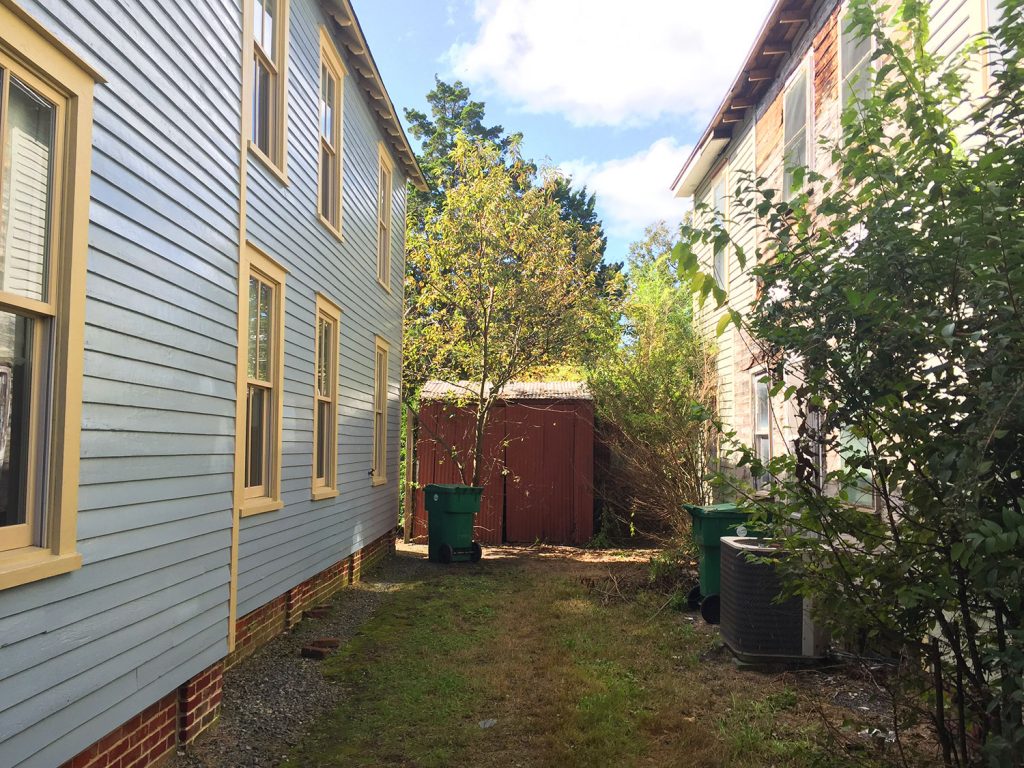
And here’s that view today. The fence is also new and matches the ones that both of our neighbors already have in their side yards. It gives us some privacy, allows our dog Burger to be loose in the backyard, and offers a sweet little peek down towards the shed when it’s open. It also swings to be double-wide when needed (future planning for parking a golf cart back there). We love that our neighbors on both sides have the same one so from the street it all looks nicely cohesive – once ours weathers to be that darker brown/gray color it’ll be great. 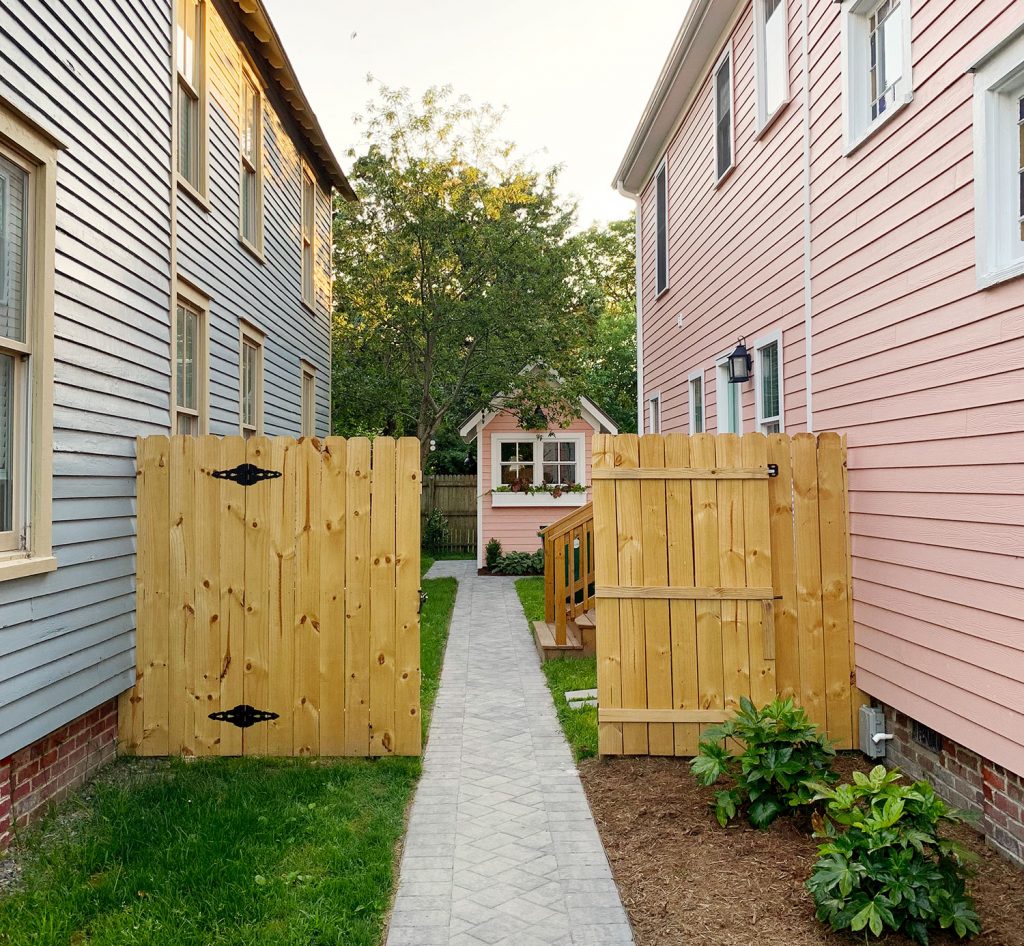
So we hope you guys enjoyed that tour around the beach house backyard. I feel like I didn’t even come close to capturing how happy this space makes us, especially since it feels like the beach house is finally complete*. 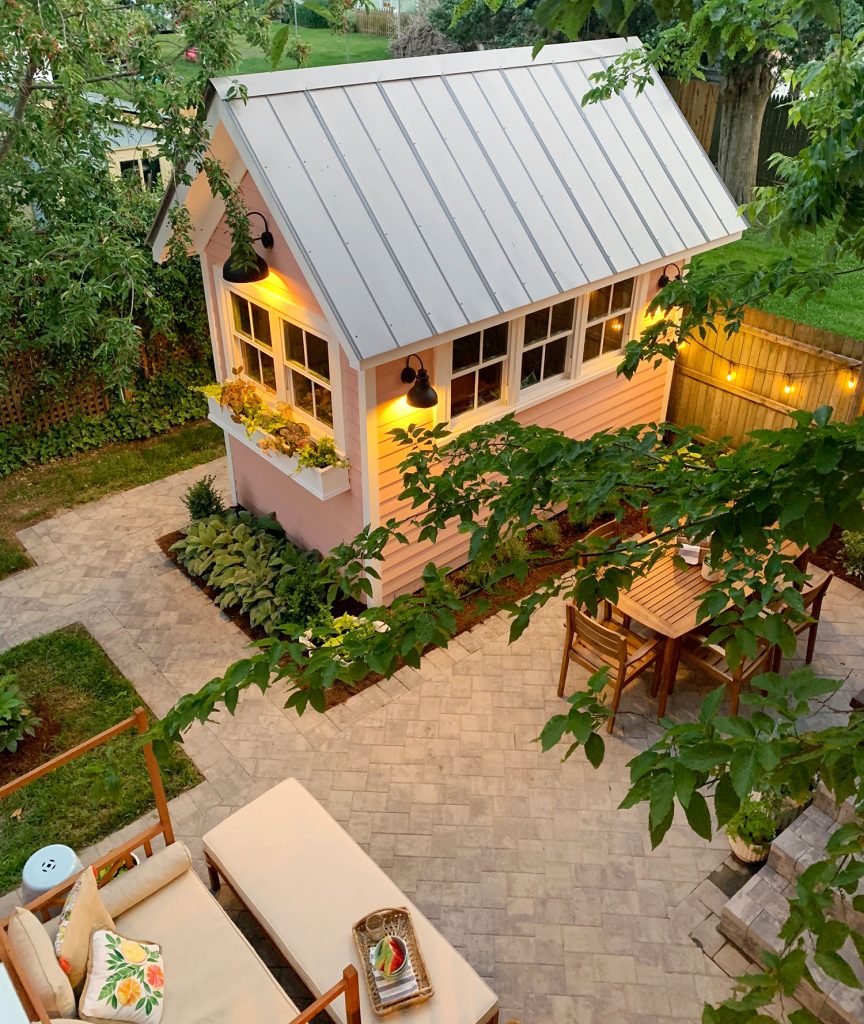
*Okay, not really. We’re already realizing this summer that there are some areas inside that could work harder or more efficiently for us (the kids need a crafting spot pronto, because the dining table is always buried in paper scraps and markers). Plus there’s the whole issue of the interior of the shed… which I may or may not have filled our car with lumber to remedy. More of these shed-shelves are on the horizon… P.S. To see more before & afters of the beach house, and read about fixing it up, here’s a category with 35 posts that cover the entire renovation. *This post contains affiliate links The post The Beach House Backyard Makeover (It’s A Biggie) appeared first on Young House Love. Via https://www.younghouselove.com/beach-house-backyard-patio/
0 Comments
AT LAST! The backyards of the duplex are DONE DONE DONE! And with basically zero time to spare (our first weeklong summer renters arrive this Saturday and we actually have some early-birds staying on one side right now until Saturday since we finished in the nick of time and they inquired with just enough time to squeeze them in!). There are lots of pics in this post, so I’ll try to keep the words under control – but this is one of our favorite makeovers in the entire renovation. 
Let’s go back in time for a second to appreciate how far the back of this house has come. This is what it looked like when we bought it: 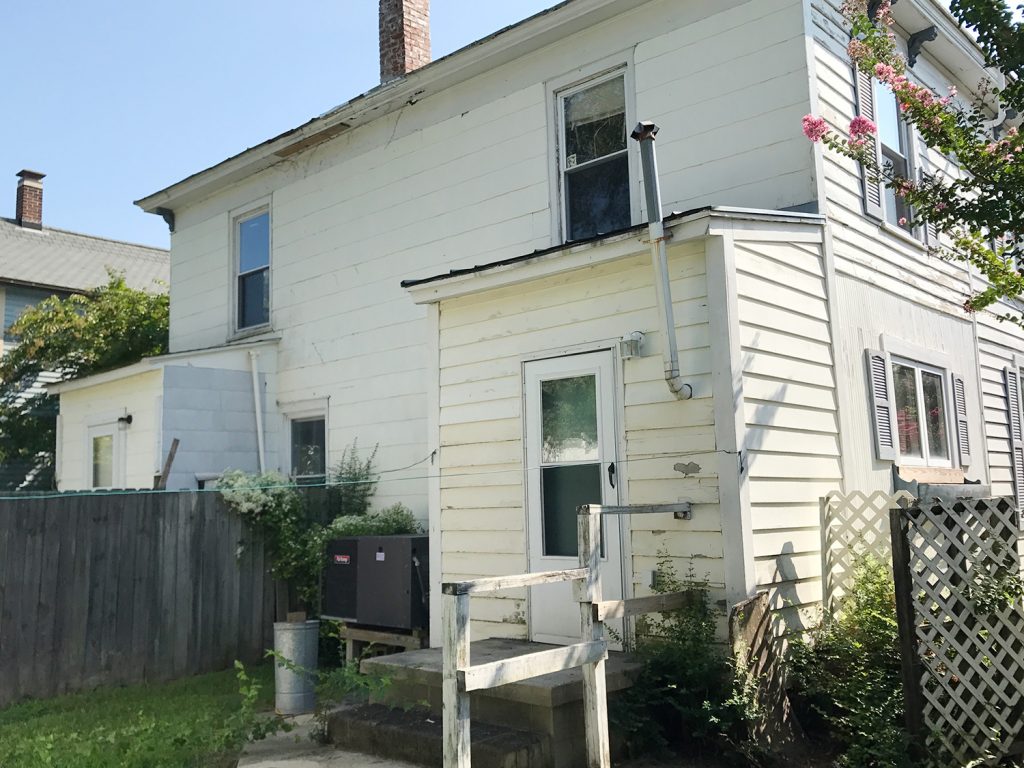
Let alone the structural changes we made to the back of the house (which you can read more about here), it’s just amazing what some grass and hardscaping and string lights (and some cute little sheds with decorative oars on them – ha!) can do for ambiance. I took this picture while it was lightly drizzling the other night and it’s STILL CUTE. What kind of magic is that? It’s literally the power of string lights, which make anything 1000% more charming. Beauty tip: Wrap them around your face a few times and tell me you aren’t positively radiant (this is a joke, but really they are miraculous beautifiers). 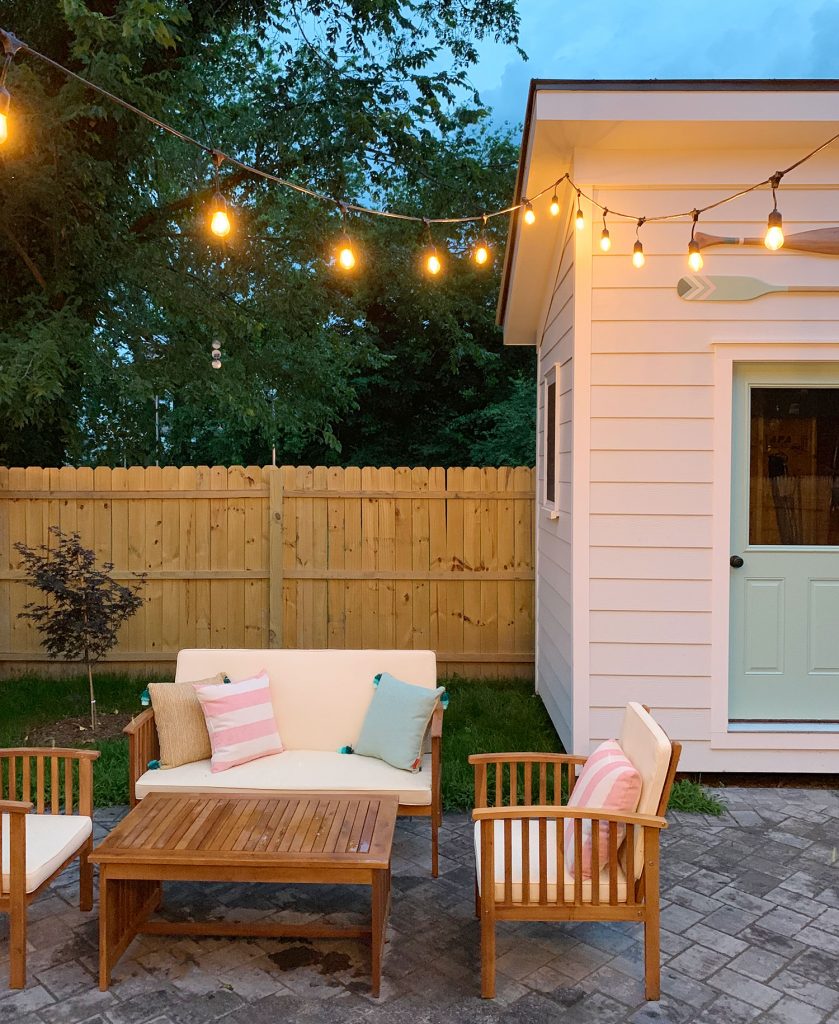
Also, I can’t underplay what a heroic role the metal awnings and the secondhand diamond doors play in the whole backyard makeover scheme, so let’s dive right into the specifics of what we did back here. 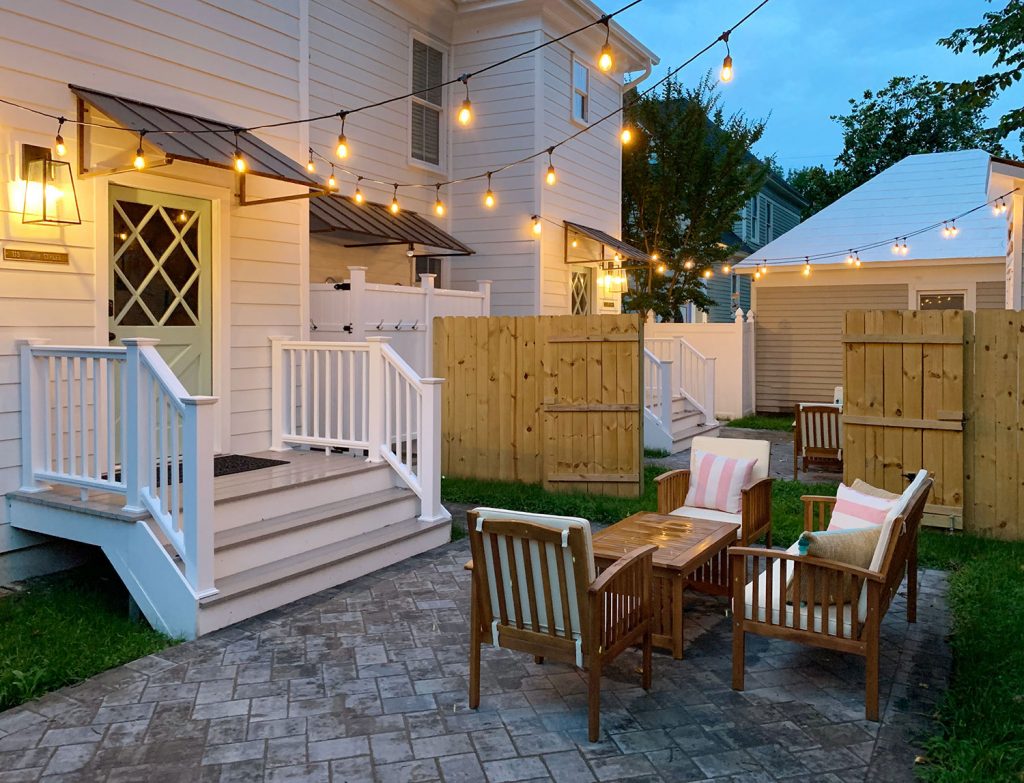
Since the keypads to get into each unit are on the back of the house (along with the outdoor showers, where people will rinse off after beaching it up) we added a nice paver path to lead people back there on each side of the house. These were extremely inexpensive $2 pavers, but the herringbone layout really upped the style-factor, and that little shed awaiting each guest in the backyard is not only extremely cute, it’s extremely practical (it’s where we’re storing the beach chairs, toys, umbrella, and other stuff for our guests to use throughout their stay). Also the picture below underscores just how amazing green stuff is. Same exact shot before the trees greened up and we planted grass. Pretty crazy, right? 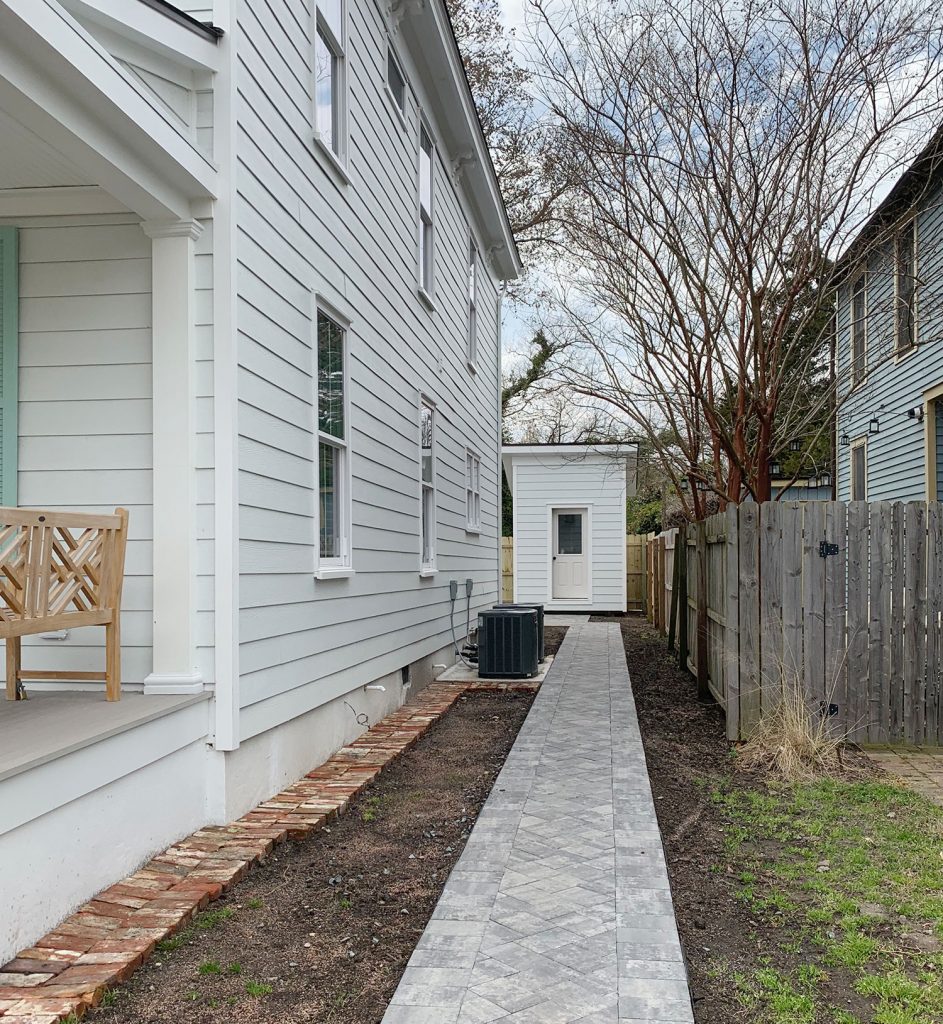
Oh and I teak oiled the bench that you see on the front porch after the grass came in (I use this stuff – you just rub it on with a rag). Can you see how it’s richer in the photo with the grass? That’s a great way to protect wooden outdoor furniture. I plan to do that to the backyard furniture set too – along with covering that in the off season. Ok, but onto the backyard! Our contractor built the sheds for us (we priced out ready-made options and his were cheaper! Plus we got to use the same matching HardiePlank siding as the house and even do metal on the roof like the front porch! We painted the shed doors the same color as the diamond back doors and the front shutters on the duplex: Pale Patina by Sherwin Williams. And the decorative oars – we actually bought them at HomeGoods and painted them to match the colors of the house. Overkill? MAYBE BUT I LOVVVVVVE THEM! As for the always-gorgeous string lights, we set them up so they run on an outdoor timer (they click on for two hours in the evening, although our guests have info about how to change that if they want them on longer or shorter). We also planted small Japanese maples in each of the tiny backyards for some color, and we think they’ll be so pretty when they grow in a little more. The pressure treated wooden 6′ privacy fence makes each yard feel nice and nestled – and it’ll get a bit darker/grayer so it’s less new looking over time, which we think will be nice. 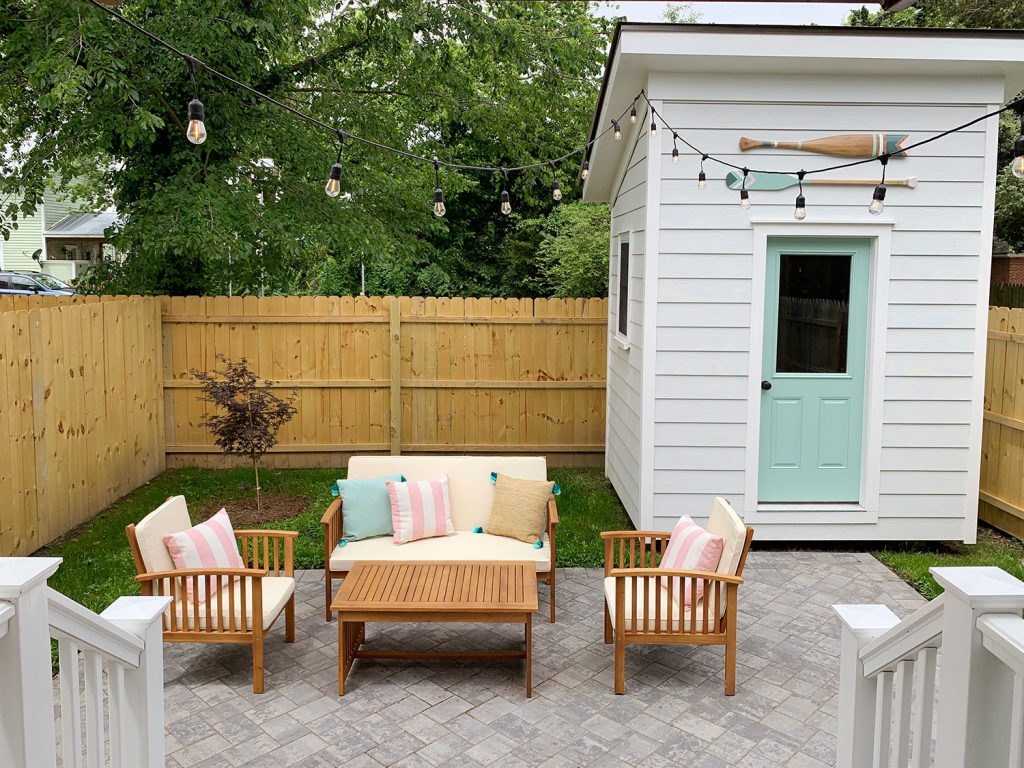
The patio furniture was a steal of a deal! I got this giant set of two sofas, four chairs, and two coffee tables for just $534 during a big Wayfair sale, and it broke down to being under $90 per furniture item (under $90 for a wood sofa or even a wood chair with cushions!). THAT IS CRAZY AND THEY’RE SO WELL RATED! They’re still an amazing price right now ($619 for all 8 pieces!) if you’re in the market, and I love the idea that you can break them up (some on the front porch or side yard, and others out back for example). So far we’re extremely pleased with them and we heard from tons of people who already owned them when we ordered them and apparently they’re great, just throw down a few accent pillows for added comfort & back support – which we did (I grabbed a few of these striped pillows and these double-sided pillows from Target). Again, I plan to cover these in the off season (and will teak oil them probably every spring/fall to keep them looking good). And don’t forget our tip for keeping light outdoor cushions clean… we pressure wash ours on a low setting every season (this is our pressure washer). 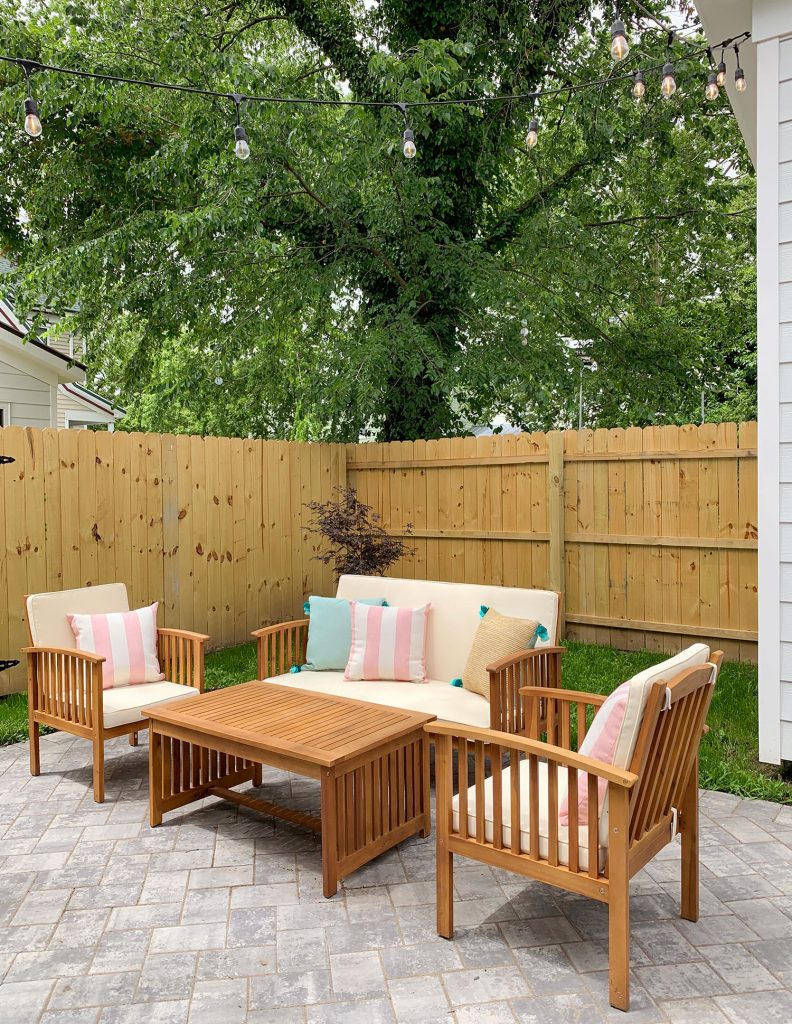
We actually have two more tan colored adirondack chairs in each shed for people who want more seating, but to keep it simple and uncrowded we aren’t leaving those out – folks can just pull ’em out if they’d like to use them. 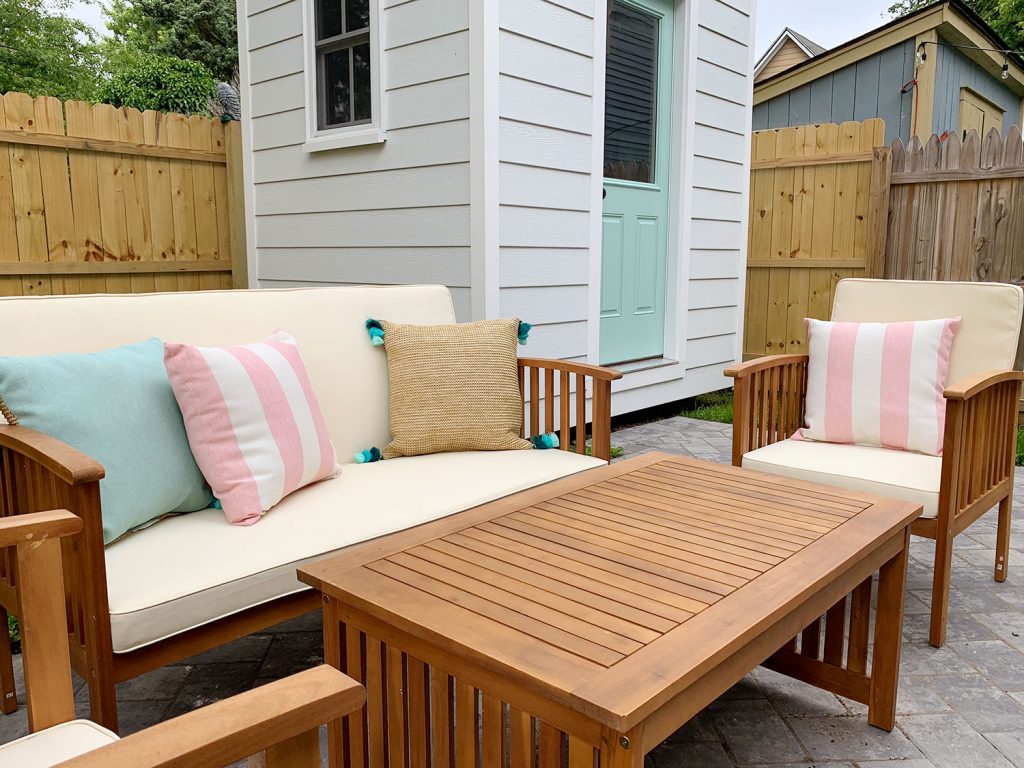
Wait but the oars. Have I told you how much I love them? I have? FINE I WILL MOVE ON. 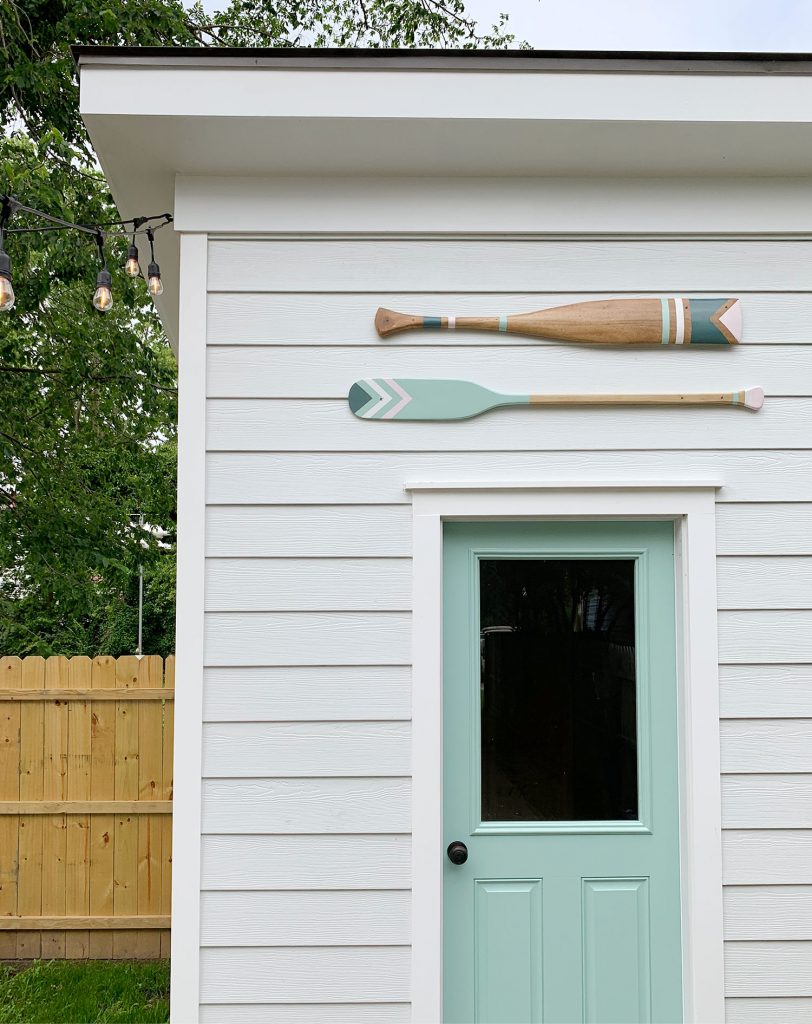
If you spin around with your back to the shed you’ll see the sweet diamond back door, which you’ve seen back in this post about the makeover of the back of the duplex itself (it also covers how we added the awnings and our overall changes in the facade of the house itself). We did add a little address plaque that we got (ours is the chocolate/gold color) just to make sure folks are on the correct side of the house when they’re entering their code. We don’t want people standing in front of the wrong door and wondering why the code doesn’t work, which is totally something I’d do… so… address plaques! Here’s a more pulled back shot so you can see the dividing fence between each side – as well as the outdoor showers back there under that larger awning. 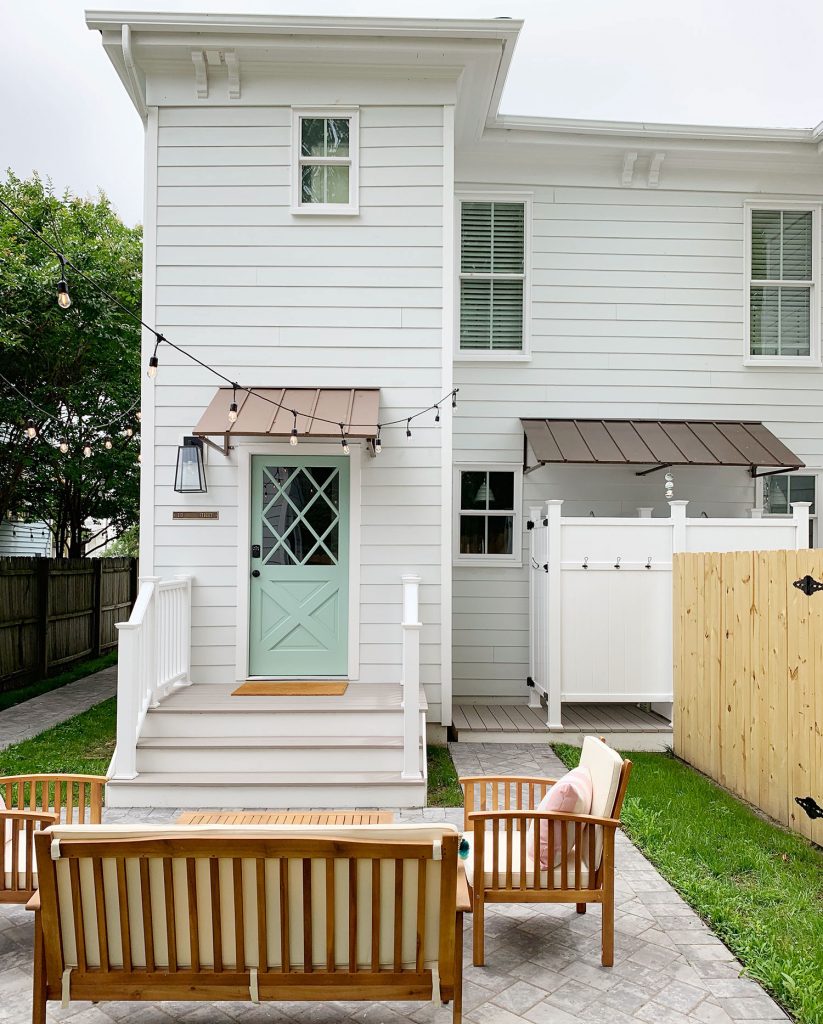
I know folks will ask about the showers, so here’s the deal. The actual outdoor shower kit is this exact one (our contractor Sean has tried all sorts and likes this one best). And the no rot composite shower surround is actually just fencing from Lowe’s that he buys and uses to build the surround. Oh and it’s important to have a draining base under an outdoor shower, so that’s Azek (a composite no rot product like Trex) with little gaps between it so the water drains into the gravel filled base below, so it doesn’t flood the patio or pool anywhere. Works so well! 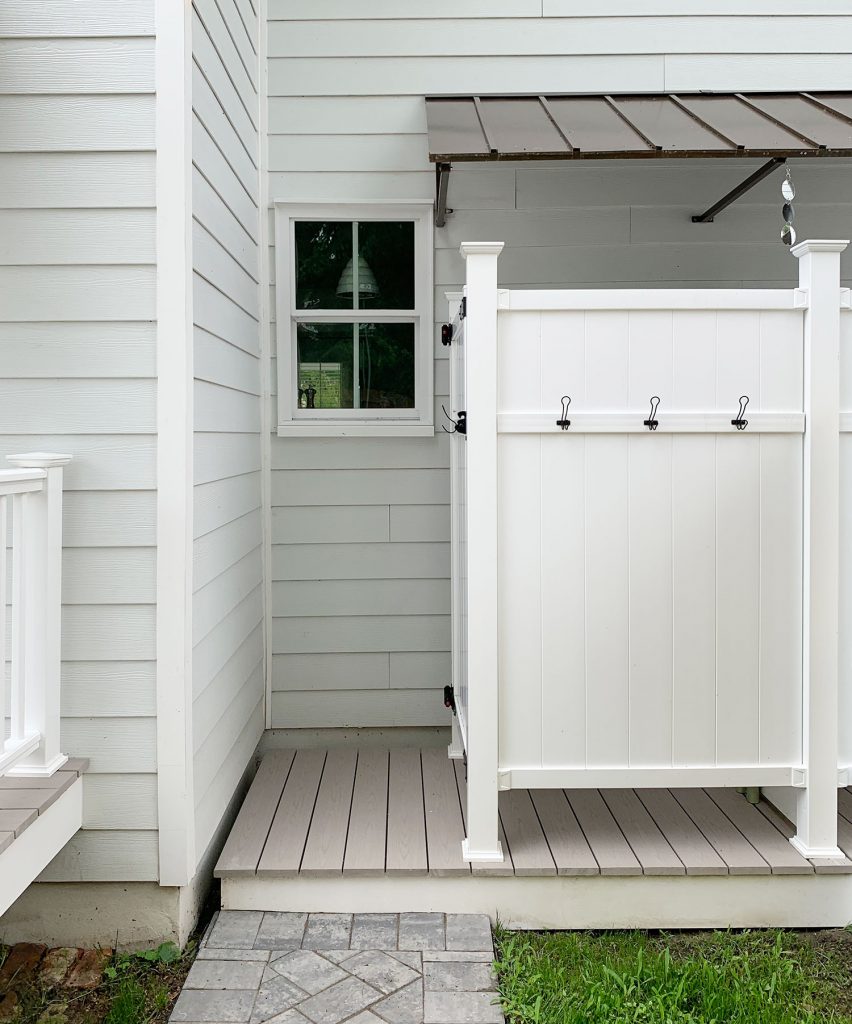
Each shower stall is completely walled off from the one on the other side, so you can’t even stand in one and bend down to see the other person’s feet on the other side (see that extra board along the bottom of this picture below?). Nice & private. We doubt anyone who would feel self conscious using one next to a stranger would ever end up doing that anyway, because each family would have to return home from the beach at the exact same time to shower off, which seems unlikely – but even if they do, that fully divided bottom ledge hopefully feels nice to have. Speaking of nice to have…. hooks galore! ALWAYS AND EVERYWHERE GUYS! Each side has 8 out here and 12 more in the mudroom. Here’s a wider shot to orient you and show you how the back is arranged. They’re basically mirror images of each other, but that nice tall 6′ privacy fence keeps them feeling separated if the two groups that rent each side don’t know each other and want some privacy. 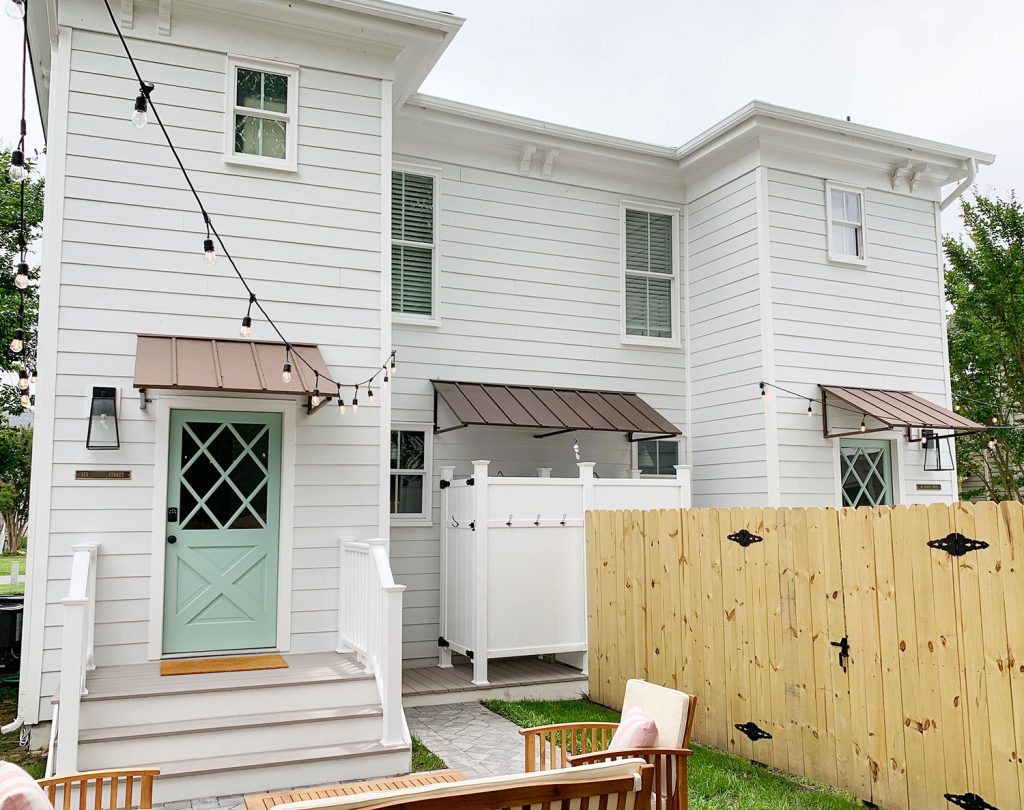
But if relatives or friends booked both sides of the duplex together and want to hang out, we designed that fence to have a giant 6′ opening that can be revealed so it essentially goes from being two private yards into one big shared one. WE LOVE HOW THIS TURNED OUT SO MUCH! We have at least a few renters who are friends/relatives so we know the gate will get some use in the open position this summer, which makes me so happy. 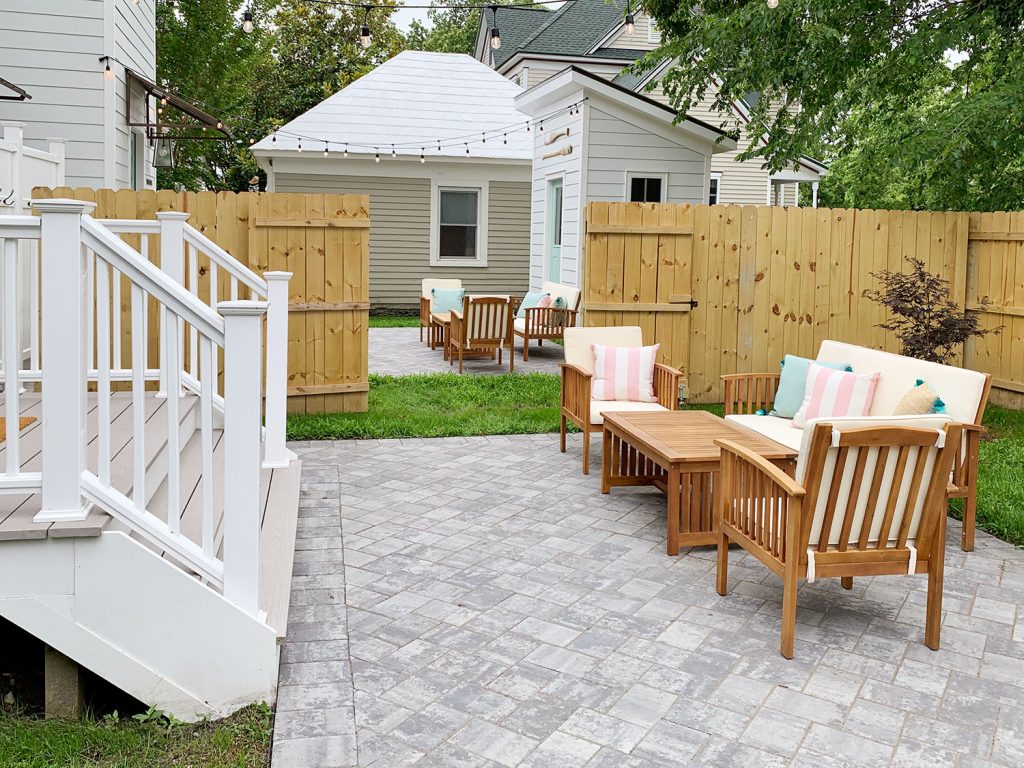
Also, this is Exhibit C that I present to you in the case of String Lights Make Anything Look Significantly Better. They’re just so charming when they’re glowing overhead. 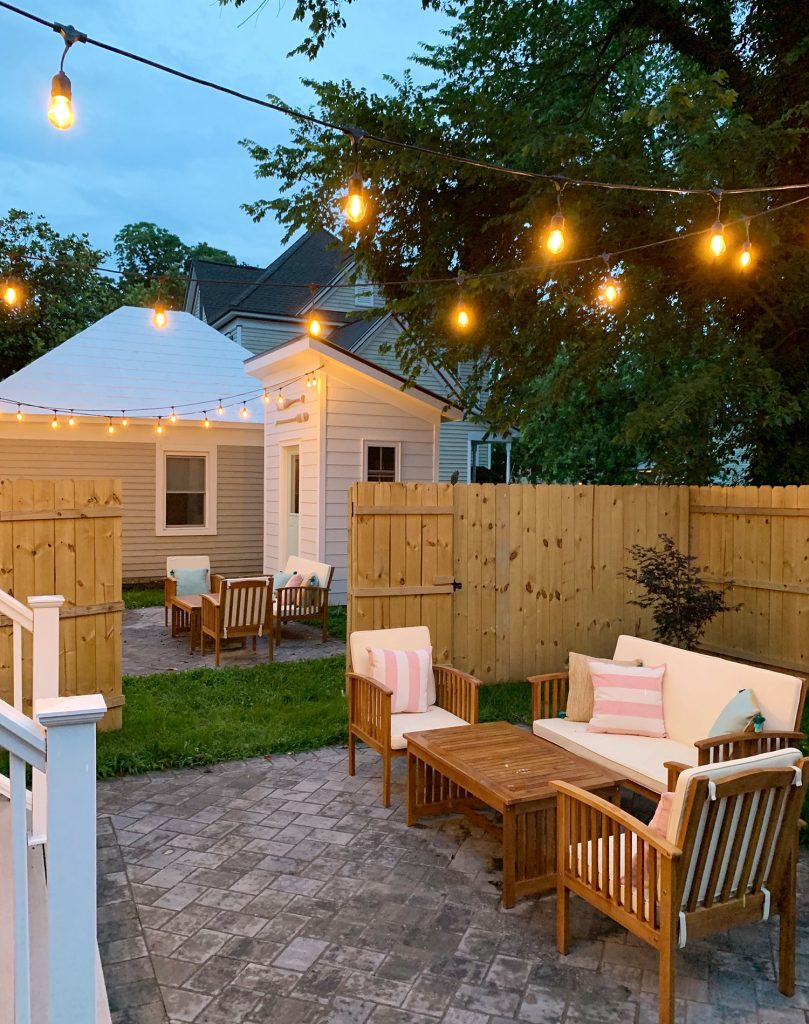
If you approach the left half of the backyard via the path on the other side of the house, there’s also some nice greenery lining that path (both of the side yards are full of crepe myrtles, which are trees that flower for almost the entire summer – so I’ll definitely share photos when that’s going on because it is bananas beautiful. We feel so lucky to have already had fences and lovely established greenery on each side of this home, so we really only had to focus on adding a few plantings in front and that maple out back and some grass. 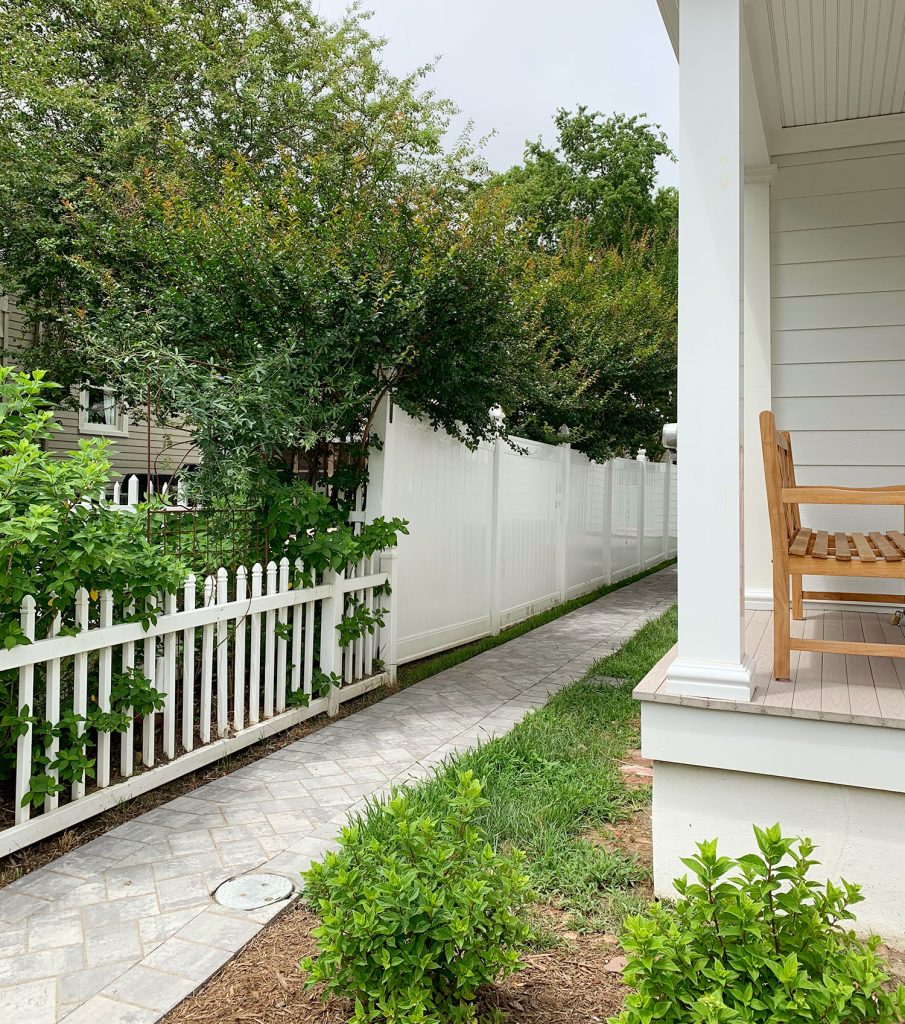
This is the view of the left side’s backyard as you look out on it from the back door. More string lights, the same furniture set (remember we split this larger set in half) and MORE OARS, GLORIOUS OARS. 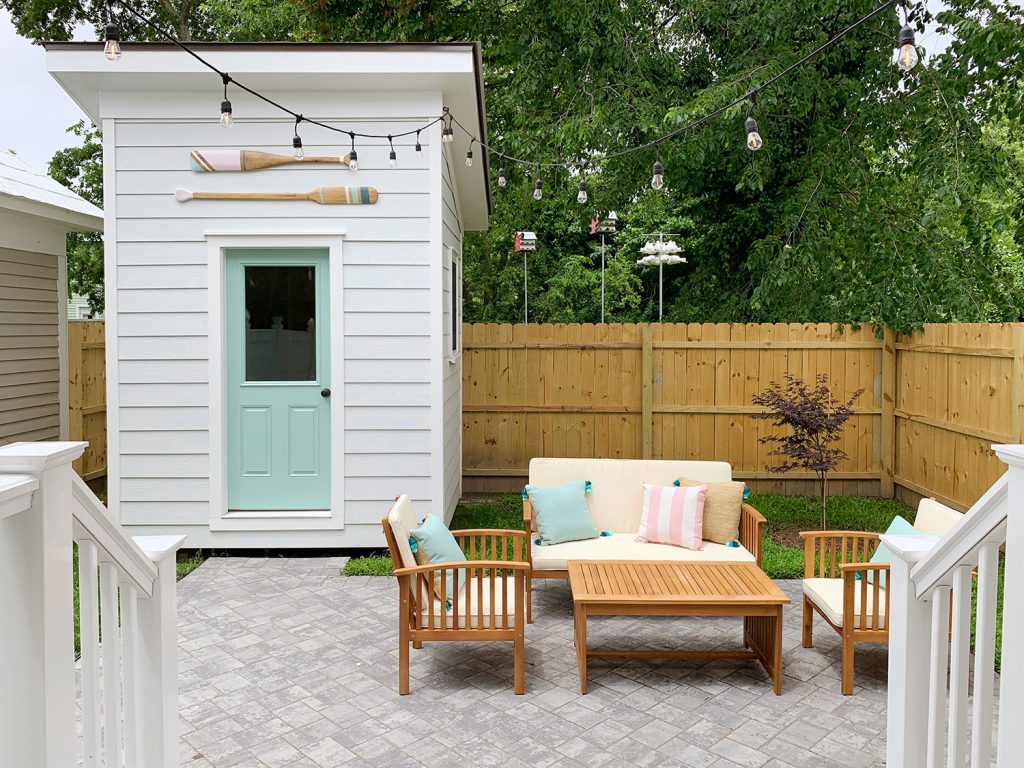
That taupe building you see in the background of the shot below is the duplex neighbor’s shed, so it’s not like someone’s kitchen window looks out onto the backyard over here (which also makes us feel very fortunate). These yards are actually more private than ours at the pink house! 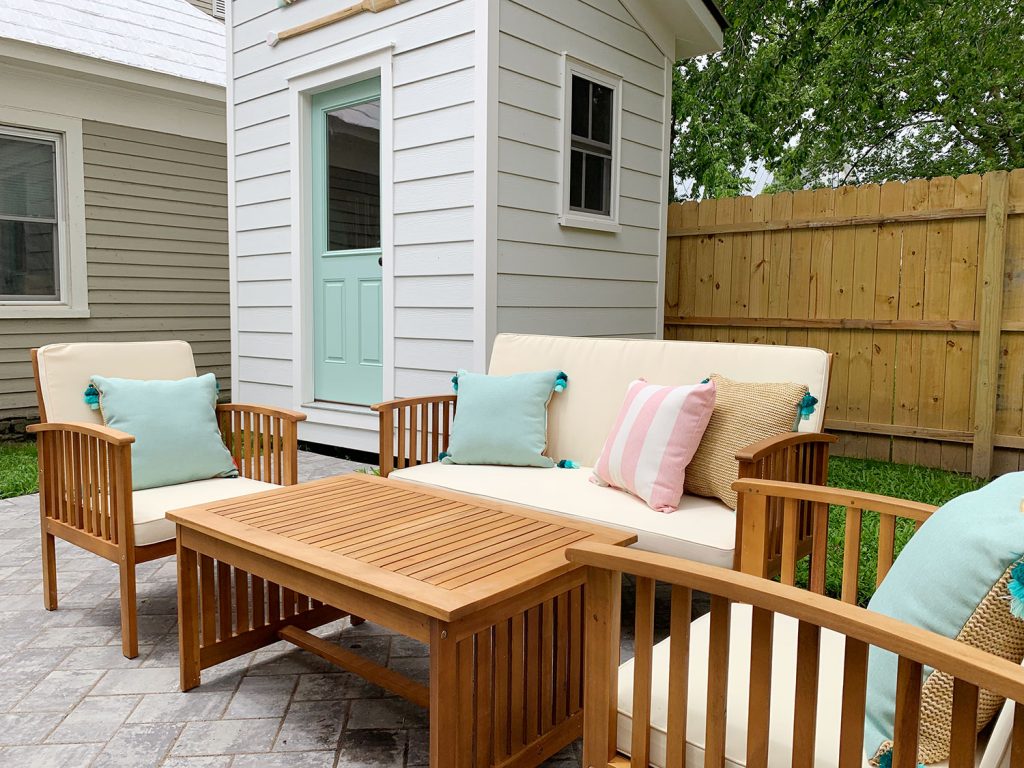
Here’s the view if you spin around. Once again we added a little address plaque by the back door, and you can see how lovely those crepe myrtles along the white fence on the side will be when they’re in full bloom. It’s gonna be SO MAGICAL. Stay tuned for approximately 78,902 photos on Instagram. 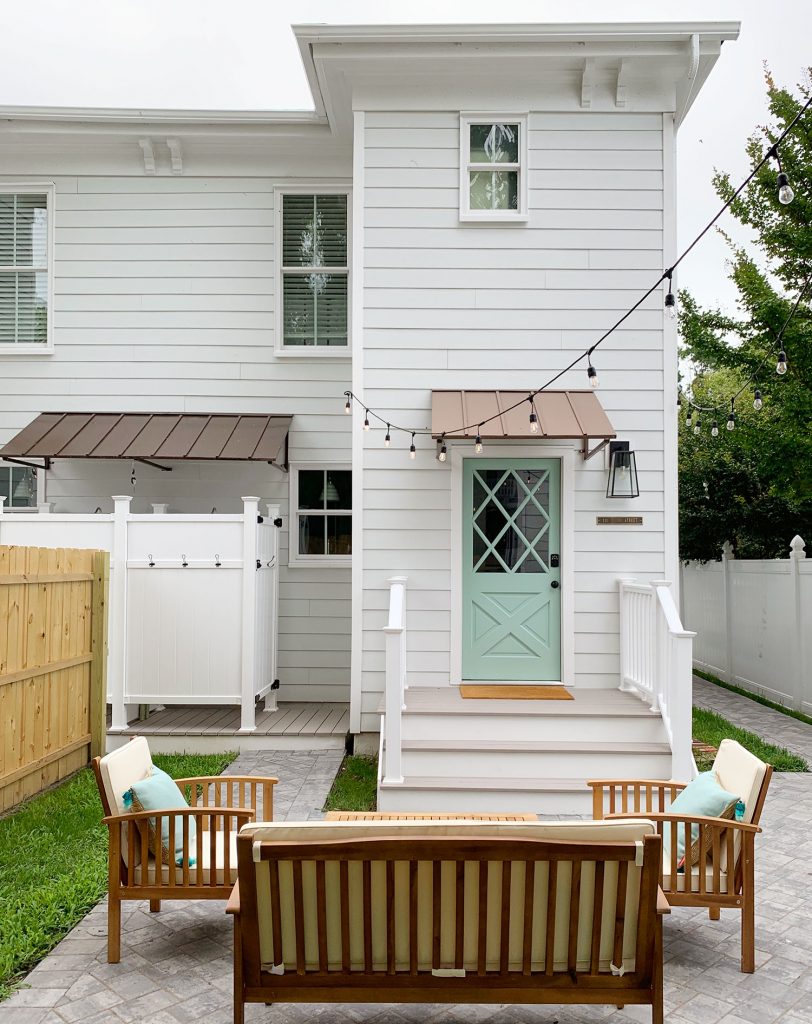
Relocating our new AC units to each side yard instead of sitting them right where the outdoor showers now live was a big upgrade. Here’s a before shot again to refresh your memory about where those used to live.
You can also see that the back steps & railing situation is a little nicer now. Thanks to having wood back steps & side steps over at the pink house (that took us way too long to stain/seal) we made the call to use no-rot composite over here for the back porches – and we are so glad to report that they’re basically zero maintenance except for blowing them off when little leaves and stuff land on them. 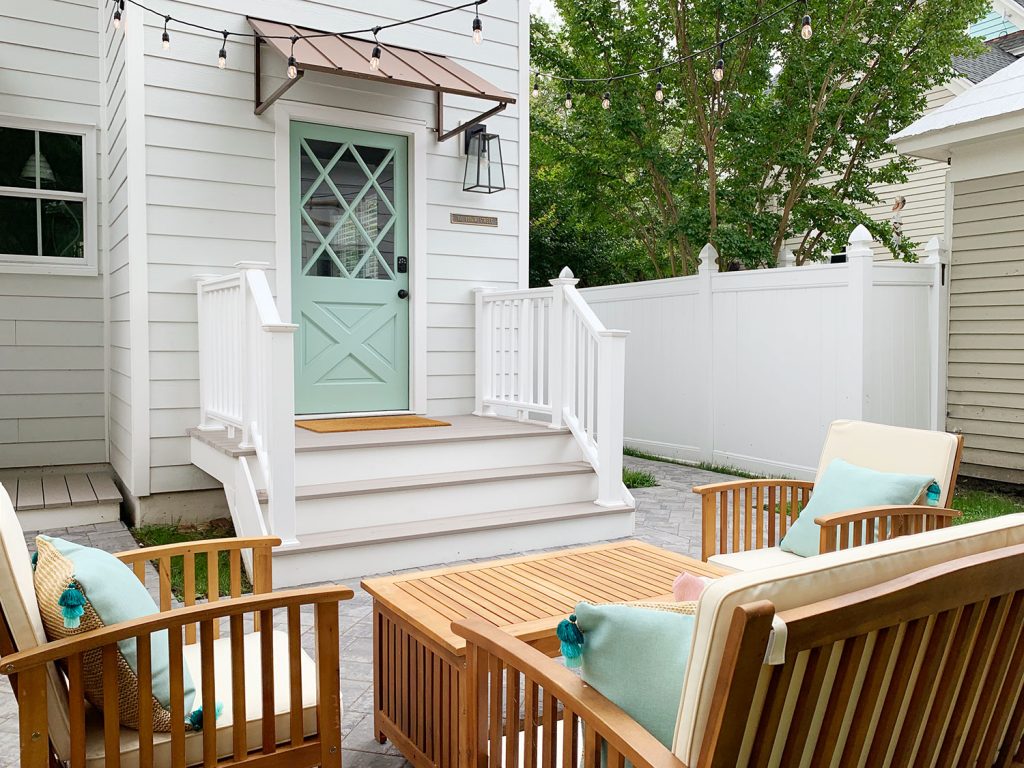
Plus the white railings tie into the outdoor shower nearby. 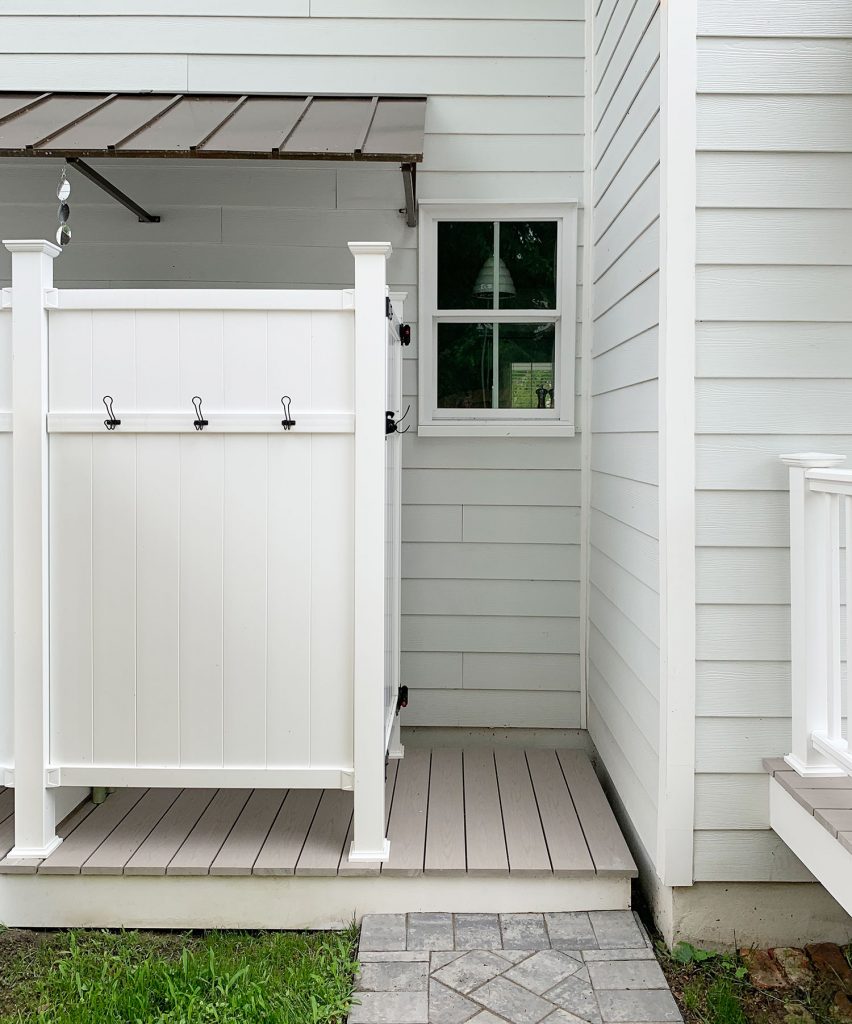
Speaking of the back steps, you’d be surprised how many builders have the instinct to narrow the steps when there’s a wide landing like the one in front of the back door (picture centered steps that are about a foot narrower on each side). But we are HUGE believers in the steps being as wide as the entire platform that you step out of the house onto. So my tip to you would be if you’re adding steps or a patio or something, have a long chat about the step width and go as wide as possible, because it makes the whole thing feel gracious and less crowded & closed in. 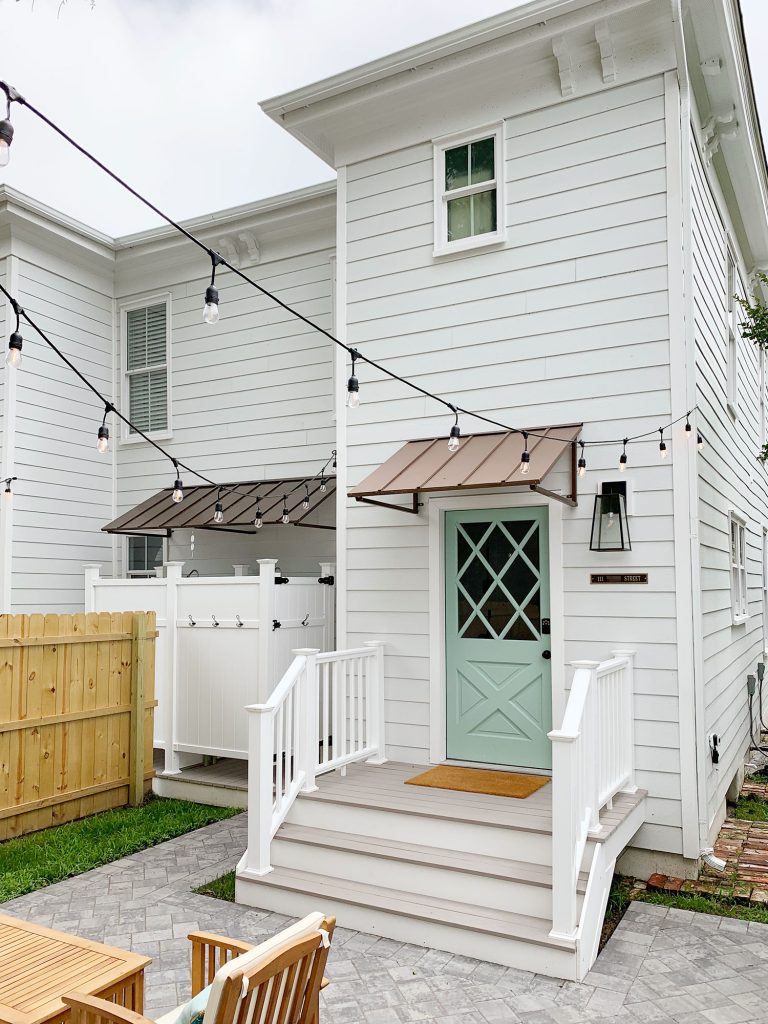
Around front you might have noticed that we finally got the duplex landscaped! We kept it simple with three hydrangeas on each side and one larger boxwood nearest to the stair rails on each side. I can’t wait for the hydrangeas all to be in bloom. Stand by for 87,990 photos of that too! 
This historic downtown area of Cape Charles really is so cutely landscaped with lots of flowering things (no deer here to eat them!) and since there are sidewalks and the whole place is so walkable, it’s nice to finally have more than dirt out front of the duplex! 
Also is there anything that fresh mulch can’t make better? Cover your face with fresh mulch and just see how polished you look! This is also a joke, but really, fresh mulch makes everything look so much crisper. 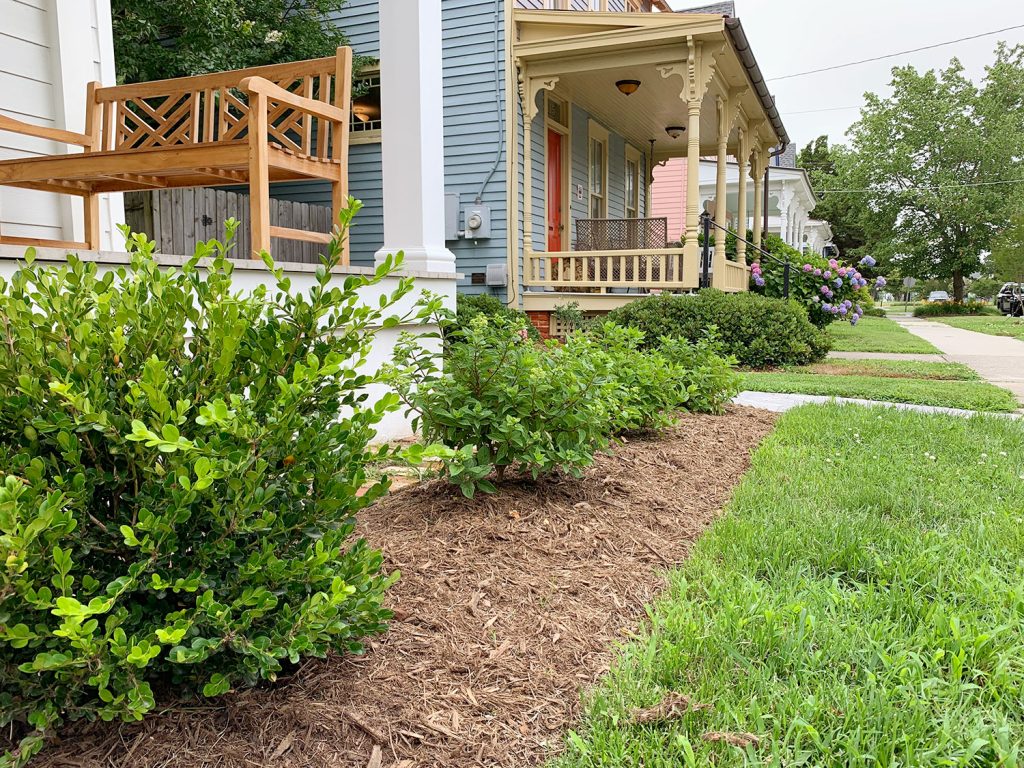
Here’s a shot from the front for ya. We can’t wait until those crepe myrtles in the front grassy area grow and bloom! Someday they’ll frame the house and be as tall as the ones that you see on the right side next to the blue house – so they’ll even add shade when people stroll under their canopy on the sidewalk below. SIGH. 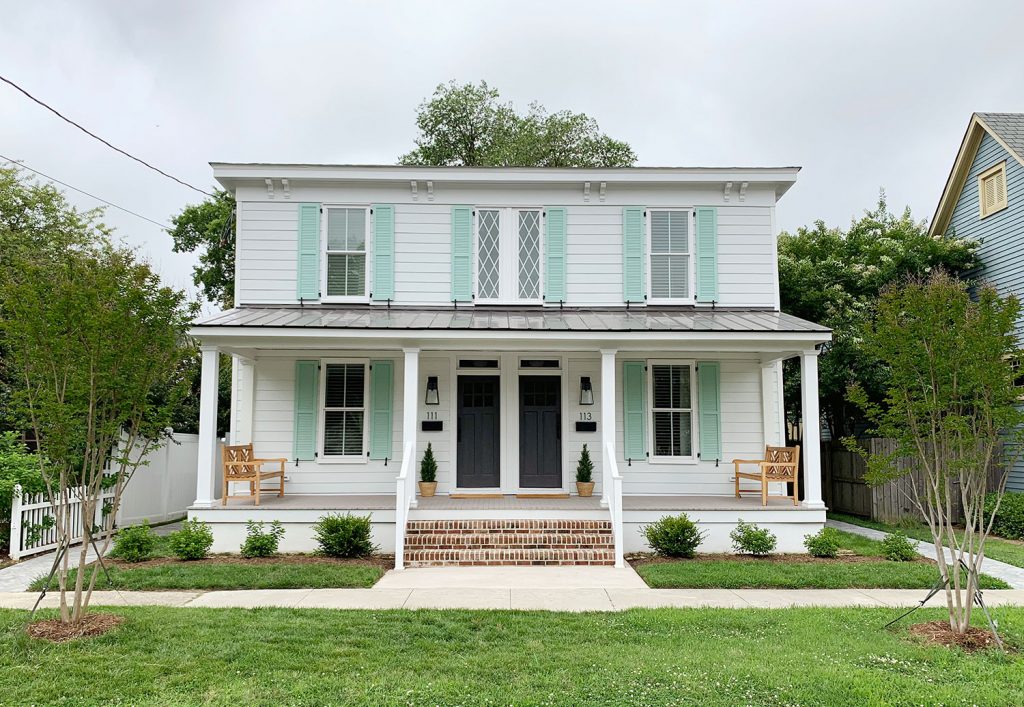
So yeah, this duplex project has been one of the hardest but most rewarding renovations we have ever taken on – and we ARE SO THRILLED TO BE DONE! I know we still owe you a full video walk-through (it’s coming!) but in the meantime, let’s soak up the moment of virtually screaming FINITO from the rooftops. 
Let’s not forget where we started… 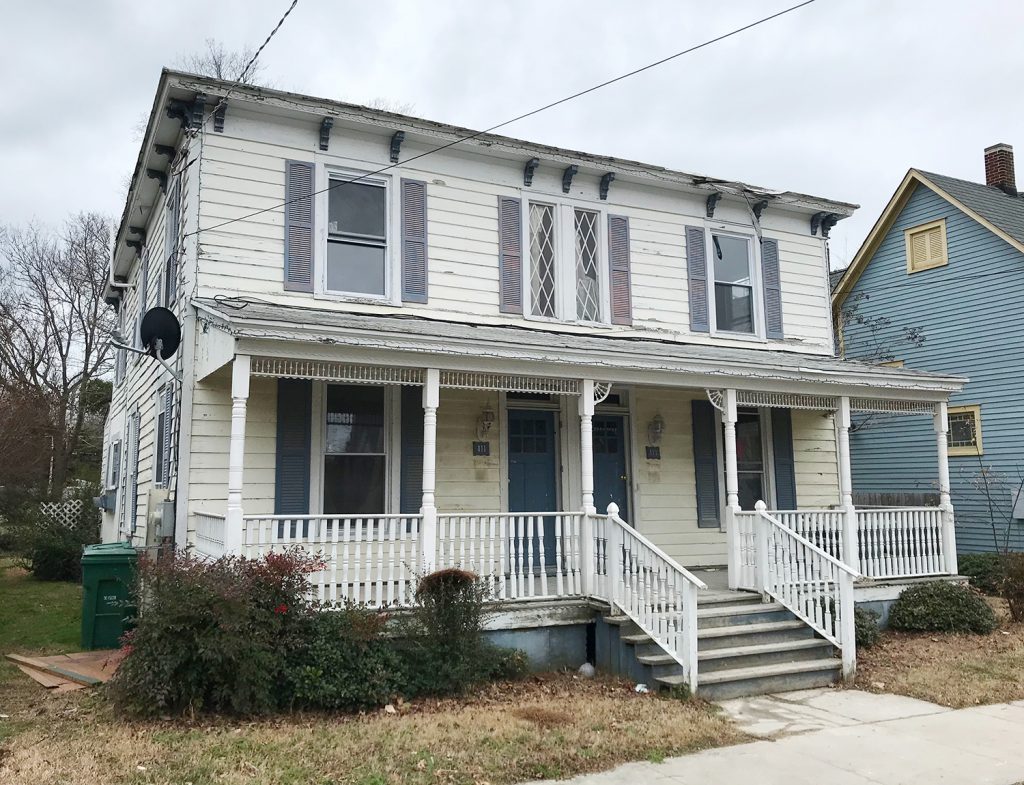
This house is such a gem and we are so glad we got to bring it back. In the fall of 2017 when we bought this place, at least a dozen locals confessed to us that they thought this was the ugliest house on the street – and some even said things like “without a tall peaked roof like the others, I don’t know how it can be good looking” – but I am happy to report that everyone can see it now! They see the beauty! Even without a peaked roof. 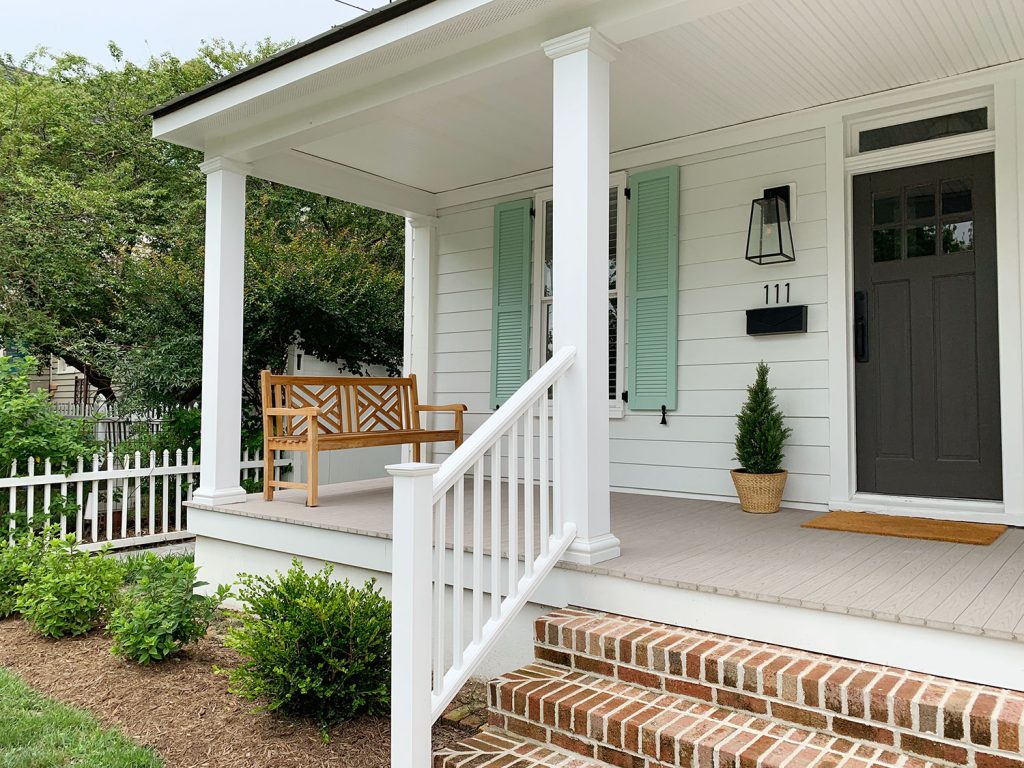
In fact yesterday someone who didn’t know us from Adam asked if they could take a photo of the house for their wife (I was outside weeding) because he said he knew it would be her favorite of all the homes he had seen on his vacation. I ALMOST CRIED YOU GUYS. P.S. You can see all of the other finished rooms in the duplex that we’ve already revealed (two kitchens! the front and back of the house! four other bedrooms! two bonus sleeping nooks with wall murals! six bathrooms! two living & dining rooms! two mudroom/laundry rooms!) along with how we planned the layout, tiled the floors & backsplashes, etc, here in our duplex category. It’s almost two years of updates covered in just 20-something posts! *This post contains affiliate links The post The Duplex Backyards – Patios, Sheds, & Outdoor Showers Galore! appeared first on Young House Love. Via https://www.younghouselove.com/duplex-backyard-patio-shed/ This week we’re digging into a survey that reveals the top homebuyer regrets – as in what features their homes have that they ended up not loving (and the results may surprise you!). A new study also concluded some shocking-to-us things about millennial dads versus their baby boomer counterparts – and we have some big feelings about one aspect of the results. We’re also sharing a crappy situation (literally) at our beach houses, and the weird measures we’re taking to resolve it. Plus, more design norms from around the world and our picks for summer entertainment. You can download this episode from Apple Podcasts, Google Podcasts, Stitcher, TuneIn Radio, and Spotify – or listen to it below! Note: If you’re reading in a feed reader, you may have to click through to the post to see the player. What’s New


Game Time: Homeowner Hindsights

 Updates


Global Design Norms
We’re Digging

If you’re looking for something we’ve dug in a past episode, but don’t remember which show notes to click into, here’s a master list of everything we’ve been digging from all of our past episodes. You can also see all the books we’ve recommended on our Book Club page. And lastly, a big thank you to Grove Collaborative for sponsoring this episode. Sign up at Grove.co/YHL and spend your first $20 to receive a FREE 5-piece Mrs. Meyers cleaning set! 
Thanks for listening, guys! *This post contains affiliate links* The post #145: The Home Features People Wish They Didn’t Have appeared first on Young House Love. Via https://www.younghouselove.com/podcast-145/ We’re back with the (finally!) finished photos of the two small-but-mighty bonus sleeping spaces at the duplex! Plus we’ve got pictures and details of two of the hardest working spaces: the linen closet and our locked owner’s closet that guests won’t see – but you can! In short: these little nooks & crannies GO HARD for us. So we’re excited to show you how they turned out. 
Since we have two larger bedrooms on each side of the duplex with closets and dressers (you can see them here and here), we refer to these as “bonus sleeping nooks” – which are pretty common around Cape Charles, as well as in other beach communities. They pass all building and rental codes in our town (yes, we have an annual rental inspection!) and are basically just a cozy spot to sleep extra guests, complete with little comforts like a ceiling fan, light-blocking blinds, a sound machine, and two wall sconces you can flick on & off without getting up. 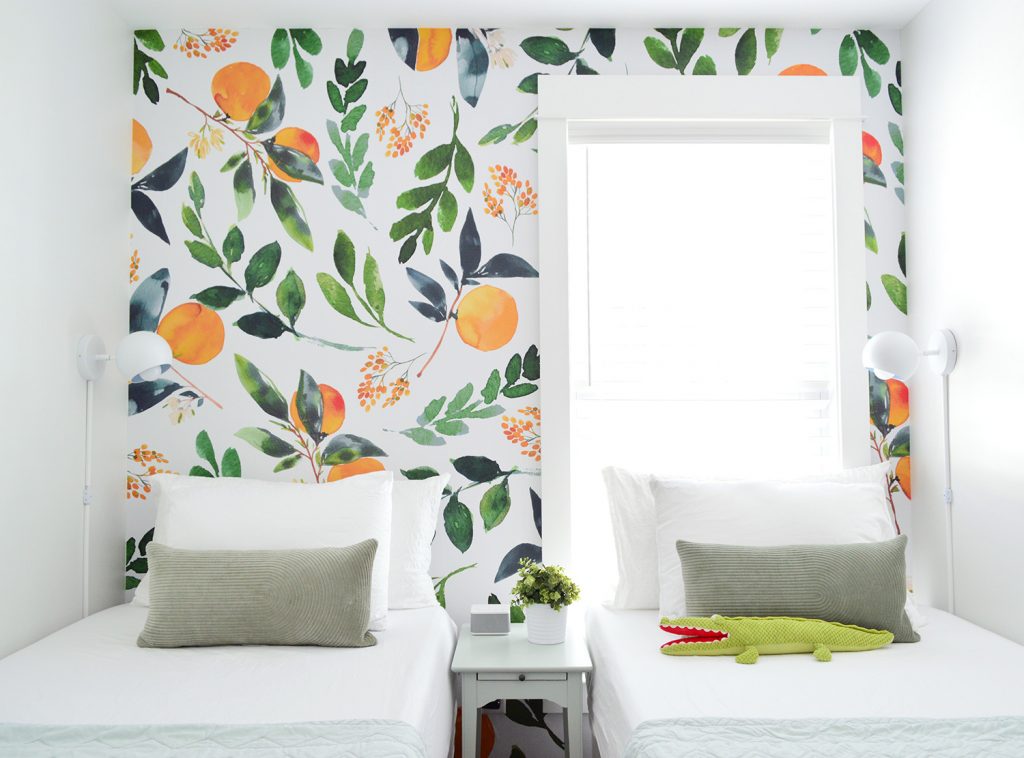
It’s probably not a room you’d want to sleep in year-round (I mean there is that whole tiny house movement…) but for a weeklong vacation, where you’ll pretty much be hanging out all over town/at the beach and just crashing in here, well, they do the job. We aimed to make them feel cozy, comfortable, and fun – and a ton of visual interest came from the murals that you saw us hang a few months ago (you can read more about how to hang them here). 
If you’ve followed along as we planned these rooms, you’ve seen us consider several layout options (bunks! two twins! a trundle! one big bed – or even a murphy bed!), and two side-by-side twins won pretty handily when over 13,000 of you tookour poll! They’re more comfortable for grown-ups to climb into than bunk beds (and much easier to make!), plus two twins can be pushed together for a king-sized sleep surface if someone requests that instead (hello versatility!). 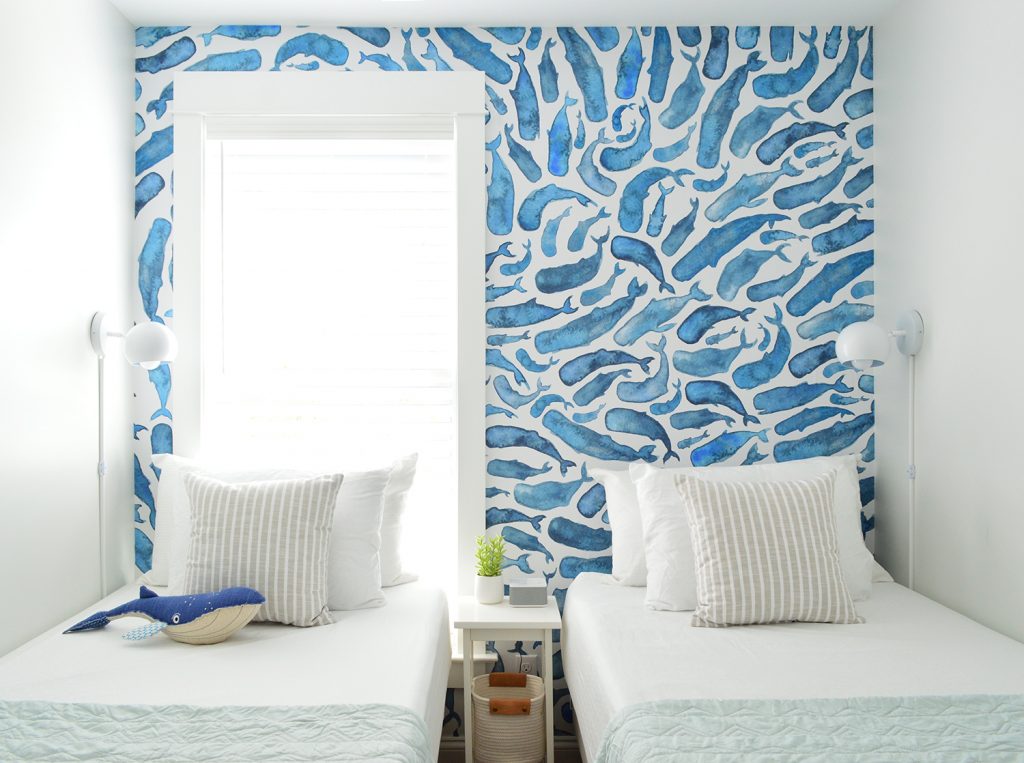
A trundle got significantly fewer votes (whether it was a pop up or a traditional one) since many people have kids who don’t sleep well together – or adults who don’t want to climb over each other. And one big bed (murphy or regular) got even fewer votes – probably because there are two other queen beds for people who want to sleep together and folks seemed to like the flexibility of one room where people can sleep separately. 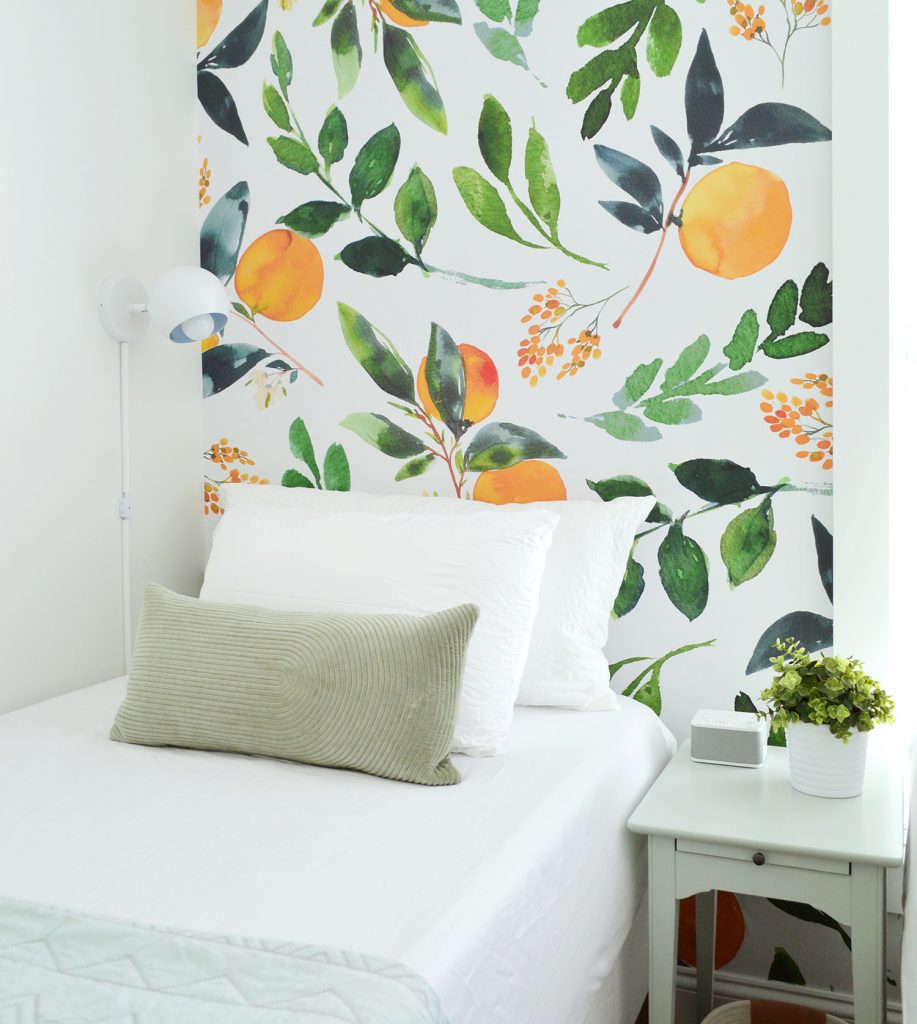
I gotta say I’m not surprised that twin beds won because when we travel we always look for… drumroll please… a room with two twins for our kids! It also doesn’t hurt that two twin beds can be RIDICULOUSLY GOOD LOOKING. Like the inspo photo below (or this one, this one, and this one). I’m 100% convinced that even the smallest spaces can have tons of style! 
Ok, on with the tour! If you spin around in the space, there’s a pocket door (they make the most of small rooms since it doesn’t swing into the space). We also hung a handy little wall shelf with empty baskets that provide some vertical storage (you could store kids pjs, favorite books, or some clothes in them if you wanted those things within the room). 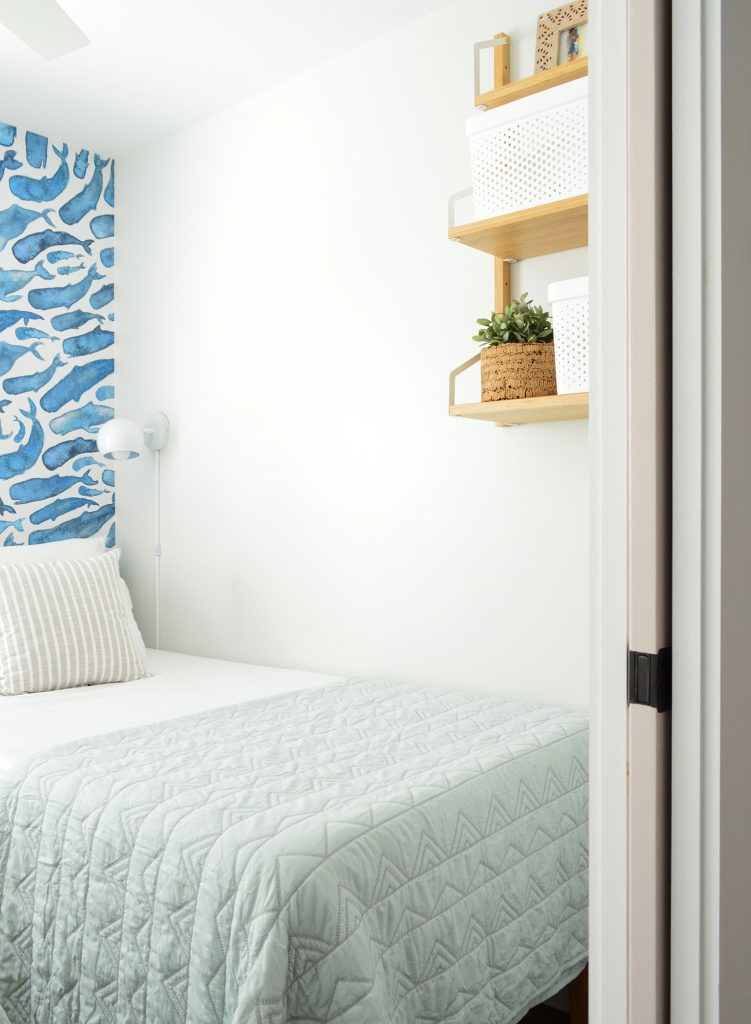
Here’s a better shot of the shelving system. It’s just 9″ deep (about the same depth as the sconces by the head of the bed) so it doesn’t feel like it’s IN YO FACE. I’m 5’2″ and have no issue reaching each item on those bottom two shelves – and the stuff on that top shelf is just decorative. There’s also room at the foot of the bed if someone wants to slide a suitcase in there. 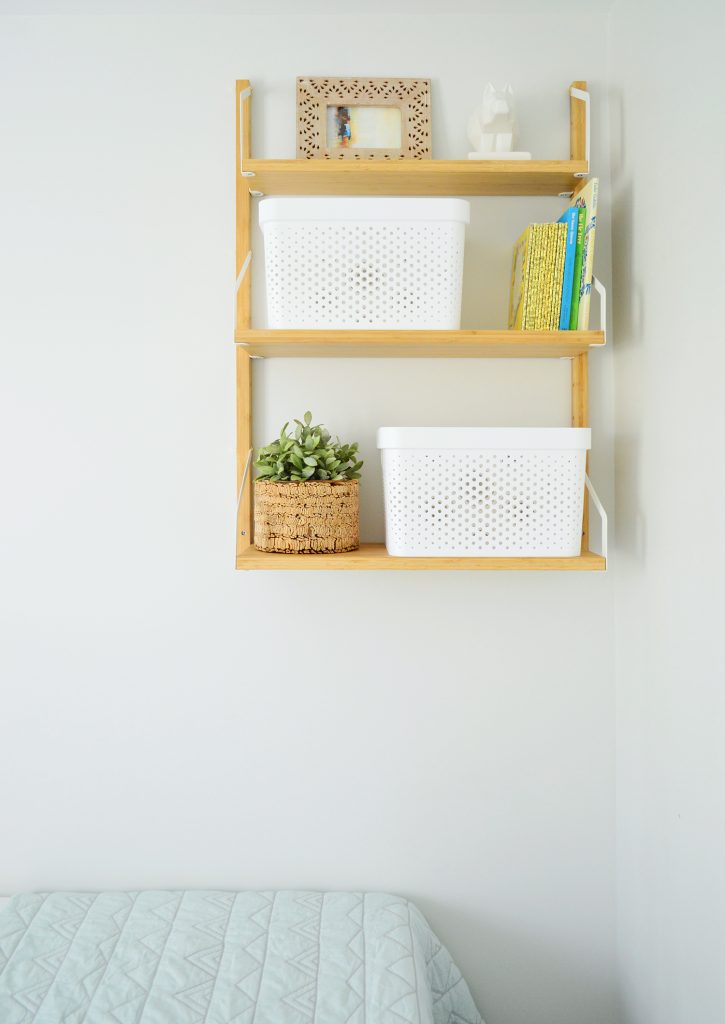
Since we know that may not be enough storage, here’s the good news: there’s a nice, big, half-empty closet just outside the room. Yes, literally one step. 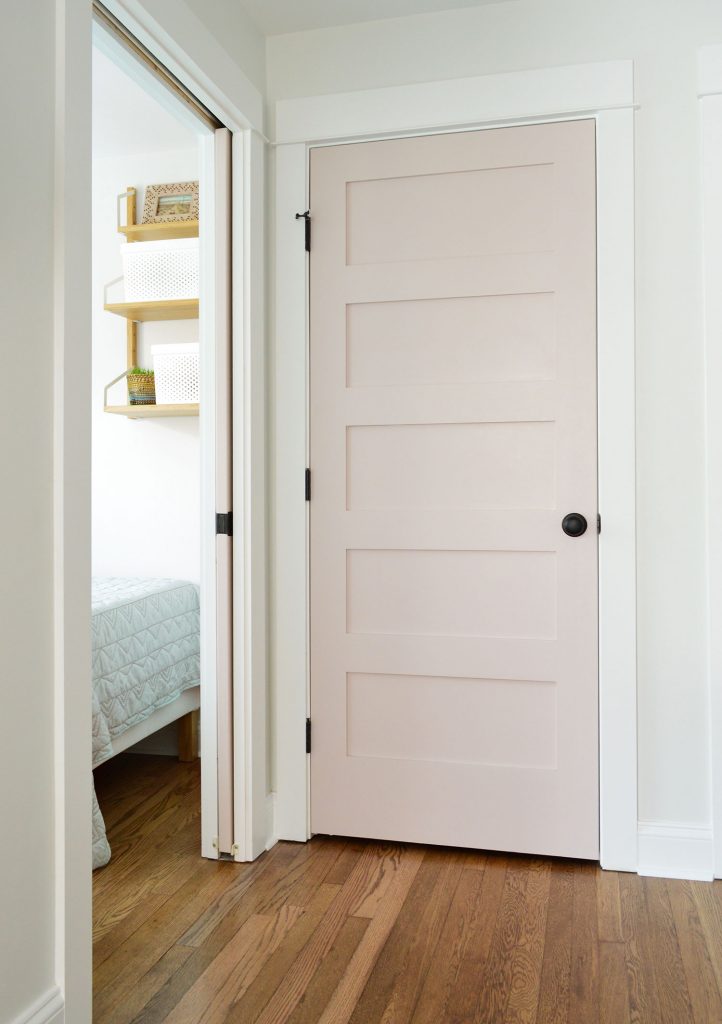
Here it is all opened up. While it has a few shelves dedicated to extra guest towels and linens – plus a high chair and a Pack ‘N Play for anyone staying with infants – we left the bottom half empty so guests can toss in extra clothes, suitcases, whatever. 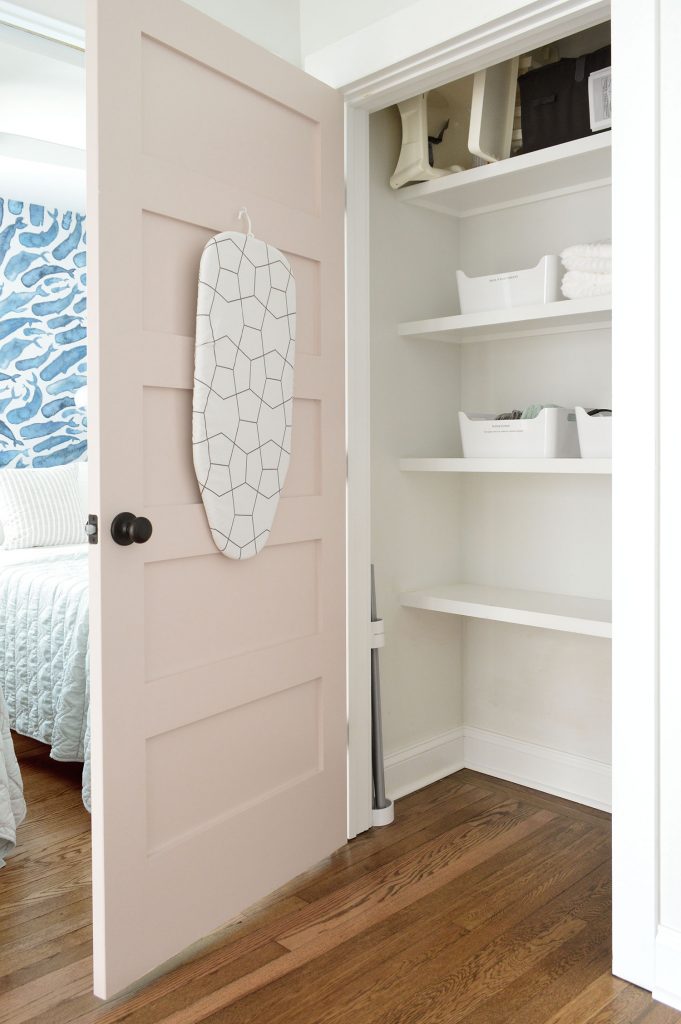
And see those silver rods corralled in the bottom corner of the closet? That’s John’s ingenious way of storing the legs to the high chair that lives on that top shelf (so they’re easier to see/grab and not hidden up there on that high shelf). The white hoops are just 3″ PVC pipe couplings from the plumbing aisle at Home Depot ($1.68 each!) and we labeled them so people aren’t like… “are these headless golf clubs? Some sort of fold-away tent? A new way to communicate with aliens?” 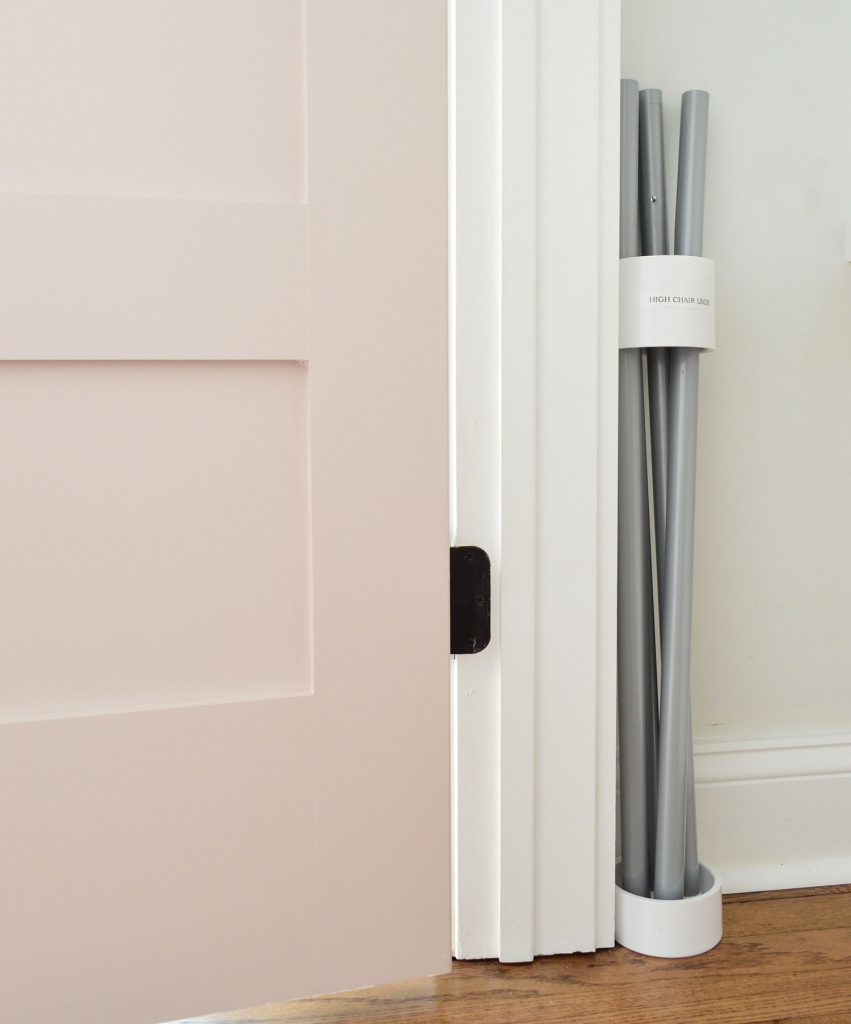
Here’s a closer shot of things like a few extra bath towels (each room has a pair left on the bed for guests when they arrive), and we have two Pack N Play sheets for people to use along with an iron, hairdryer, and first aid kit. We had some fun with a label maker as John mentioned on Monday’s podcast (I know, we are PARTY ANIMALS) just so everyone knows where to find things. It also makes it easier for our house cleaners to put things back in the right spot between guests. 
We were even able to communicate some simple instructions to our guests with the labels we added. For example, the washcloth bin says “use gray ones for makeup removal please” since we heard from our cleaners that light colored washcloths rapidly get ruined when guests use them to take off their makeup. 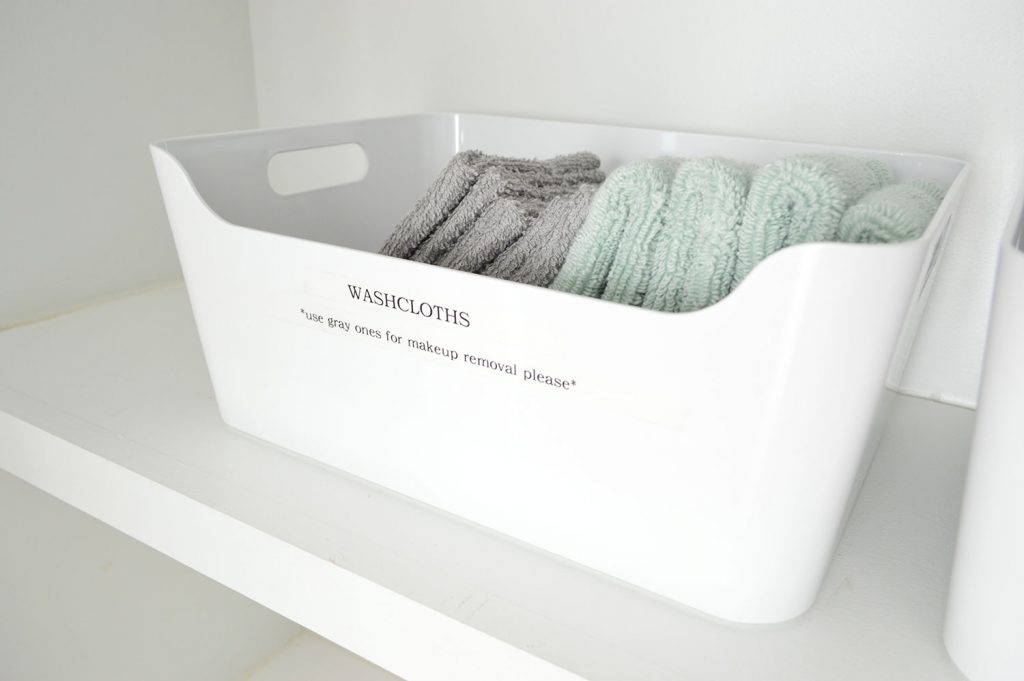
We also learned that it’s smart to add photos to your Airbnb listing of the perks you’re offering, so we snapped some shots of the high chair set up downstairs, so anyone scrolling through the pics sees it without having to read a bunch of fine print. 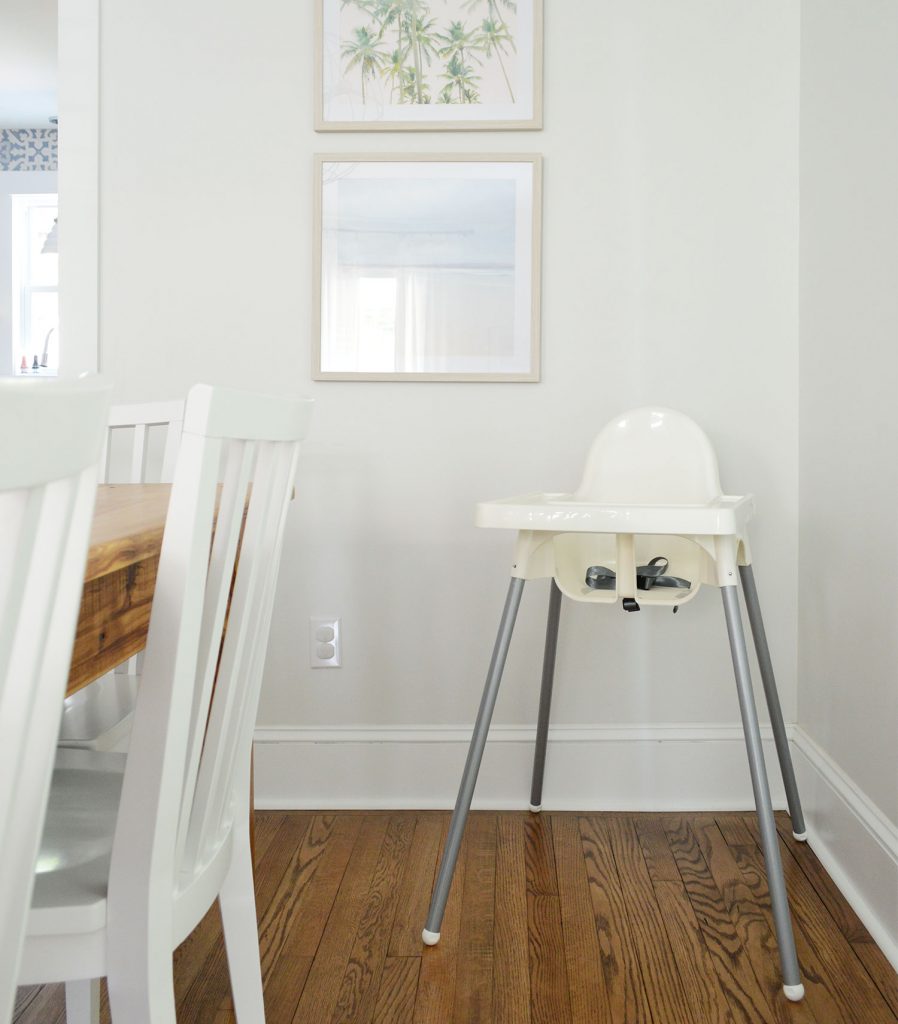
We also took a photo of the Pack N Play, which fits nicely between the double closets in the master bedrooms (as well as in a few other spots). It’s hard to see in this pic, but that window has white faux wood blinds, cause nobody wants to put baby in a 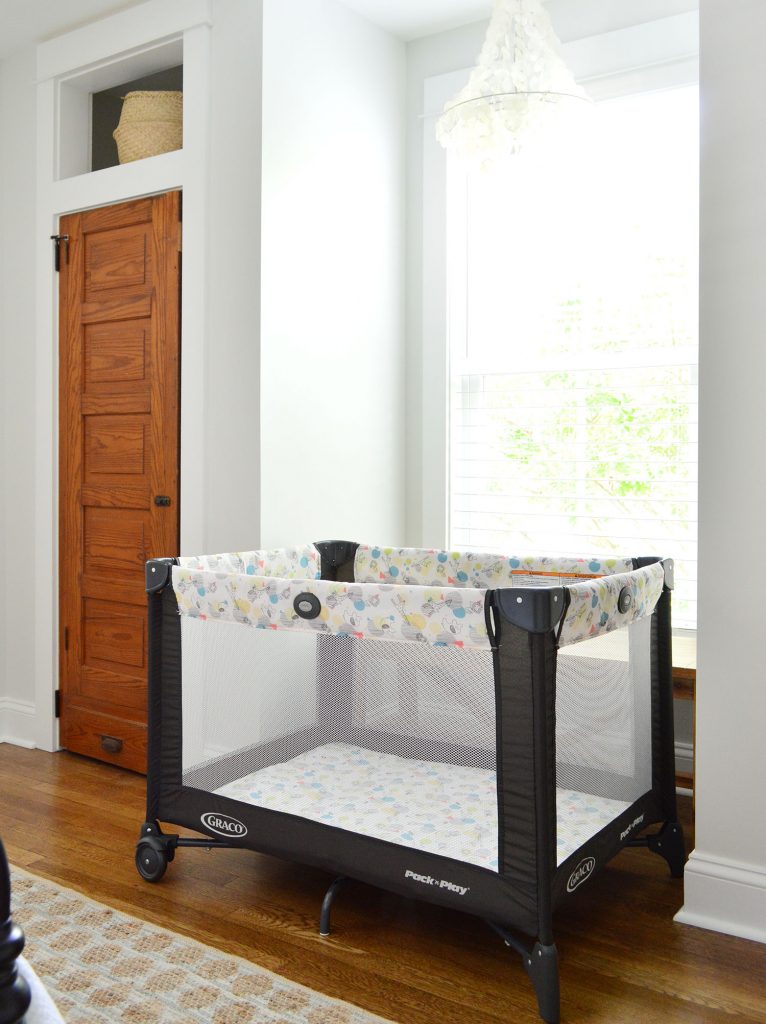
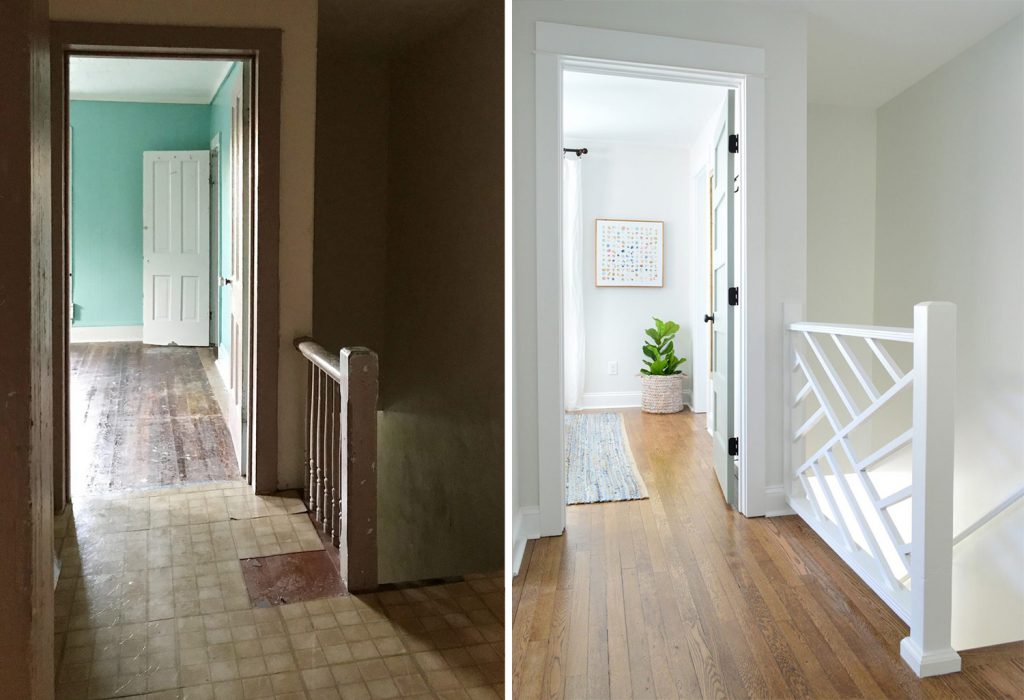
And before I show you the locked owner’s closet, I couldn’t resist throwing in this before & after of the upstairs hallway. Here it is today: 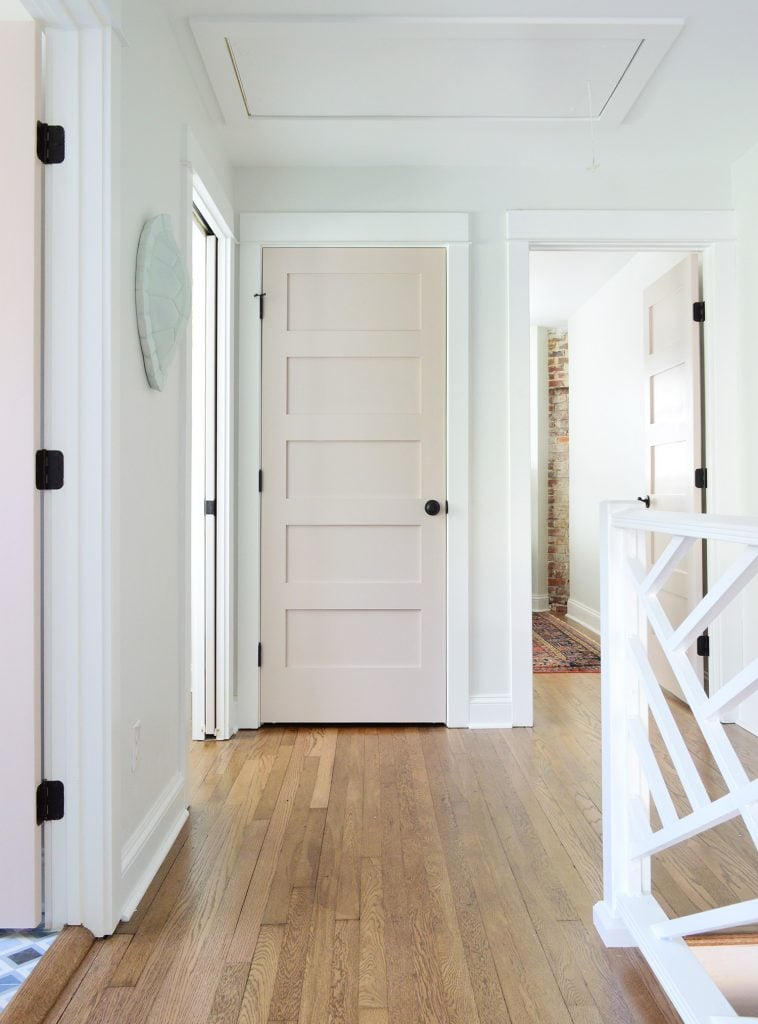
And here’s that same vantage point when we bought the house back in 2017. How funny is that pink trim? It was one of the reasons we chose a pink tone for all of the doors on this side of the house (White Truffle by Sherwin Williams). The super cool wallpaper border didn’t come back, but we did move the door to the master bedroom over about 5′ to the right so we could add this awesomely useful hall linen closet, and WE’RE SO GLAD WE DID. 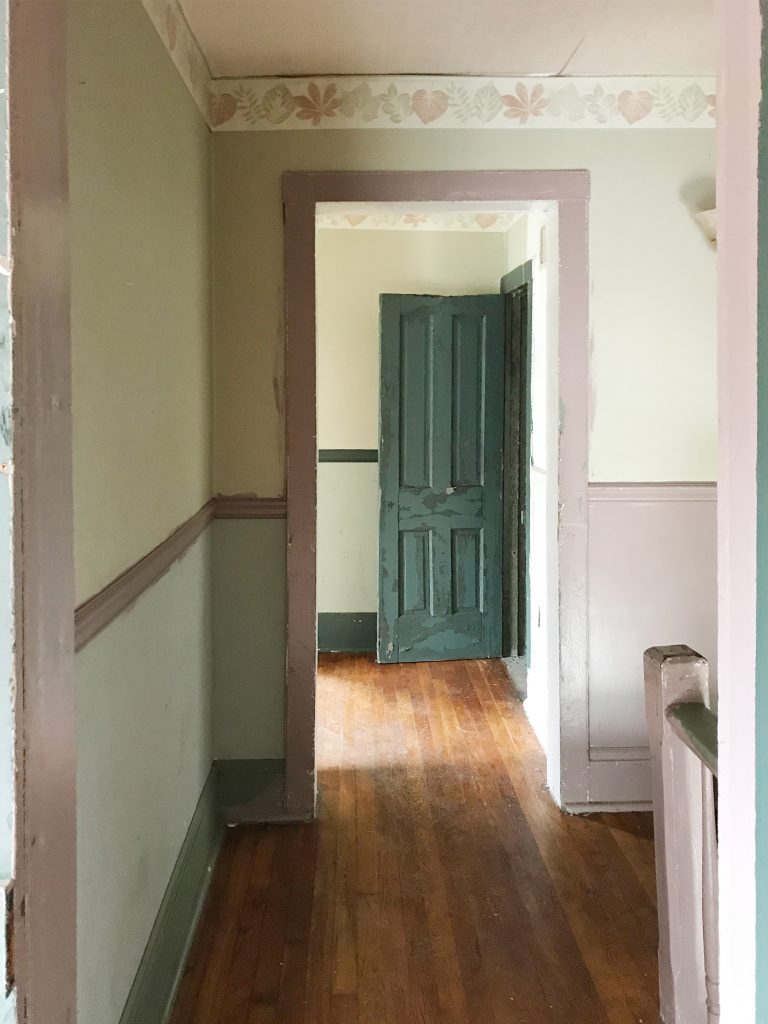
But the hardest working closets in the duplex are downstairs under the stairs, right next to the TVs on either side. Renters won’t have access to them, but we thought you might be curious to see what’s in our locked owner’s closets. 
These closets are for us to store all of the refills and extras that our cleaning people will need to access on both sides of the house as they flip them between guests. It’s all a learning curve to us, so I’m sure this will change over time, but inside we’ve got all sorts of bulk-sized refills for things like hand soap, laundry detergent, fabric softener, dish detergent, shampoo, conditioner, and body wash (thank you Costco!). You can hear more about our adventures of being new Costco members here – it’s a whole new world. 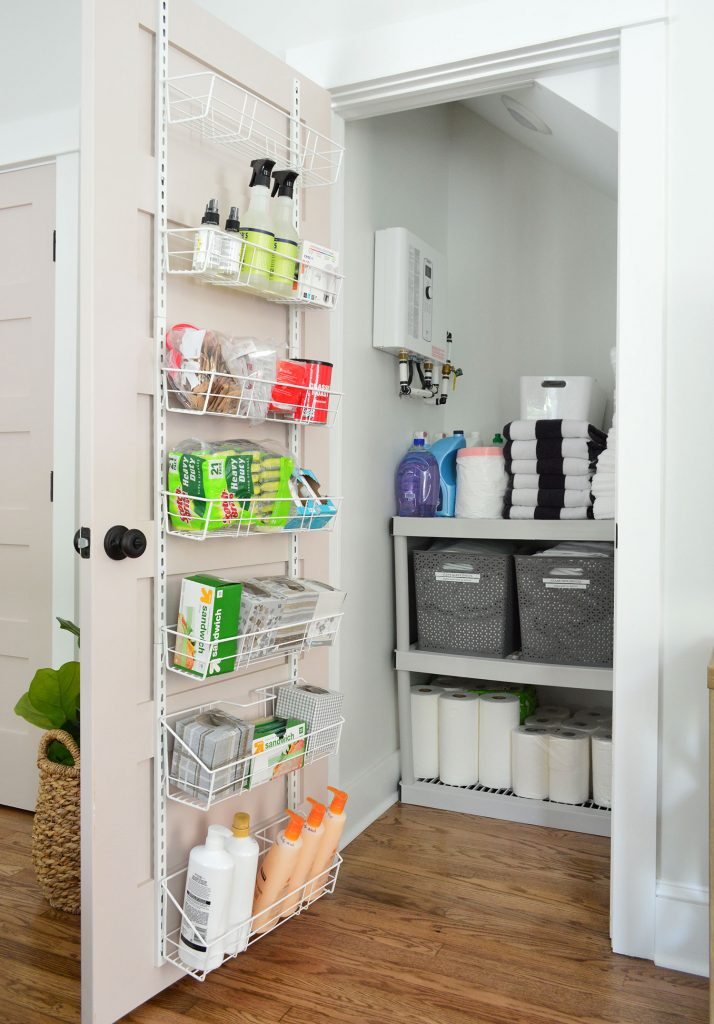
The closet isn’t huge, so we added some wire-shelving to the back of the door to wrangle small items like coffee grounds, coffee filters, tea bags, Sugar In The Raw packets, tissues, sandwich bags, light bulbs, bathroom spray, sponges, small bathroom trash bags, and various soaps. Then we bought one ofthese tall plastic garage shelving units and split it across the two owner’s closets (thanks to the sloped ceiling, one half of the unit fit perfectly on each side). The plastic shelf helps us store toilet paper, paper towels, kitchen trash bags, and extra linens in case the cleaners don’t have time to fully launder everything between guests – or if they find something that has been stained or ripped that needs quick replacing. We’re learning that these very short turnover windows make it really important to have extra items on hand so there’s not a huge last minute panic. Here’s hoping! 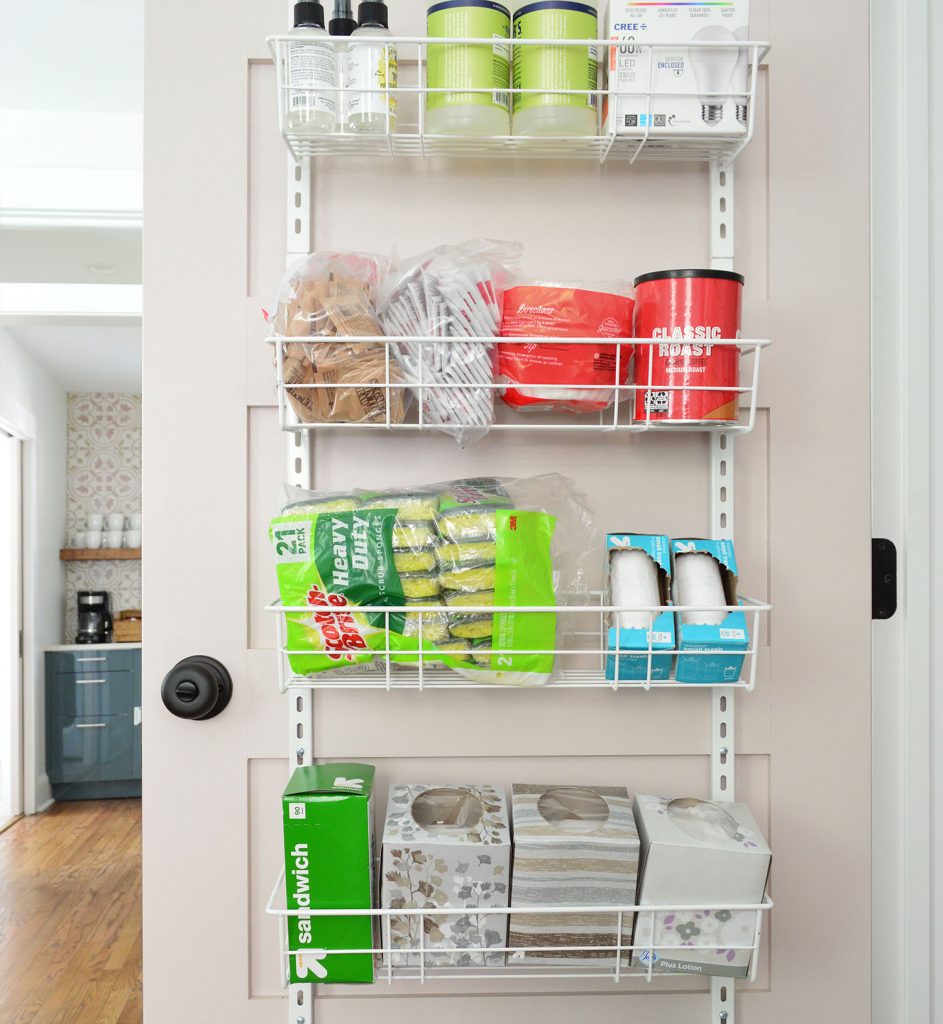
Some people reading the list of things we’re providing might be like WHAAAAAA????!!!” but many other rentals in our area offer those things and we wanted to as well. It totally varies by where you live I think. In the area where John’s parents have their beach rental, nobody provides sheets or towels (EVERYONE BRINGS THEIR OWN!) so it’s pretty funny to see how much things differ by region. This locked closet is also where we access the tankless water heater & the HVAC system, so there is a hidden key that our plumbing & HVAC pros can access if they ever need to get in to fix something without us being there. 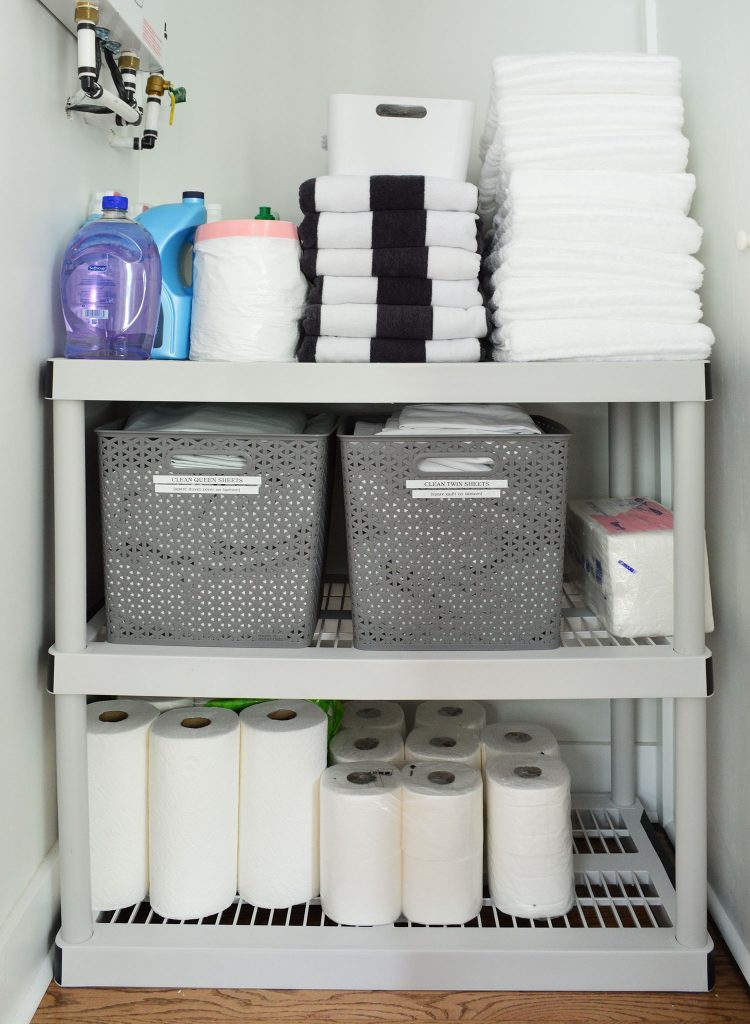
So there it is. The last few finished interior duplex spaces! We still want to do a video walk-through so you can see how it all flows and connects. And we still have to photograph the back patios, which I can’t wait for you to see! They turned out even better than I hoped. Completely unrecognizable from what was back there before. I feel like they might be my favorite makeover in the entire duplex project! So cross your fingers for some good weather so we can get them all photographed ASAP. P.S. You can see all of the other finished rooms of the duplex that we’ve already revealed (two kitchens! the front and back of the house! four other bedrooms! six bathrooms! two living & dining rooms! two mudroom/laundry rooms!) along with how we planned the layout, tiled the floors & backsplashes, etc, here in our duplex category. It’s almost two years of updates covered in just 20-something posts! *This post contains affiliate links The post The Last Finished Duplex Spots You Haven’t Seen appeared first on Young House Love. Via https://www.younghouselove.com/duplex-sleeping-nooks-closets/ We recently made two big changes to our shopping habits that are having both positive and negative repercussions. So we’re sharing what we did, why we did it, and how we’re trying to course correct a few pitfalls that popped up. We also got a refreshing reminder that it’s liberating to acknowledge that you don’t have to be good at everything – especially in a social media world where everyone else seems to have it all figured out. Plus, we share a big hiccup that was narrowly avoided at the duplex, an organizational tool that we’ve fallen hard for, and Sherry’s deep feelings for a certain crunchy green snack. You can download this episode from Apple Podcasts, Google Podcasts, Stitcher, TuneIn Radio, and Spotify – or listen to it below! Note: If you’re reading in a feed reader, you may have to click through to the post to see the player. What’s New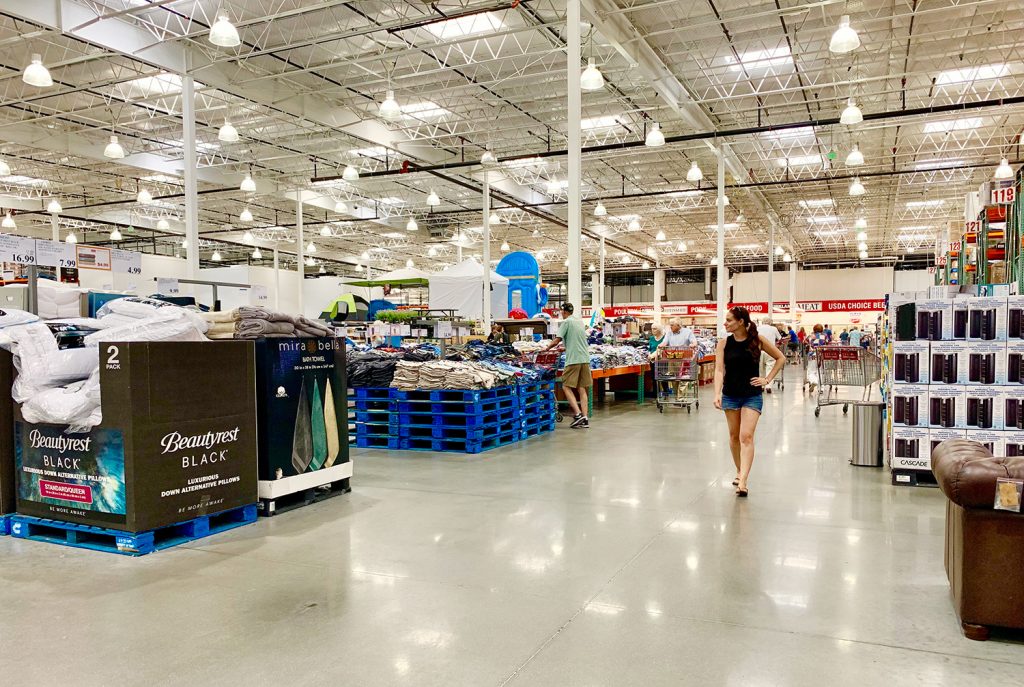


That’s Embarrassing
It’s Okay Not To Be Good At Everything
We’re Digging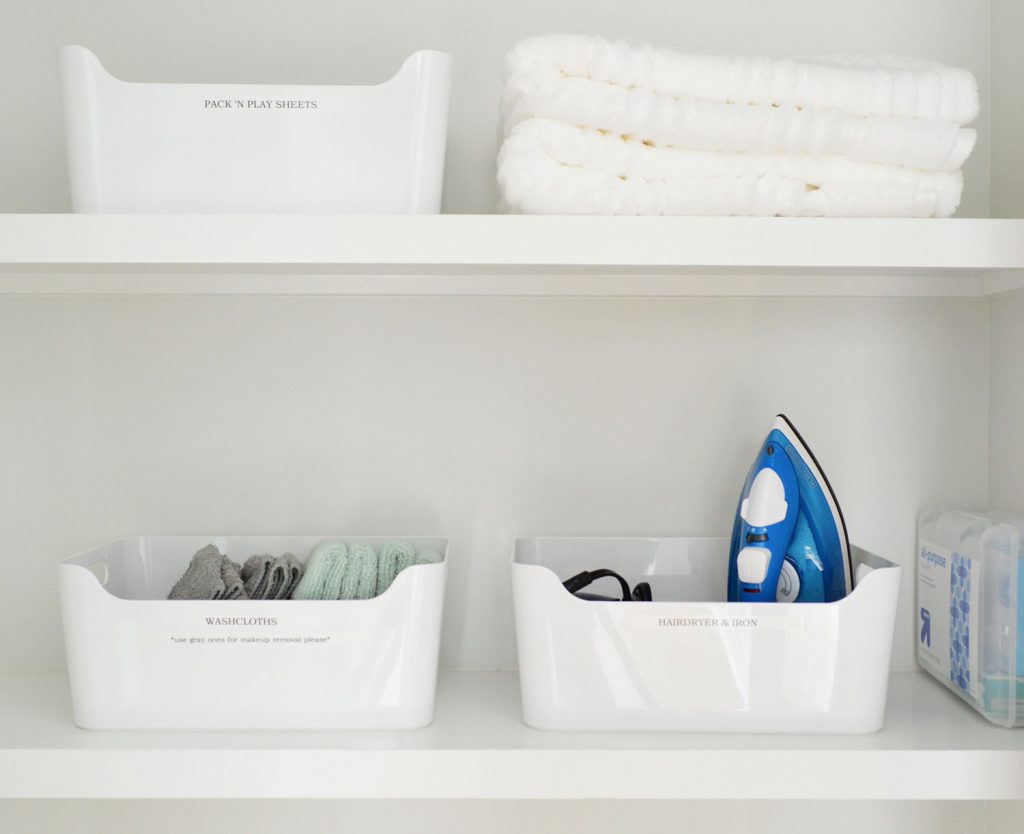

If you’re looking for something we’ve dug in a past episode, but don’t remember which show notes to click into, here’s a master list of everything we’ve been digging from all of our past episodes. You can also see all of the books we’ve recommended on our Book Club page. And lastly, a big thank you to Annie Selke for sponsoring this episode. Check all of her classic and colorful designs at annieselke.com/YHL, including their Dash & Albert Designer Favorites – to help you zero in some great no-fail rug options. And get 15% off your order with the code YHL15. 
Thanks for listening, guys! *This post contains affiliate links* The post #144: When You Don’t Even Recognize Your Own Shopping Habits appeared first on Young House Love. Via https://www.younghouselove.com/podcast-144/ This is the story of how not one, but two tables got a complete refresh thanks to a little elbow grease and, well, a lot of sanding. And it’s also a testament to how generally great secondhand finds can be (they literally can look like new – or even better than something new). It’s also a testament to how straightforward it can be to breathe new life into an old piece of furniture. Not all DIY projects are always straightforward, so let’s hear it for that adjective! 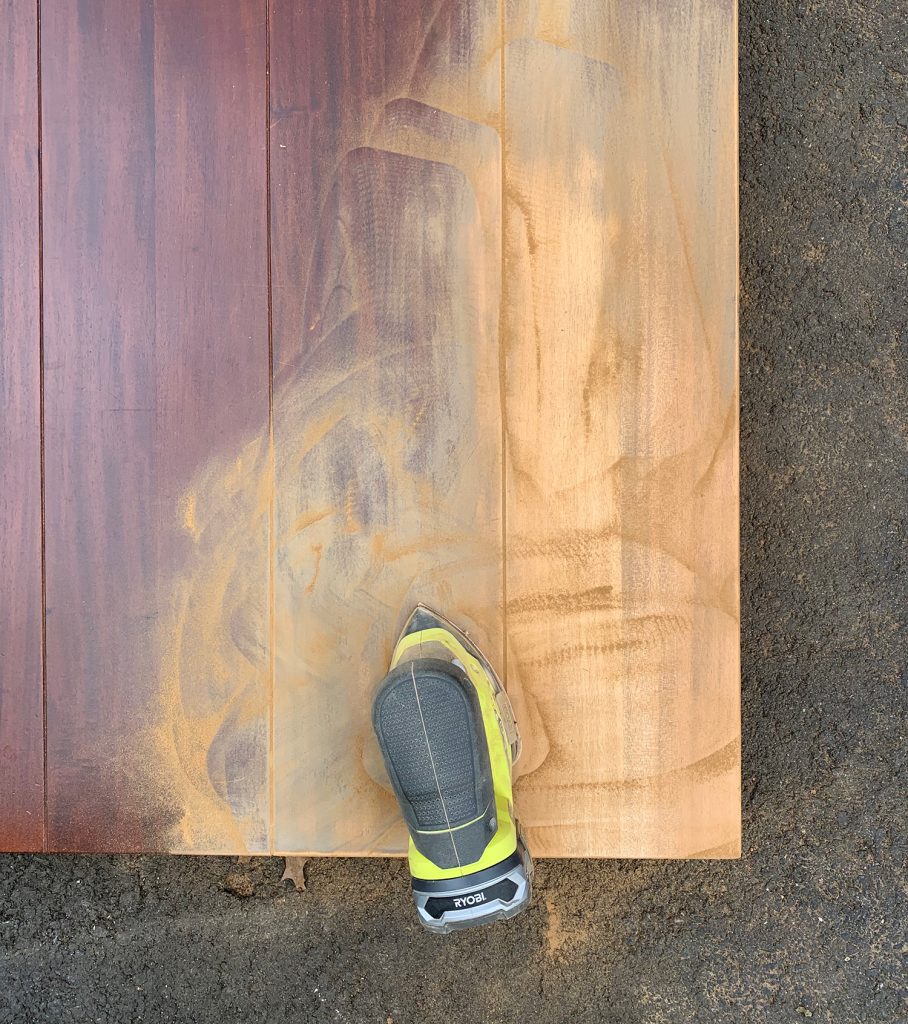
Since the duplex has two dining spaces (one on each side) we obviously needed two dining tables. For one side we planned to use our old dining table, which you’ve probably seen in this photo from our second book. 
We replaced it over a year ago with a bigger table that we also scored secondhand – this time on Facebook Marketplace – and while some sleuths noticed the change on IG Stories or in a random social media photo, it wasn’t always easy to catch because it has pretty much been constantly covered in supplies waiting to be delivered to the duplex for the last six months. So if you saw it, you didn’t see much of it. Anyway, the table shown above has been stored up in our attic for the last year or so, just waiting for eventual transport to the duplex. But first, it needed some love… 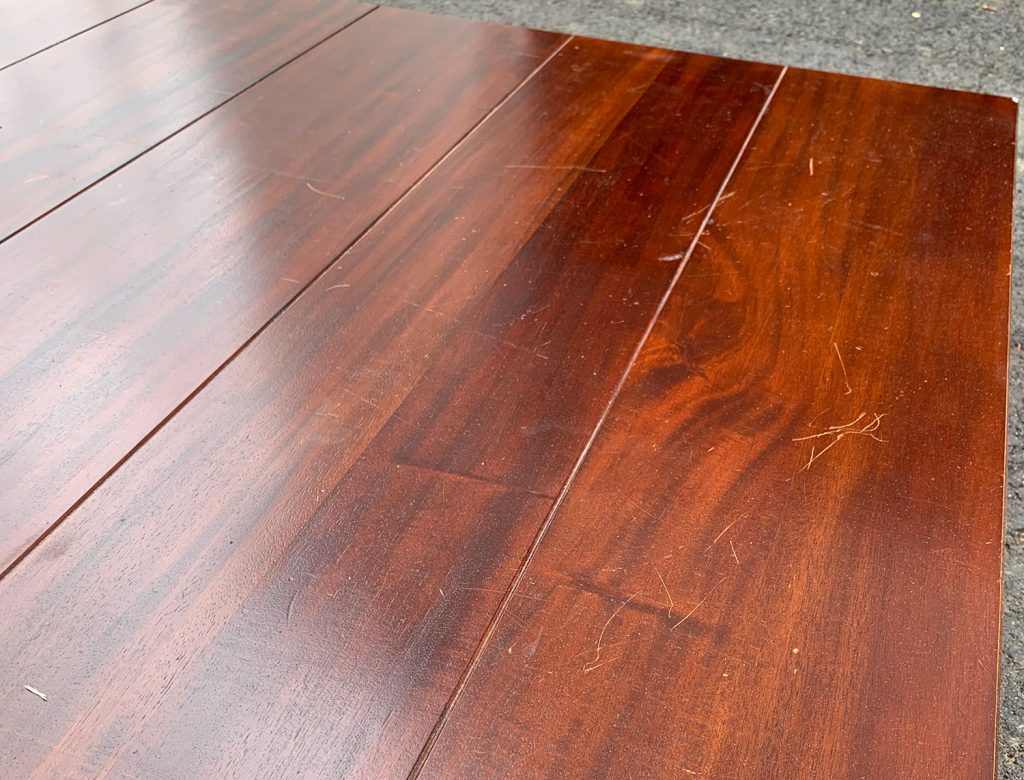
We actually got this table as part of a table swap with a friend. What, you haven’t heard of a table swap? Just kidding it’s not a thing, but it worked out well. She needed a big round table and the one we’d used in our second house was too wide for our current dining room, so we traded our big round one for her rectangular Crate & Barrel one. It fit our space MUCH better, but she warned us it was pretty scratched up and needed some refinishing. We’d always planned to sand & restain it at some point… it just took us nearly 5 years to do it! We were a little anxious about taking a sander to a Crate & Barrel table, so we dipped our toes in slowly by first sanding the top of one of the legs. If it was a bust, no one would ever see the attempt. But fortunately, it worked. BEAUTIFULLY. 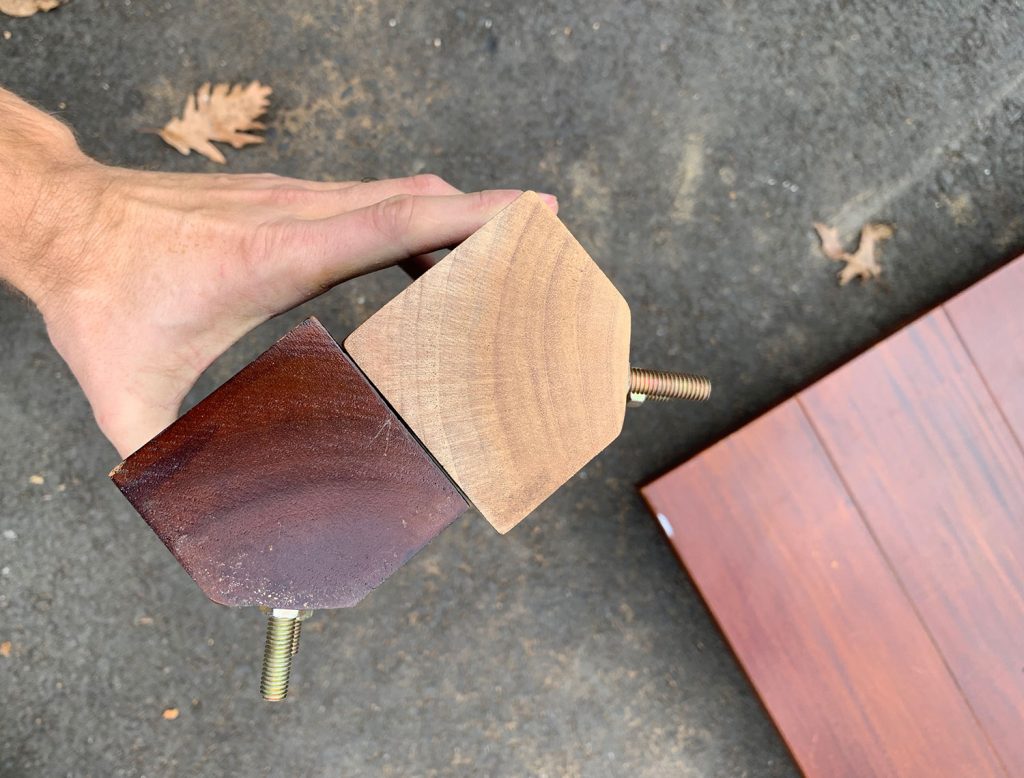
But before I show you more of this table, let me introduce you to the other secondhand table we refinished for the other side of the duplex. 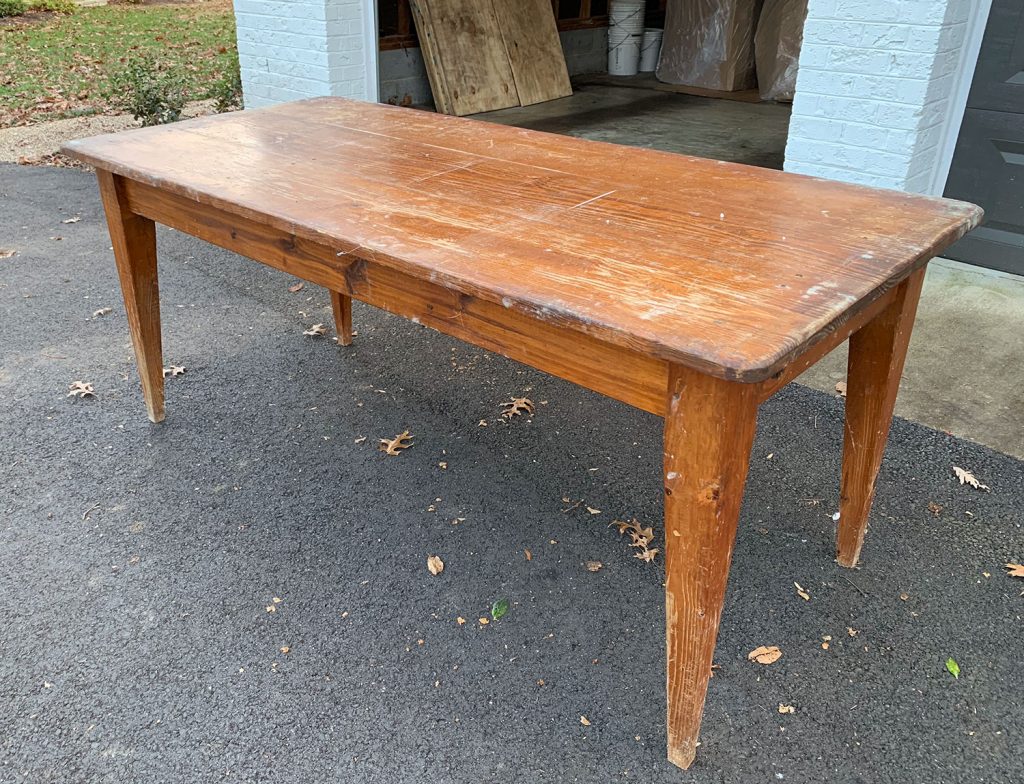
My sister was replacing her old solid-wood dining table (which you can see in this old post from when we house crashed her in 2013) and we jumped at the chance to buy it before she listed it on Facebook. It too was pretty worn from years of use, but the size was perfect and we loved how solid and casual it was. I was less nervous about ruining this one, so I took my sander right to the top and went to town. 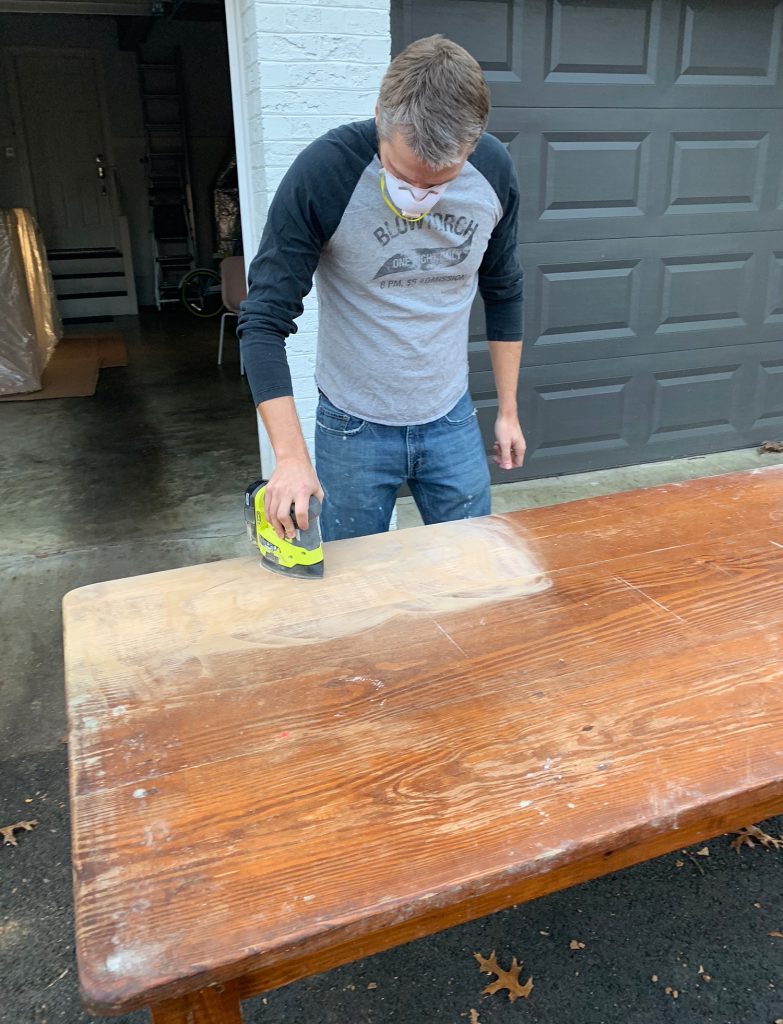
The battery-operated corner cat sander I already owned did a fine job, but it took a long time to get the finish off of this table completely. And even after an hour or so of work, it still wasn’t quite as stripped as I’d hoped. So I bought this $79 corded random orbital sander to see if a little bit more power (cue the Tim Taylor jokes) could get me a cleaner and faster result. It. Was. So. Worth. It. 
It immediately showed me how good it was for removing some of the more stubborn scratches and marks on this table (see the left photo above, which was taken before I used it, and the much cleaner and more stripped shot on the right, which was taken as I was going over it with the orbital sander). It was also a lot faster, which helped immensely when it came to sanding off the thick factory finish on the Crate & Barrel table. Can you even believe how much wood grain was hiding under that dark red stain?? 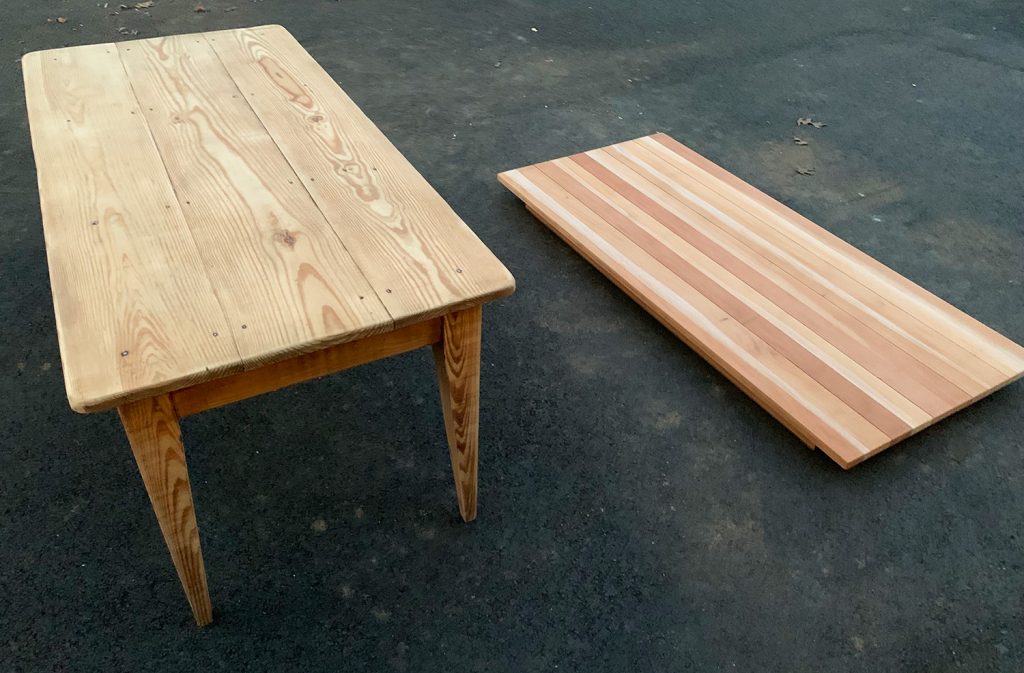
All in all it probably took us 2 to 3 hours to sand both tables, especially because of all of the legs and aprons we had to get too. But I was happy to have discovered the new heavier-duty sander and even MORE happy about the results. We decided to transport them to the duplex like this and then stain and seal them in place, that way we could be sure we liked how the stain colors were looking in the space (and adjust them if they looked weird in the rooms). First we tested what it would look like if we just clear sealed both tables. 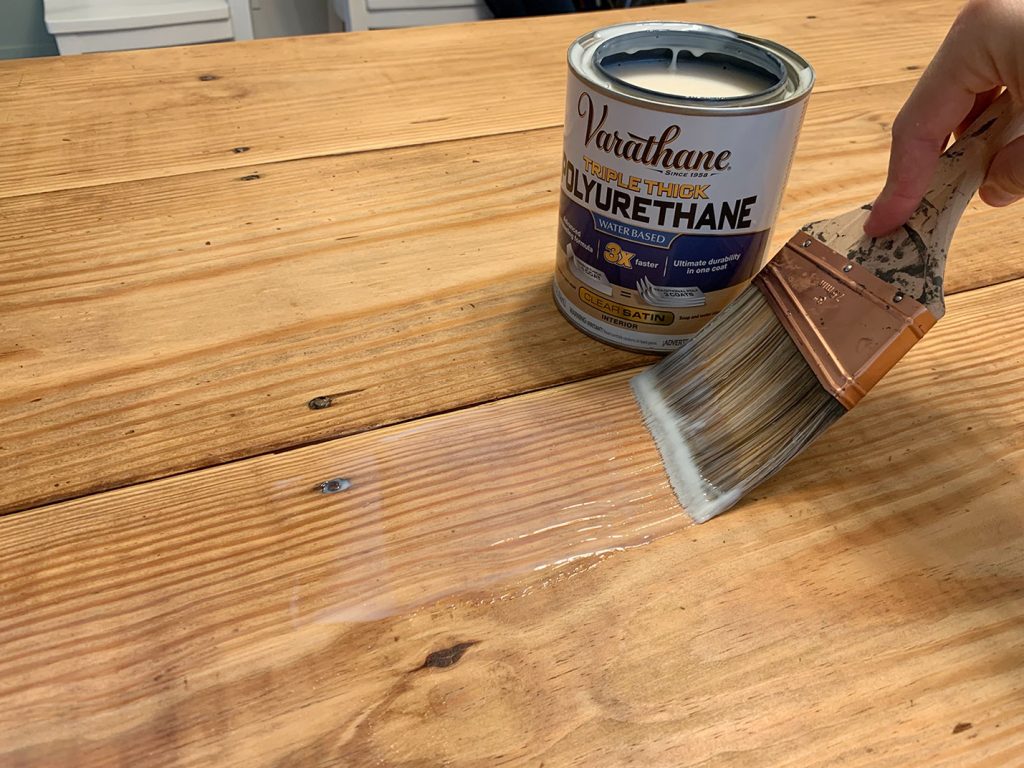
We loved the result on the table from my sister, since it deepened the color only slightly and didn’t disguise any of the wood grain. Sherry applied one coat of basic water-based sealer, and then for our second coat we tried this “Triple Thick” version to hopefully add extra protection and durability. It went on just as easily and we love the satin finish. Highly recommend it. Here’s a reminder of what the top of this table looked like before: 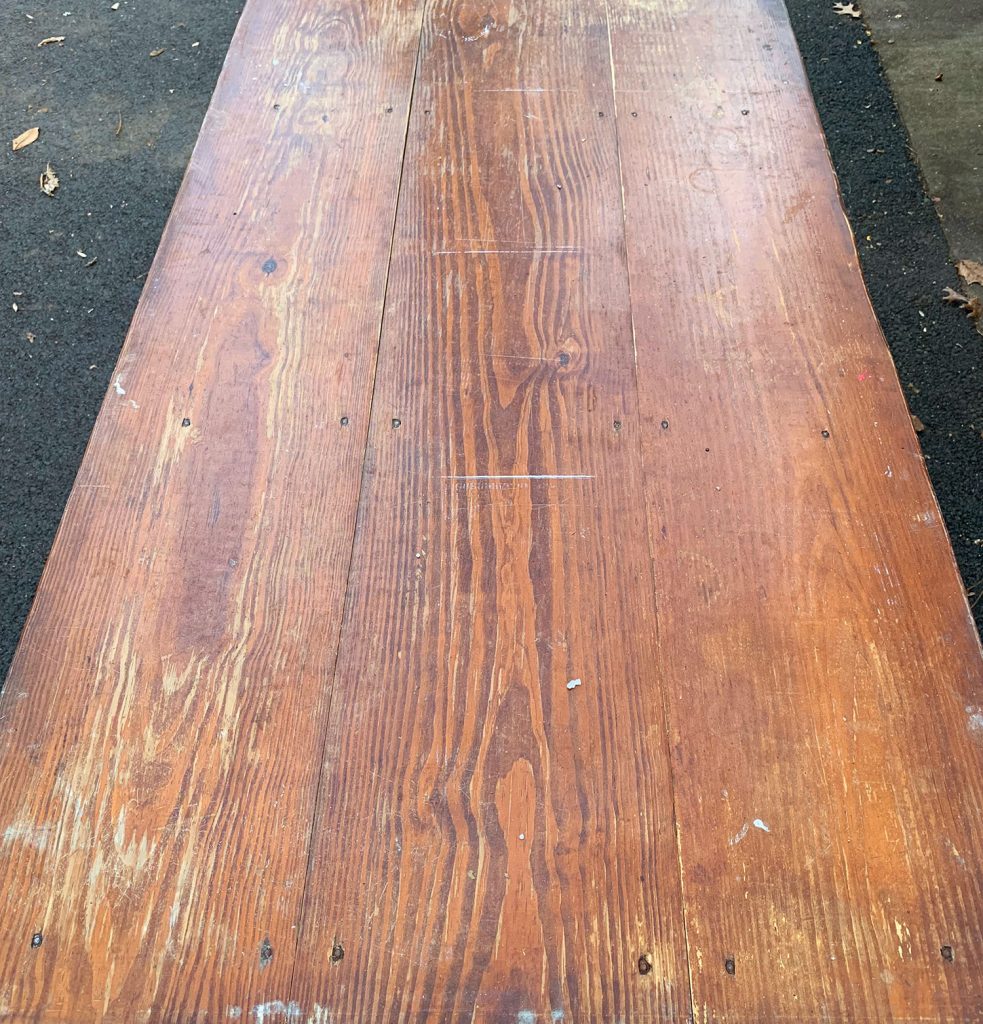
And once we finished clear-sealing it, the lop looked like this: 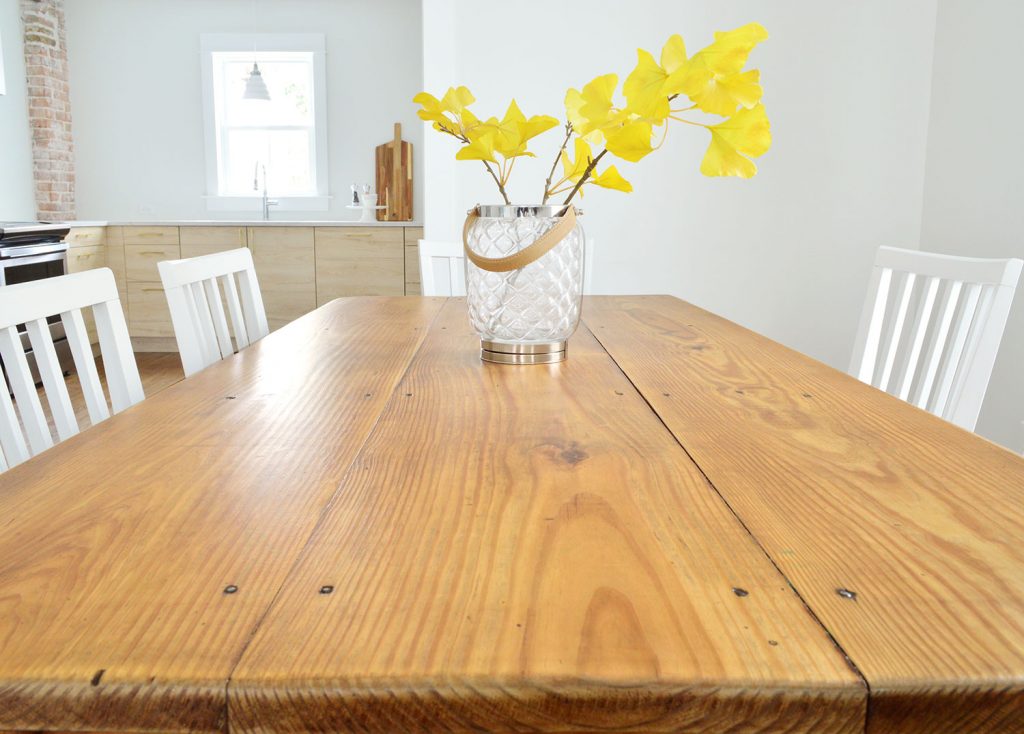
Now the room has come a lot further (as well as that kitchen behind it), so this is the final result. We love how it ties into the wood door that you see peeking out of the mudroom next to the kitchen. 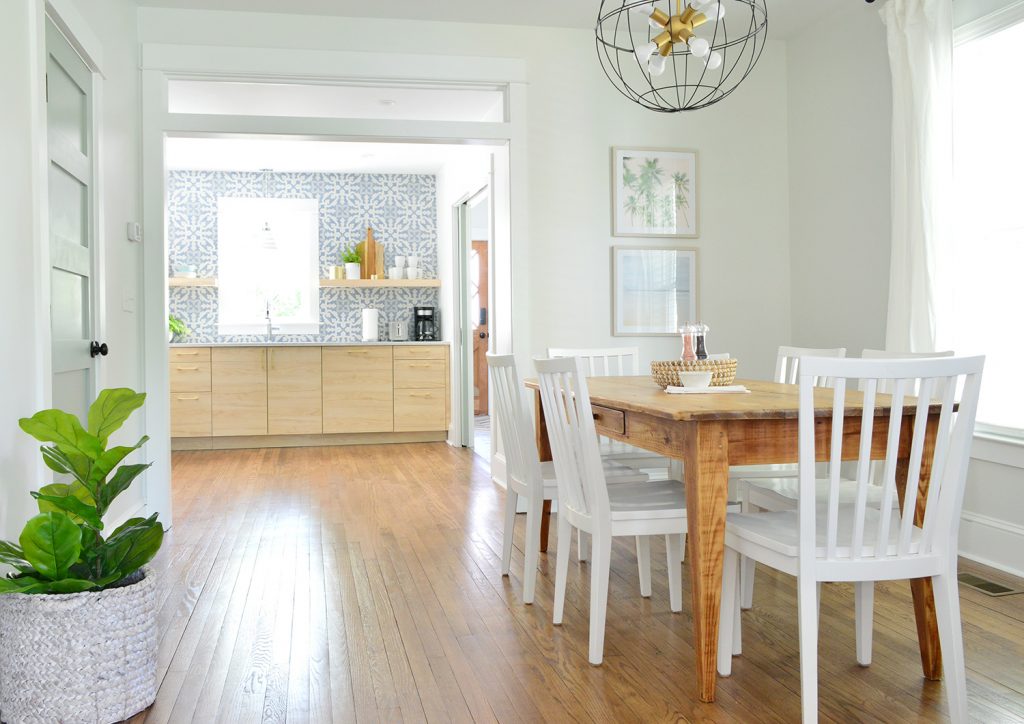
When it came to the Crate & Barrel table, our little test spot of the clear sealer just brought out the red undertones of the wood when it dried, which is NOT what we wanted. So we decided to stain it with a cooler brown color to downplay the red. Our first instinct was to useSpecial Walnut by Minwax, since that’s what we used on the duplex floors (you can see the before & afters of those here). 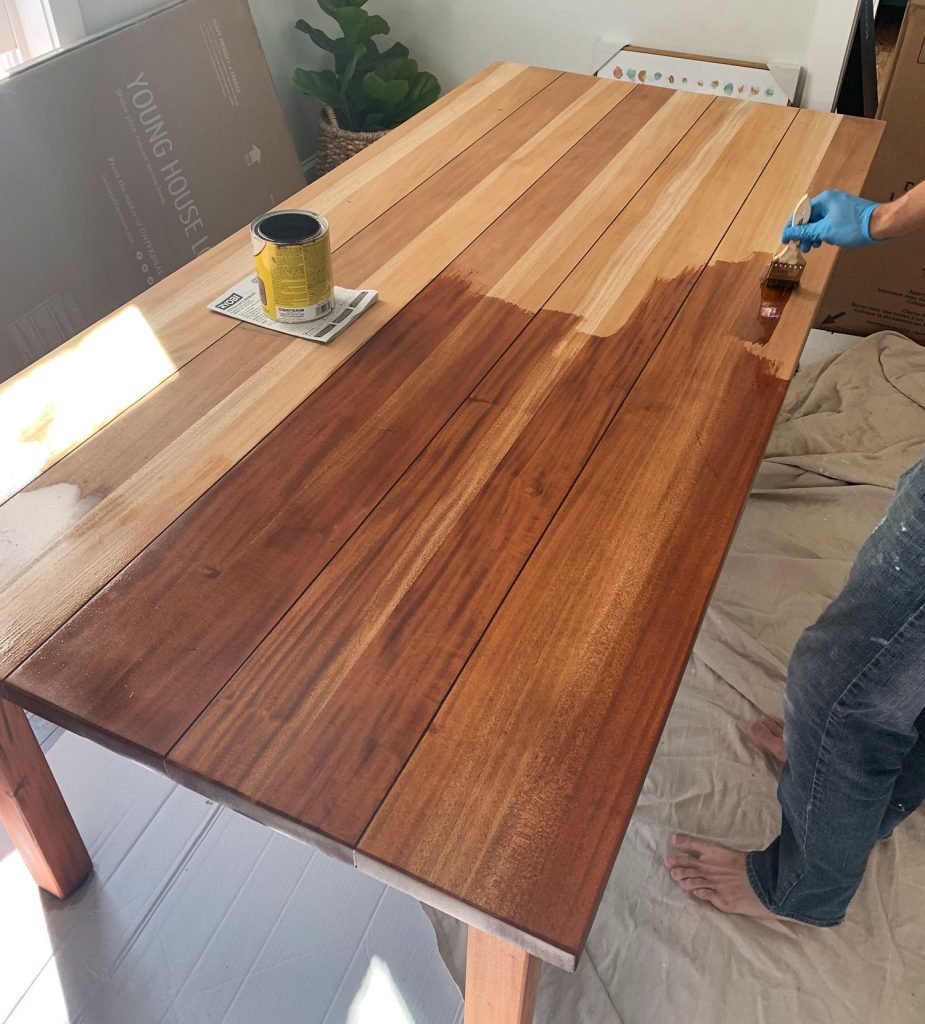
It was looking good as it was going on, but once it dried it looked redder than we wanted (it kinda felt like it was slowly creeping back to the dark red original color that we painstakingly sanded off). So we darted out to the hardware store and bought a gray stain instead (called Classic Gray) and wiped on a very light coat to see if it would cool off the red undertones. 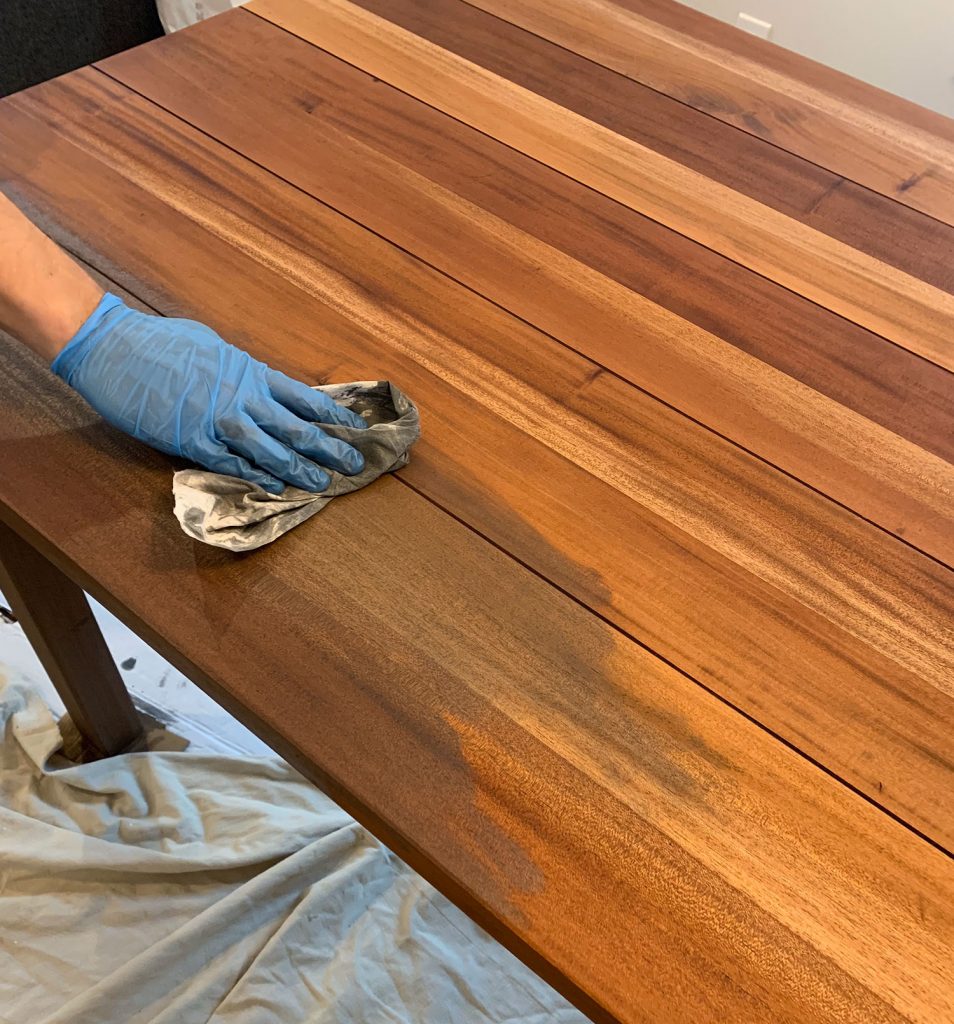
It did just the thing we were looking for, so it was full steam ahead on this combination of stains. As for how we did this step, we wiped on a really light coat of the Classic Gray and then immediately wiped it off (the can usually tells you to wait, but we didn’t want things getting too gray). 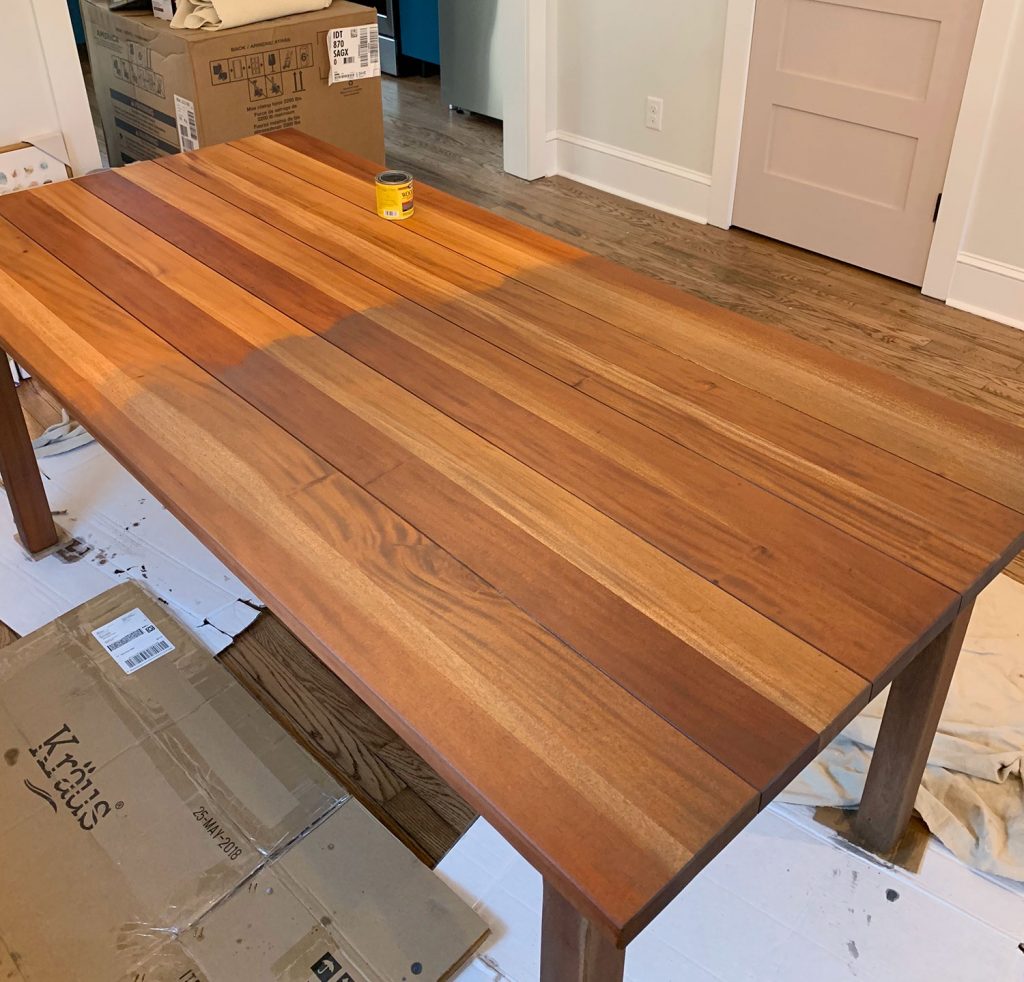
In the end we’re so glad that you can still see the variation in the wood tones through those two layered stains, and after that quick Classic Gray coat dried, we did two coats of that same “Triple Thick” sealer we used on the other table and BINGO BANGO, both tables were done. 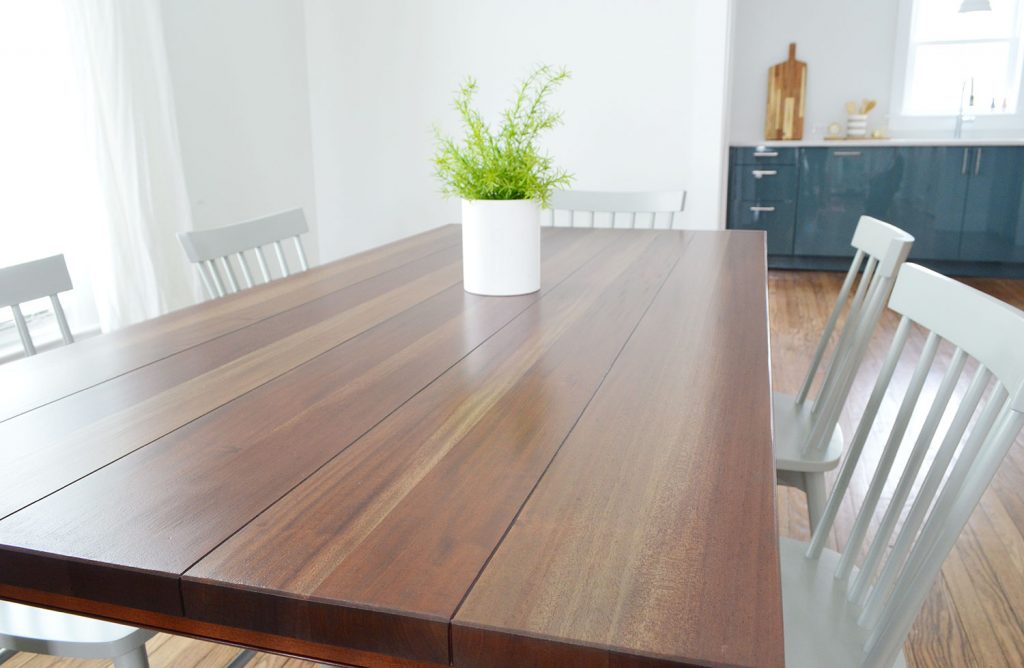
Oh and we only had to buy two of the gray dining chairs because four of them were the ones that we already had at the beach house (before we opted to replace four of them them with long benches). Sidenote: our dining table at the beach is ALSO a secondhand find! Yes, we own four dining tables, and none of them are new. 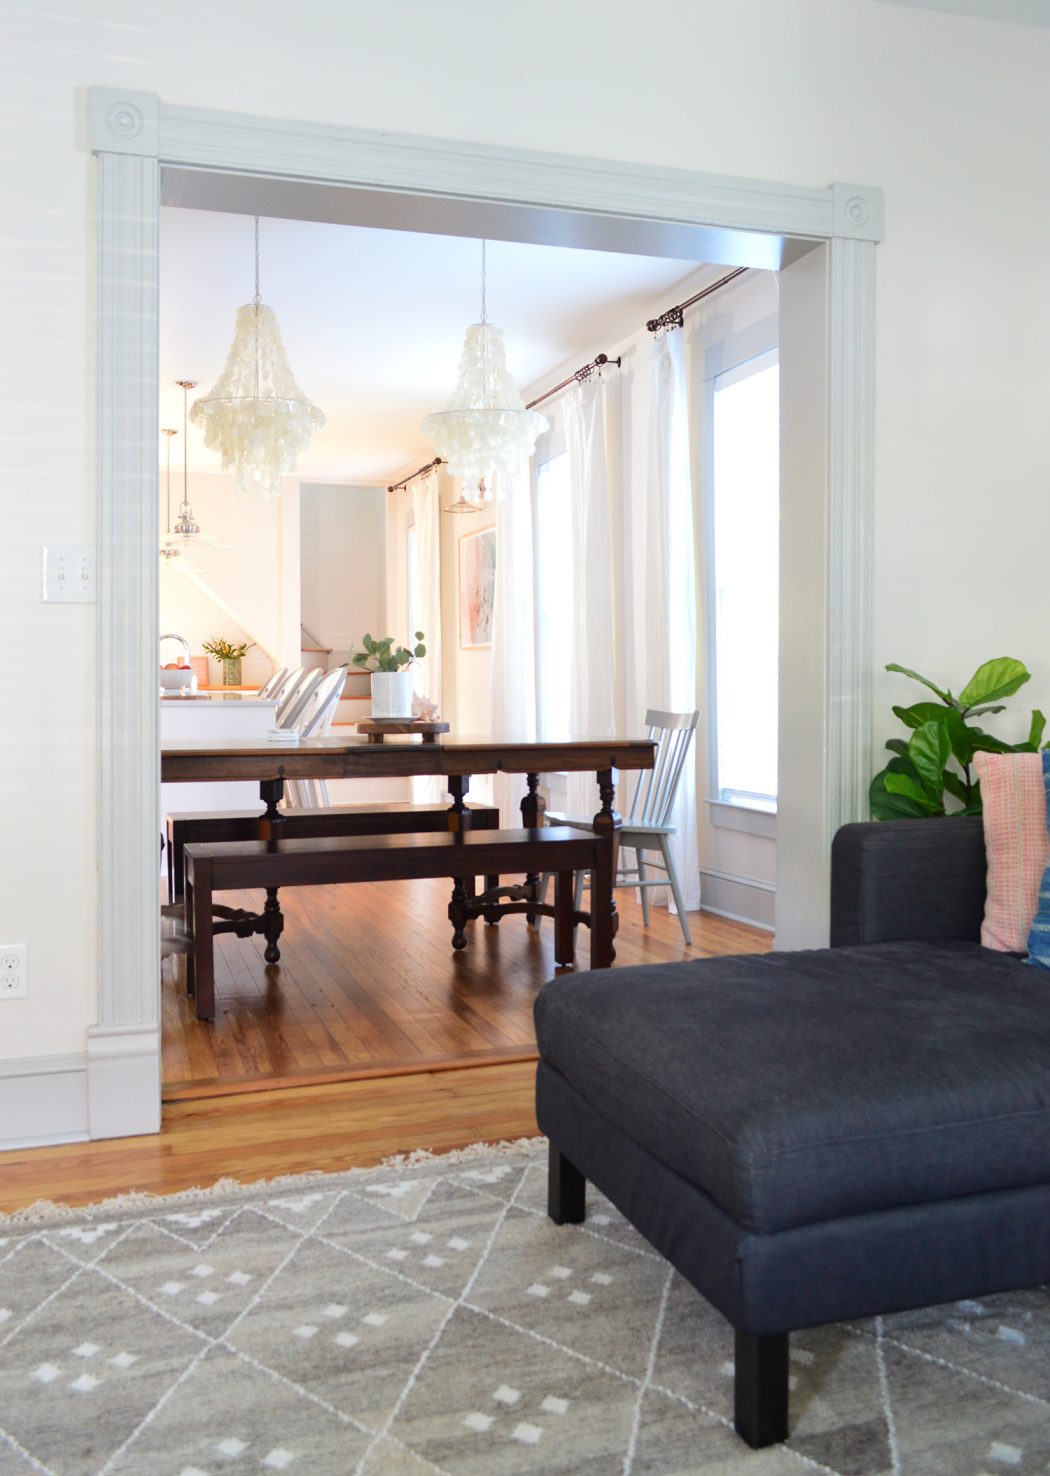
Let’s just glance back one more time at where the red duplex table started.
And here we are now, complete with our tiered capiz chandelier (in the gold finish) above that table. 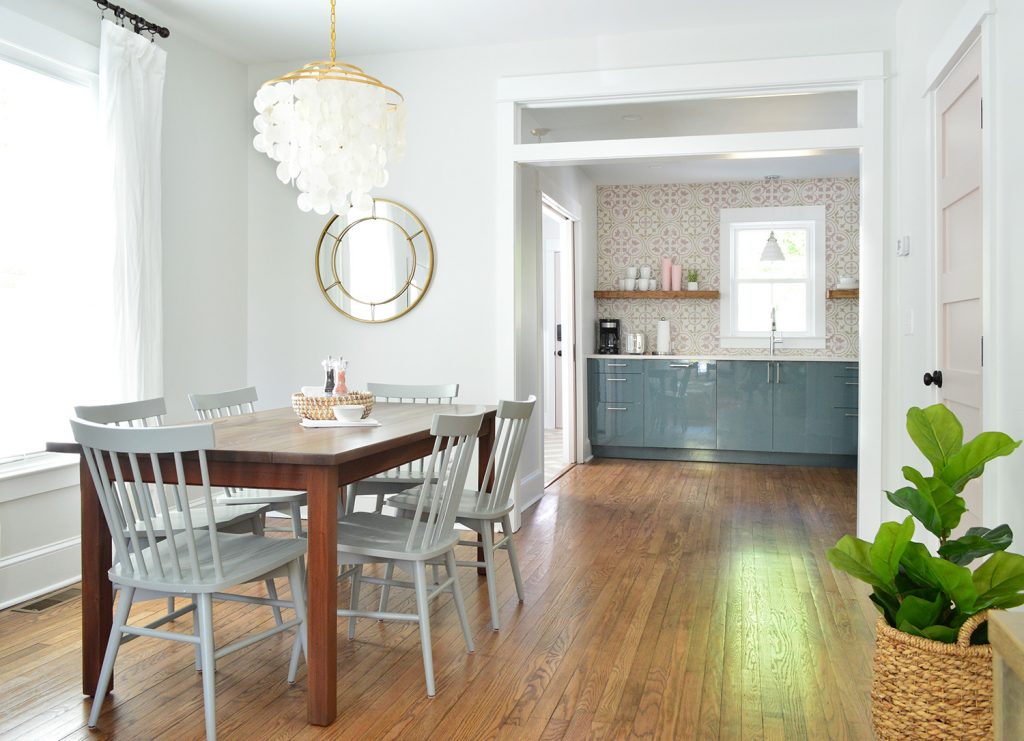
On the other side we used our mixed-finish wire globe light (which also comes in white + brass, or all bronze) and added the white dining chairs from our furniture line. Sherry laughed about the fact that between the table, the chairs, and the backsplash in here, we’re repping something old, something new, and something blue. Maybe the duplex guests can count as “something borrowed” since they aren’t permanent? Might be a stretch.
In the end, neither of us really knew what to expect as the outcome of these refinishing escapades, but we’re extremely relieved that they worked out so well. And apart from the new sander, some sealer & stain, and the cheap family rate my sister gave us on her table (ha!) we didn’t have to spend anywhere close to the cost of two brand new tables. Which clearly is our favorite party trick because our other two dining tables are also secondhand. Just gotta get around to refinishing them sometime… maybe in five more years if we stick to our pattern. P.S. For lots of other furniture makeovers & DIY projects, check out our Furniture Upgrades category. *This post contains affiliate links* The post The Miracle That Is Sanding & Refinishing A Table appeared first on Young House Love. Via https://www.younghouselove.com/sanding-and-refinishing-dining-tables/ |
